How to Schedule a Crontab Job for Every Hour
Sometimes, performing the same task again and again may become tedious. To automate this task instead of involving the assistance of humans, cronjobs are scheduled. Often, in Linux, the user has to run various scripts at the same time which becomes difficult to manage to reduce the workload of the user for executing the same task repeatedly. Cron is a utility that enables us to schedule the tasks according to our needs. Cron is a built-in utility which is provided by Linux. We don’t have to install it; we just simply schedule the tasks using some commands and files. Cronjob saves the time of the user by allowing them to manage their important task instead of repeating the same task again and again.
If we want to send the emails to our clients or customers every week instead of performing it manually, we can automate this task by creating a cronjob. It is a type of utility that works silently on the backend but does not involve any human interaction with it. It is a simple text file that includes the commands that have to be executed and the time at which it is to be executed.
Uses of Cronjob
Cronjob is used to manage the database tasks like getting backups on daily basis and managing the maintenance of the system by scheduling a cronjob. It is also helpful for the deletion of log files and cleaning the cache files. There are many other jobs that the cronjob can perform.
Syntax:
The following is the syntax for defining a cronjob:
The asterisk is used to indicate the time on which the command is executed like the minute that ranges from 0-59, an hour which ranges from 0-23 since it manages a 24-hour notation, and days which range from 1-31, months which range from 1-12, and day of the week from 0-6. The command can be anything that you want your system to automate like creating a backup or deleting files, etc.
Example: Creating a New Hourly Cronjob
Let us create a job that is executed every hour. For that, we first create a new file in the home directory. It is not necessary to create a file in the home directory. We can create it anywhere in the system. But for that, we must pass the path along with the file name. To create a new Bash file, we write the following command:
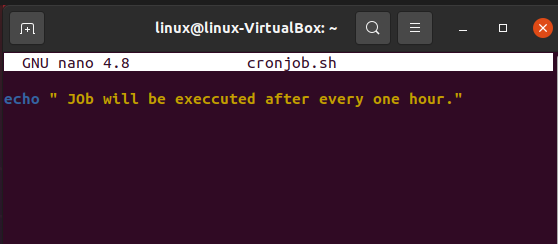
In this command, we create a file named “cronjob” with an “.sh” extension. We modify that file using the nano text editor by writing an echo command with a dummy message. After that, we save and close the file. As we can see in the following illustration, we created a new file named “cronjob.sh”
After the creation of the file, we now open the terminal again where we write the command to start the cronjob. We now execute the following command:
After running the given command, it asks to enter the password. After entering the password, it starts the cronjob. One thing to remember is it won’t display anything; it just simply exits the command without generating any error.
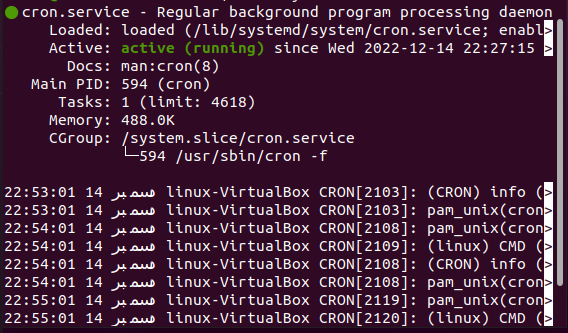
Now, let us check the cron status whether it is working or not. We run another command which displays the status of the cronjob and whether it is active or not.
After running the previous command, we get the output with an active status.
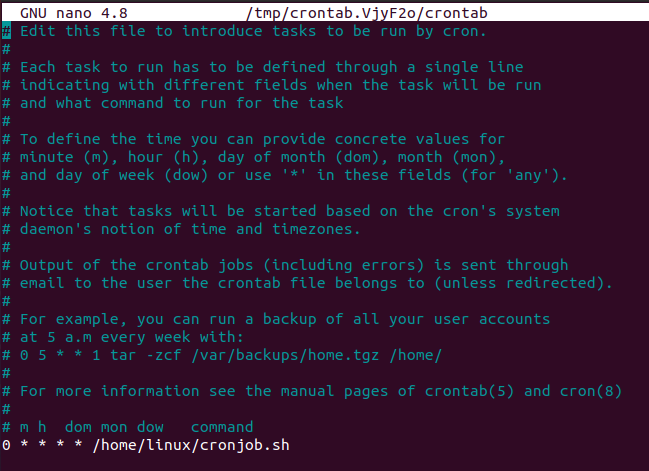
Now, let us execute the crontab file using the “crontab –e” command in which “-e” is the indication of editing the crontab file in any of the editors. We edit the crontab file using the nano editor.
By running this, we open the crontab file in which we write a command to execute the file every hour. The first zero indicates that the “cronjob.sh” file is executed after every hour which is saved in the “home” folder of the system named “linux”.
Now, we close the file by pressing the “Ctrl+x” key. After closing it, we get the output which indicates the installation of crontab as shown in the following snippet:
![]()
Let us now check whether the file is executed or not. To check it, we just write the following simple command:
In the previously-mentioned command, grep is the short form for “global regular expression print” which is used to search the text or the command which is written in any file. In our case, we want to find the cronjob command that we have written in the “cronjob.sh” file where “-a” denotes the line that is to be read from the “cronjob.sh” file.
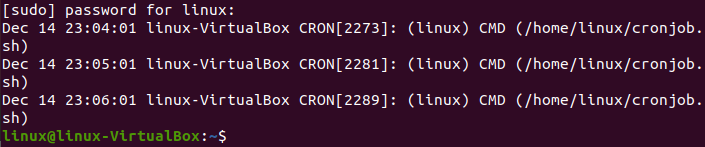
After running the provided command, we get the following output. As we can see, it first asks the user to enter the password for the system to verify whether we are an admin or not since the cronjobs are only managed by the admin. In Linux, there can be more than one admin at a time. After entering the password, we get this output in which our “cronjob.sh” is executed three times on the 14th of December.
Conclusion
Repeatedly performing the same task might be hectic to manage by an admin. So, for their automation, cronjob is introduced. Today, our main focus is on the cronjob. We introduced you to the cronjob, how the jobs are scheduled in the cronjob, and how to manage them. We explained the concept of a cronjob along with an example in which we created a cronjob that is executed after every hour. To understand it better, you can create your desired cronjob.
Source: linuxhint.com