How to Replace innerHTML of a div Using jQuery?
The innerHTML can be utilized for writing the HTML document dynamically. It is mostly deployed for generating dynamic HTML documents, including comment forms, registration forms, links, and many more. Furthermore, you can also replace the innerHTML inside a div with the help of jQuery. To do so, the “.html()” function is utilized. When you click the button once the website has loaded, the content inside the div will be modified with the content from the html() function.
This write-up will demonstrate replacing the innerHTML of a div utilizing jquery.
How to Replace innerHTML of a div Using jQuery?
To replace the innerHTML of a div container utilizing jQuery, follow the below-stated procedure.
Step 1: Create a Main “div” container
Initially, create the main “div” container by using the “<div>” element and add an id within the “div” opening tag with a particular name.
Step 2: Add Headings
Next, use any heading tag from “h1” to “h6” to add a heading to an HTML page. For instance, we have utilized “h1” for the main heading and “h2” for the second heading. You can also define inline styling inside the heading tag.
Step 3: Make Another div Container
After that, make another div container by following the same method in the previous step.
Step 4: Create a Button
Then, add a button with the help of the “<button>” element. Also, add a “class” attribute inside the div opening tag and assign two or more class names to this attribute. The “type” attribute is used for specifying the type of the element. Then, embed text in between the “button” element to show on the button:
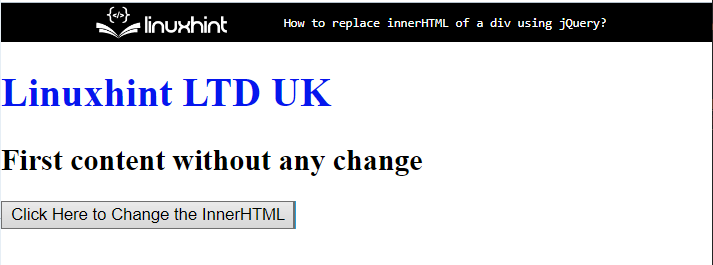
<h1 style="color: rgb(6, 22, 238)">Linuxhint LTD UK</h1>
<h2 >First content without any change </h2>
</div>
<div class="second-div">
<button class="button primary-btn" type="click"> Click Here to Change the InnerHTML </button>
</div>
The output of the above code block is stated below:
Step 3: Apply CSS on “div” Container
Access the second “div” container with the help of the class name “.second-div”:
text-align: center;
}
After accessing the div container, apply the “text-align” property of CSS that is utilized for setting the alignment of the text.
Output
Step 4: Insert jQuery Library
We will add the jQuery library by inserting the following link inside the <script> tag in between the head element of the HTML file:
</script>
Step 5: Replace innerHTML of div
In the “<script>” tag, add the following code:
$(document).ready(function() {
$(‘.button’).click(function() {
$("#first-div").html("<h2><span style=’color: blue;’>Linuxhint LTD UK"+
"</span><br>The content after changing innerHTML</h2>");
})
})
</script>
In the above code snippet:
-
- Define the “ready()” function that will only run once the page Document Object Model (DOM) is ready for JavaScript code to execute.
- Make a function for the button element for performing the action when the user hits on it.
- Now, the “&(selector).html()” function is utilized for replacing the innerHTML of div. To do so, add the data inside the “()” to replace.
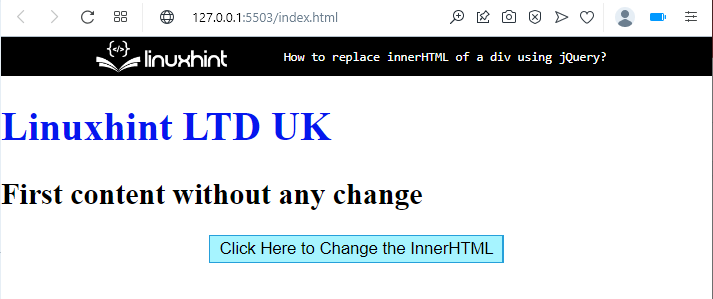
It can be observed that the innerHTML of the div has been changed when the button is clicked:

You have learned about replacing the innerHTML of a div using jquery.
Conclusion
To replace the innerHTML of a div using jQuery, first, insert a link of the jquery library in the script tag with the help of the “src” attribute. Then, the “html()” function is used as “&(selector).html”. To do so, the “$(“#first-div”).html” is utilized in this scenario. This write-up explained the method for replacing the innerHTML of a div container utilizing jQuery.
Source: linuxhint.com