How to Remove Duplicates in Power BI
Duplicate data refers to rows in a dataset that have identical values across all or specific columns. Having duplicate data can lead to incorrect aggregations, skew the analysis results, and impact decision-making. Therefore, it is crucial to identify and remove duplicates before performing any data analysis.
This tutorial explores various techniques to remove duplicates in Power BI.
3 Methods of How to Remove Duplicates
There are several methods available for removing duplicates in Power BI. But for the sake of this tutorial, we will focus on these three methods:
The “Remove Rows” Transformation Method
The first method of removing duplicates in Power BI is by using the “Remove Rows” transformation. It stands out as a simple yet effective method to remove duplicates from your data. This feature is readily available in the Query Editor, and it allows you to clean your data before loading it into the data model.
Step 1: Open the Query Editor
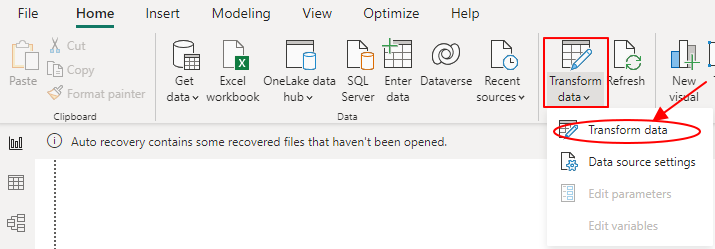
To use the “Remove Rows” transformation, open Power BI Desktop, load your data, and open the Query Editor by clicking on Transform Data.
Step 2: Access the Reduce Rows Pane
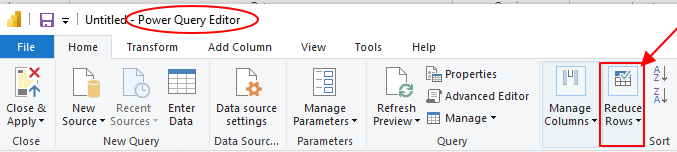
On your Query Editor, proceed to select the table or dataset that contains the duplicate data and click the “Home” tab in the Query Editor. Once here, click on the “Reduce Rows” tab.
Step 3: Remove Rows
The above step will lead you to a small drop-down menu. Click on the “Remove Rows” button in the toolbar. A new drop-down menu will appear, and this is where you should select “Remove Duplicates” to remove duplicates from your table.
Power BI will automatically analyze the selected table and identify duplicate rows based on all columns. It will then remove the duplicate rows, leaving only the unique records in the dataset.
The “Remove Duplicates” Transformation Method
The second method of using the Power BI Remove Duplicates feature is the “Remove Duplicates” transformation method. It provides greater flexibility in removing duplicate data compared to the simple “Remove Rows” transformation.
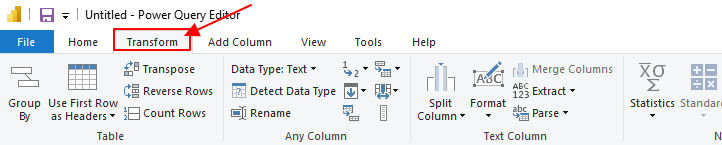
Interestingly, this feature allows you to choose specific columns to consider when identifying duplicates, giving you more control over the cleaning process. To use the “Remove Duplicates” transformation method, open your Query Editor and click on the Transform tab.
Once you load your data into the Query Editor in Power BI Desktop, navigate to the “Transform” tab in the Query Editor and click on the “Remove Duplicates” button.
A dialog box will appear, displaying all the columns in the selected table. By default, all columns are checked, meaning Power BI will look for identical rows based on all columns to determine duplicates. However, you can uncheck the columns you want to exclude from the duplicate detection process.
After selecting the columns, click “OK” to apply the changes. Power BI will then remove duplicate rows based on the chosen columns, retaining only the unique records in your dataset. This method is particularly useful when your dataset has unique identifiers and you want to maintain specific data integrity while eliminating duplicate occurrences.
Using “Group By” to Eliminate Duplicates Method
The “Group By” function in Power BI is an effective way to remove duplicates by grouping data based on specific columns and then applying aggregation functions to consolidate the duplicate rows.
To use this method, load your data and then open the Query Editor in Power BI Desktop. Go to the “Home” tab in the Query Editor and click on the “Group By” button.

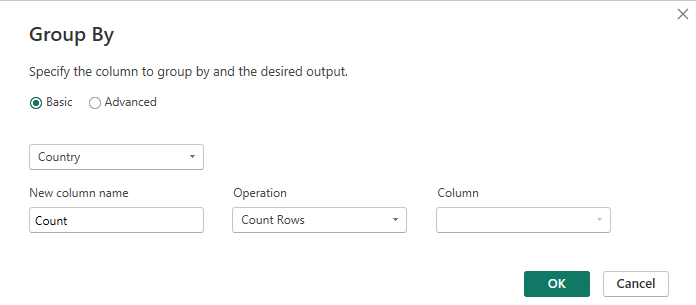
In the “Group By” dialog box, choose the columns that define uniqueness for your dataset. Then, define the aggregation functions for each column. For example, you can use “First” or “Last” to retain the first or last occurrence of the duplicate data. Once you have set the grouping and aggregation rules, click “OK” to apply the changes.
Power BI will consolidate the data based on your chosen columns, removing duplicates and providing you with a clean dataset that retains essential information while eliminating redundant rows.
Handling Duplicate Data in Query Editor vs. Data Model
Handling duplicate data in Power BI can be done either in the Query Editor or the Data Model, and understanding the difference between these approaches is crucial.
In the Query Editor, using features like “Remove Rows” or “Remove Duplicates” directly modifies the loaded data before it enters the Data Model. This means that duplicate rows are permanently removed from the dataset at the data preparation stage.
On the other hand, handling duplicates in the Data Model involves using DAX expressions or other calculations to address duplicate data while visualizing or creating measures. The original data remains intact, and duplicates are resolved dynamically during analysis and reporting.
Using the Query Editor is recommended when you want to clean the data at the source and avoid duplicates in the final dataset. Conversely, handling duplicates in the Data Model is useful when you need more complex logic to deal with duplicates or want to preserve the original data for other purposes.
Conclusion
Power BI offers versatile approaches to eliminating duplicate data, ensuring the integrity of your analysis and visualization. The “Remove Duplicates” transformation, available in both standard and customizable forms, simplifies the process by swiftly cleaning up data.
Alternatively, the “Group By” transformation allows for tailored consolidation with specific aggregation functions. Deciding between these methods depends on the complexity of your dataset and the level of control desired.
Source: linuxhint.com