How to Overclock the GPU & CPU of Raspberry Pi.
How to Overclock the GPU & CPU of Raspberry Pi
The overclocking of both CPU and GPU can be done by modifying the config.txt file. For better understanding we will discuss the overclocking of the CPU and GPU one by one:
Overclocking CPU
To overclock the CPU, follow the instructions steps which are mentioned below:
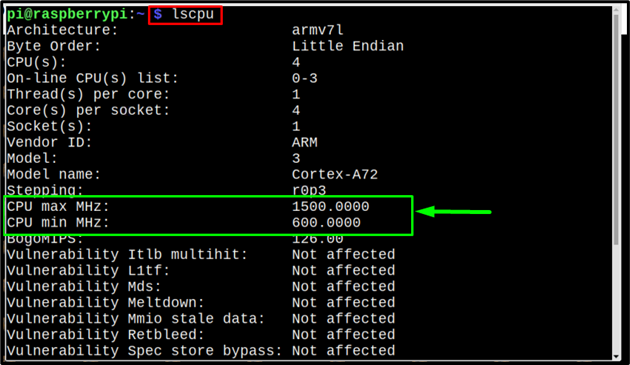
Step 1: Before overclocking the CPU let us first display the CPU information by using the below-mentioned command:
In the screenshot below the maximum and minimum frequency of Raspberry Pi’s CPU is mentioned:
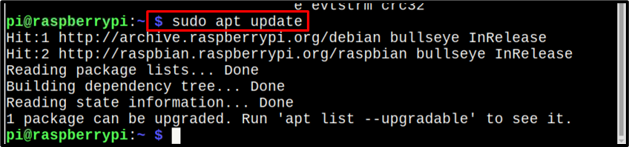
Step 2: To overclock the Raspberry PI CPU firstly update the repository:
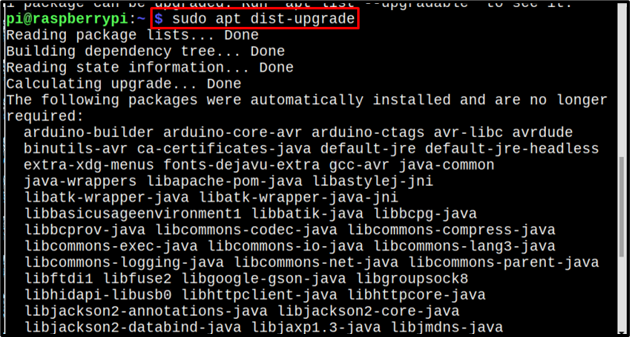
Step 3: Then upgrade the dependencies by using the below-written command:
Step 4: Now Reboot the system so that the system will restart with an updated repository:

Step 5: Now open the config.txt file with a nano editor by using the below-written command:

As an output the config file will appear on screen. Scroll down in the file till the arm_freq=800.
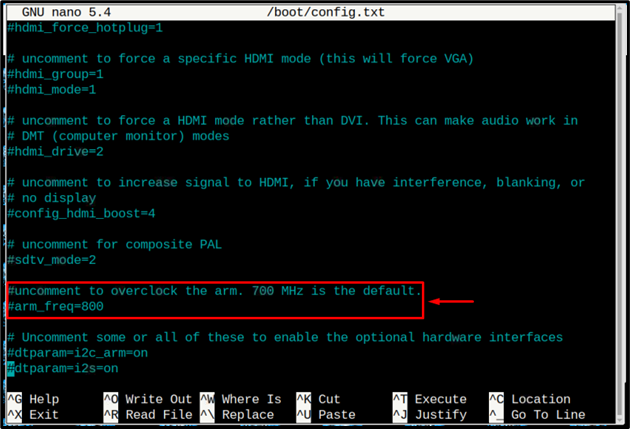
Step 6: Uncomment the arm_freq by removing the “#” and change the arm_freq value to your desired value for overclocking. Here, I have used 1600; you can also use any other value. Just remember that for a Raspberry Pi 4 the maximum arm_freq value is 2200MHz but it is recommended to keep it below or equal to 1800 to avoid the overheating problem.
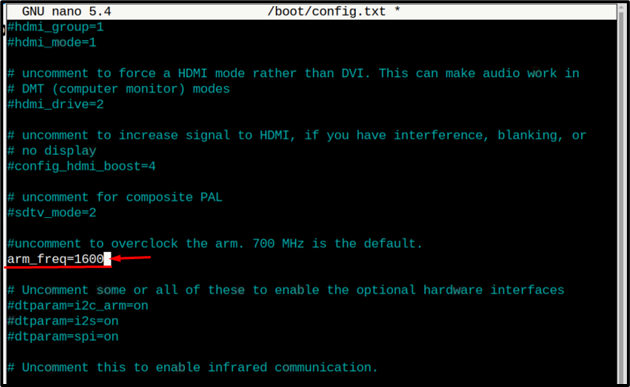
Step 7: Then just below the above line add another line which is over_voltage = 3 to let Raspberry Pi deliver more power to the CPU. Here, I have used an over_voltage value equal to 3; users can pick any other value also. The range for over_voltage is between -16 to 8V.
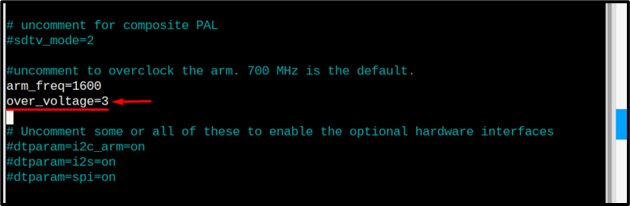
Then press Ctrl+X and Y to save the modified file.
Step 8: Now finally reboot to incorporate new changes in the system:

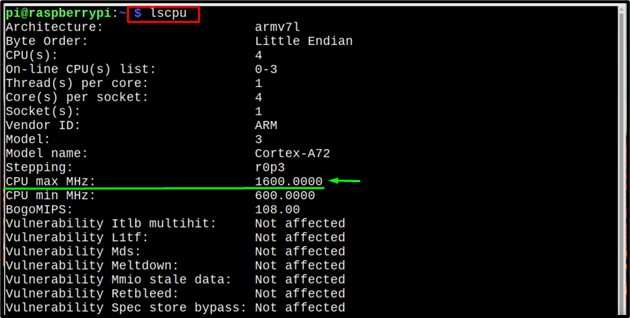
Step 9: After the reboot use the below-mentioned command to verify if the CPU of Raspberry Pi is overclocked or not:
It can clearly be seen in the below image that the CPU is now overclocked with frequency equal to 1600MHz.
That’s all for overclocking the CPU now let’s overclock the GPU.
Overclock the GPU
Graphics Processing Unit (GPU) of Raspberry Pi can be overclocked to enhance the graphics quality and to run them smoothly on Raspberry Pi for a better Video/gaming experience. To overclock the GPU, follow the below steps:
Step 1: Open the config.txt file using the nano editor same as we did for the CPU overclocking by using the below-written command:

Step 2: Then just below our previously added lines add one more line to set gpu_frequency. Here, I have used a value equal to 600MHz. The maximum limit for GPU overclocking is 750MHz.
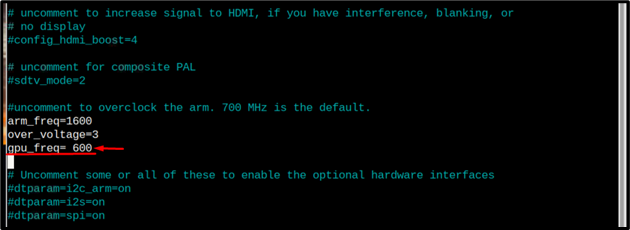
Then press Ctrl+X and Y to save the updated config.txt file, and press Enter to get back to the terminal.
Step 3: The last step to apply all changes is to reboot the system. Reboot the system by using the below-mentioned command:

Conclusion
To overclock the CPU and GPU of Raspberry Pi the system is updated first then the dependencies are upgraded. And then after a reboot, the config.txt file is opened through the nano editor to modify the arm_freq and gpu_freq. The max limit for arm_freq is approximately 2200MHz and for gpu_freq it is equal to 750MHz. Once the required changes are made the modified file is saved and the system needs to reboot so that new changes could be incorporated into the fresh start.
Source: linuxhint.com