How to Integrate the MongoDB Node.js Driver
Set up MongoDB Driver Using the npm Module
To get the MongoDB node.js driver, we first need to get the npm module for Node.js on our system, which should be updated. We have installed npm with the latest version globally on the system. The command for installation of the npm module is provided below:
Here, it is evident that the npm module has been added to the computer.

Now, we need to integrate MongoDB with the Node.js driver, so the following command assists us in getting the Mongodb driver by using the npm command. The dependencies are saved by npm in a file called “package.json” with the -save option. However, we can install the MongoDB driver and add it to the project’s dependencies without the –save option to achieve the same result.
The MongoDB driver is now successfully installed, as seen in the following image.

The next step is to make a unique directory where the MongoDB program can be put. To do this, create the directory “NewFolder” using the mkdir command. The command for creating the directory is as follows:
Now, we have specified the path as shown below to get into that specific directory.
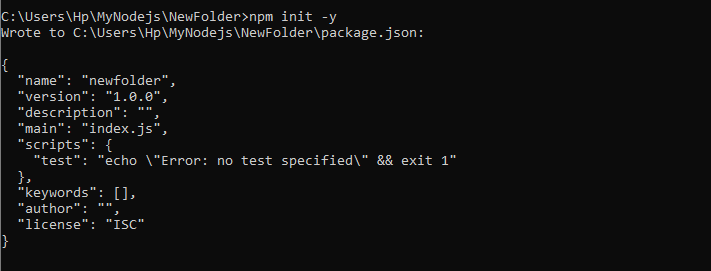
Thus, we are now in the directory “NewFolder” that was created in the prior step. Moving ahead to the next process, we prompt the “npm init -y” command to quickly initialize a new Node.js project by generating a package.json file with default values without requiring any user input.
The basic package.json file with default values has been created as the command output below.
Example # 1: Establishing the Connection with MongoDB Server by Integrating Node.js
All the initial steps to get the MongoDB driver within Node.js have been successfully completed in the above section. Now, we can easily establish a connection with the MongoDB server. For this, we have created a file within the directory “NewFolder” with the name “MongoDB.js”. The script for establishing the connection is given below.
const url = 'mongodb://<a href="http://127.0.0.1:27017/" target="_blank" rel="noopener">127.0.0.1:27017</a>';
const client = new MongoClient(url);
const db_name = 'NewDatabase';
async function main() {
await client.connect();
console.log('Connected successfully to MongoDB server');
const db = client.db(db_name);
const collection = db.collection('users');
return 'done.';
}
main()
.then(console.log)
.catch(console.error)
.finally(() => client.close());
We have added the class “MongoClient” from the MongoDB package to generate the MongoDB server connection. Then, we specified the variables “url” and “db_name” where the MongoDB server URL is defined, which in this case is localhost, and specified the name of the MongoDB database “NewDatabase.”
After that, we set the async function and called it main(). Inside that function main(), we have employed the connect() function for establishing the connection, and when the connection is established successfully, then the log() will print the message.
After setting up the connection, we access the collection “users.” Here, we can perform various database operations inside the main function. Next, the main function is called using main().then(console.log).catch(console.error) to handle success and error cases. Finally, we closed the MongoDB connection using client.close() in the .finally() block.
The output displayed that the connection with the MongoDB server had been successfully established as we executed the file with the node command.

Example # 2: Insert Documents into the MongoDB Collection by using Node.js
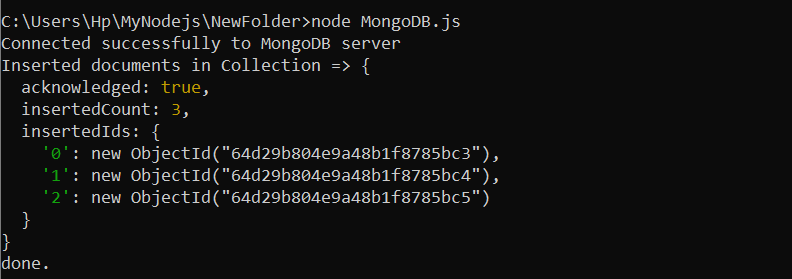
We have connected to the MongoDB server in the prior section. As the connection is established, we can insert the documents into the collection that is specified in the above program. The operation of inserting the document into the collection “user” is added to the same file, “MongoDB.js”.
const url = 'mongodb://<a href="http://127.0.0.1:27017/" target="_blank" rel="noopener">127.0.0.1:27017</a>';
const client = new MongoClient(url);
const db_name = 'NewDatabase';
async function main() {
await client.connect();
console.log('Connected successfully to MongoDB server');
const db = client.db(db_name);
const collection = db.collection('users');
const insertDocs =
await collection.insertMany([{ name: 'Alex', email: "<a href="mailto:alex@example.com" target="_blank" rel="noopener">alex@example.com</a>" },
{ name: 'Andy', email: "<a href="mailto:andy@example.com" target="_blank" rel="noopener">andy@example.com</a>" },
{ name: 'Sam', email: "<a href="mailto:sam@example.com" target="_blank" rel="noopener">sam@example.com</a>" }]);
console.log('Inserted documents in Collection =>', insertDocs);
return 'done.';
}
main()
.then(console.log)
.catch(console.error)
.finally(() => client.close());
Here, all the script is the same as above; we just inserted the operation of insertion in the async function main(). We created the variable “insertDocs” and then called the insertMany() function using the await command. For the insertMany() function, we have specified three documents that contain “name” and “email” fields with different values in each. A statement will be generated when all the documents have been inserted correctly.
The output displayed the documents are inserted successfully into the collection with three unique IDs.
Example # 3: Update the document into the Collection using Node.js
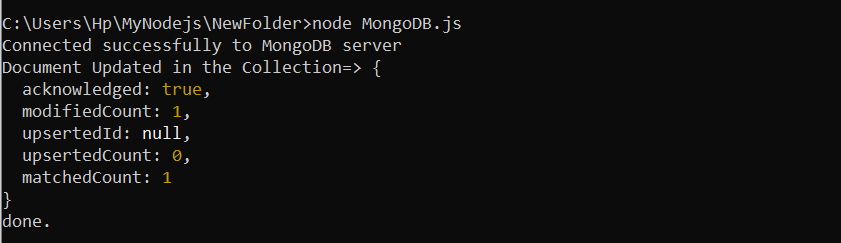
In the same way, we can also apply the update operation of MongoDB in Node.js by following the same file, “MongoDB.js.” The operation is added to the file for the update operation. Consider the program for this operation.
const url = 'mongodb://<a href="http://127.0.0.1:27017/" target="_blank" rel="noopener">127.0.0.1:27017</a>';
const client = new MongoClient(url);
const db_name = 'NewDatabase';
async function main() {
await client.connect();
console.log('Connected successfully to MongoDB server');
const db = client.db(db_name);
const collection = db.collection('users');
const updateDoc = await collection.updateOne({ name: 'andy' },
{ $set: { email: "<a href="mailto:andy12@example.com" target="_blank" rel="noopener">andy12@example.com</a>" } });
console.log('Document Updated in the Collection=>', updateDoc);
return 'done.';
}
main()
.then(console.log)
.catch(console.error)
.finally(() => client.close());
Here, we have called the variable “updateDocs” where the update operation is defined with the $set operator. The updateOne() method’s definition states that only one document needs to be updated. In the updateOne() method of MongoDB, we have provided the name field with value as the first statement, and then we have given the $set operator to the second statement, where the “email” field is given to update the new email accordingly.
The output is displayed where the document to be updated is matched and modified by using Node.js.
Example # 4: Delete Document from the MongoDB Collection Using Node.js
Next, we applied the delete operation of MongoDB using Node.js. The operation is provided in the similar file “MongoDB.js.”
const url = 'mongodb://<a href="http://127.0.0.1:27017/" target="_blank" rel="noopener">127.0.0.1:27017</a>';
const client = new MongoClient(url);
const db_name = 'NewDatabase';
async function main() {
await client.connect();
console.log('Connected successfully to MongoDB server');
const db = client.db(db_name);
const collection = db.collection('users');
const deleteDoc = await collection.deleteOne({ name: 'Andy' });
console.log('Document Deleted=>', deleteDoc);
return 'done.';
}
main()
.then(console.log)
.catch(console.error)
.finally(() => client.close());
Here, we have defined the new variable “deleteDoc” where the document is deleted from the same collection “users.” The deleteOne() method is provided within the “deleteDoc” variable to only delete the specific document, which is the one with the field “name” stored with the value “Andy”. When the document is deleted from the collection, the Node.js file will also generate the deletion message.
As expected, the document is successfully deleted from the MongoDB collection “users.”

Conclusion
We demonstrated how to establish a connection to a MongoDB database and access a collection using the MongoDB Node.js Driver. After connecting successfully with MongoDB, we have included additional operation code within the main function to perform MongoDB operations.
Source: linuxhint.com