How To Install SSD In Laptop Without Reinstalling Windows
Installing SSD in a laptop without reinstalling Windows
In the past most laptops were equipped with mechanical hard drives that had slower speed thus affecting the efficiency of the laptop. However, now mechanical hard drives are replaced with the solid-state hard drives that are much faster and contribute a lot in increasing the efficiency of the laptop. So, to install an SSD in your laptop without reinstalling the Windows follow the given steps:
Step 1: The first step is to set up the SSD by connecting it with your laptop and initializing it from the Disk Management of your laptop. Next Right click on the SSD in the Disk Management and select the option of “New Volume” from the pop-up menu and set up your SSD by following the “New Volume” setup.
Step 2: Once you have set up your SSD now it’s time to clone the Windows to your SSD and for that you need a third-party software which can be downloaded by clicking here.

Once the setup file is downloaded complete your installation process by running the downloaded file.
Step 3: Run the cloner software and click on the “Disk Clone” option where you will see your present hard drive and the SSD connected with your laptop:
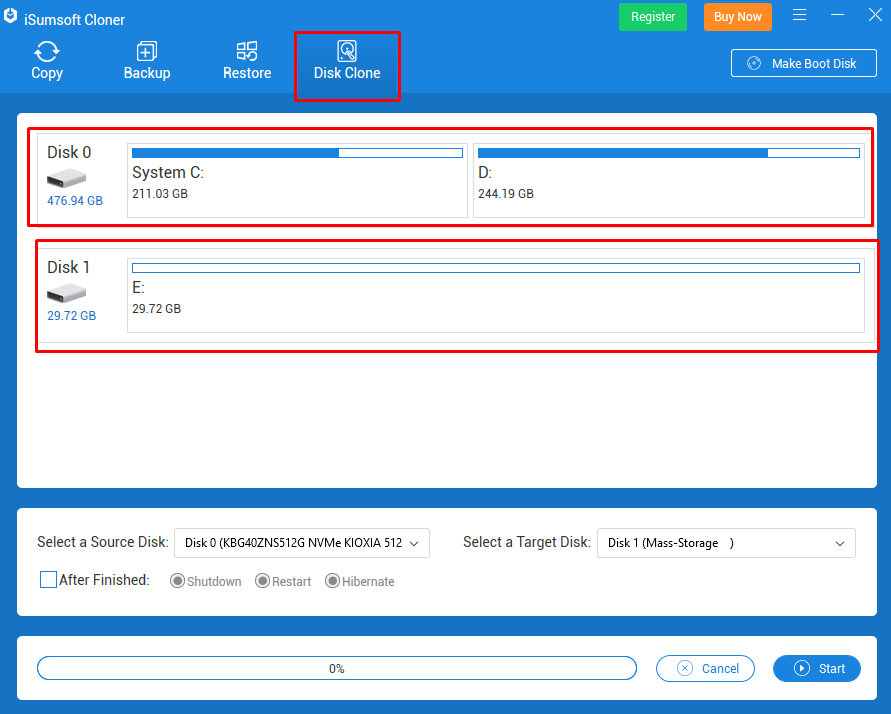
At the bottom there are two options one is the Source Disk, and the other is the Target Disk so to select the disk you want to clone go to the source disk and to select which disk is to be made a clone go to the Target Disk. Here in our case Disk 0 is the source disk and Disk 1 is the target disk.
The next option is “After Finished” check the box if you want to Shut down, Restart or Hibernate your laptop and once you selected relevant option click on “Start” to begin the cloning process:

Step 4: Once the cloning is done, it’s time to change the hard drive so take the following measures:
- Shut down your laptop and disconnect the charger
- Disconnect the battery of the laptop if it is removable
- Disconnect peripherals connected with the laptop
Next check the place of the laptop’s hard drive from its user manual and open the back cover of the laptop gently by using the right screwdriver. Once you have pulled out the hard drive, open its casing and place your SSD in the place of hard by connecting it with the laptop pins. There might be a difference of pins so first find an appropriate conversion adaptor and then plug it in. Next place the hard cover back and bolt on the screws nice and tight.
Step 5: Now turn on the laptop and it will run as normal just like nothing has happened however you will feel the difference in its speed.
Note: Every laptop has a different design, so it is better to consult the user manual before changing the hard drive of any laptop.
Conclusion
Memory of a laptop plays an important role as the whole data and the operating system is saved in it, also it is a major contributing factor in the speed of laptop. If you want to avoid reinstalling the operating system while upgrading the hard drive to SSD then read this guide as I have explained how to install the SSD without reinstalling the Windows of your laptop.
Source: linuxhint.com