How to Install Plex in Ubuntu 22.04
Plex is a streaming media server that allows you to store and access the media content on your system from any device. Based on the client-server model, Plex turns an ordinary system into a full-fledged media server. All media files are stored in a single system with a Plex server installed. The server organizes the media from your collection and online services. You can then access the media on the server from any smartphone, smart TV, or streaming box. All you need is to have a Plex client installed on these devices. Then, you can connect to your Plex media server to access all the media content. You can install the Plex media server on Windows, Mac, Linux, and NAS OS.
This article will show you how to install and setup the Plex media server in Ubuntu 22.04 LTS. It is recommended to use the static IP on the server machine so that it will not get changed when the client tries to access it. For installation, you will require the sudo privileges.
Open the command-line Terminal application to install Plex. Use the Ctrl+Alt+T keyboard shortcut to open the Terminal.
Step 1: Install Plex Media Server
This step involves installing the Plex media server in Ubuntu by downloading its deb package and installing it using the dpkg command.
- The first step is to download the Plex media server for Linux from its official Downloads page. When downloading the package, make sure that you grab the right package for your Ubuntu system.
Alternatively, use the following command in the Terminal to download the Plex media server into your system:
The Downloaded file is saved as “plexmediaserver_version-number_amd64.deb” where the version-number is the version of the Plex media server package that you downloaded. In our case, it is plexmediaserver_1.28.0.5999-97678ded3_amd64.deb.
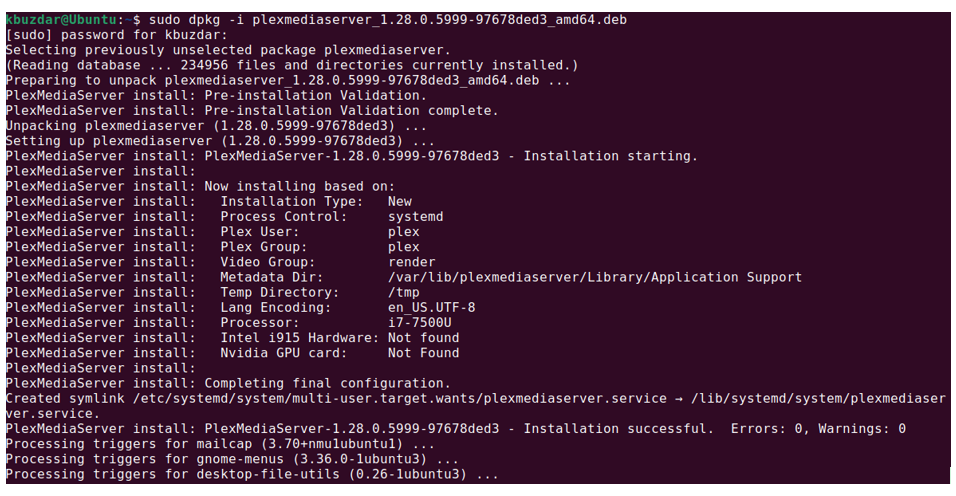
- The next step after downloading is to install the Plex media server. Make sure that you are in the same directory that contains the plex media server package that you downloaded in the previous step. Then, in order to install the Plex media server to your system, use the dpkg -i command followed by the downloaded package name.
In the given command, replace the version-number with the version of the Plex media server that you downloaded, which in our case, would be:
Wait for a while until the installation of the Plex media server in your system is completed.
Step 2: Start Plex Media Server
The Plex media server is enabled automatically and starts running immediately after installation. However, in some cases, you will have to manually enable and run the Plex after installation. You can configure Plex with the following commands:
Start the Plex media server:
Verify the status of the Plex media server service:
If the service is running properly, you will see the status set as Active.
You can also enable the Plex media server on boot:
Step 3: Configure Firewall
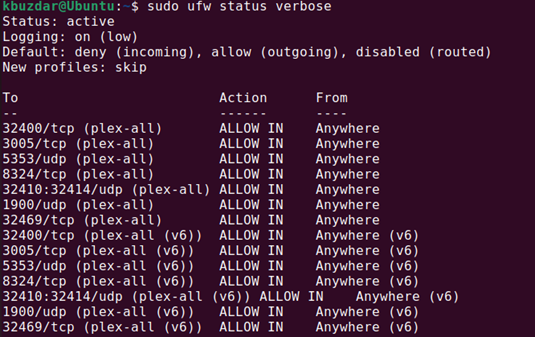
Plex media server uses a number of ports for different services. However, the most significant port that must be allowed through the firewall is the TCP port 32400 that Plex uses for communication. In this step, you configure the firewall in your system for the Plex media server.
Note: You can skip this step if the firewall is not enabled in your system.
- Use the following command to check if the firewall is enabled in your Ubuntu system:
- Create a new application profile “plexmediaserver” in your UFW firewall at the /etc/ufw/applications.d directory. We use the Nano editor here. However, you can use any editor of your choice.
Add the following lines to the file:
title=Plex (Standard)
description=Access to the Plex Media Server
ports=32400/tcp|3005/tcp|5353/udp|8324/tcp|32410:32414/udp
[plex-dlna]
title=Plex(DLNA)
description= Access to the Plex DLNA Server
ports=1900/udp|32469/tcp
[plex-all]
title=Plex (Standard + DLNA)
description=Access to the Plex Media Server (with DLNA capability)
ports=32400/tcp|3005/tcp|5353/udp|8324/tcp|32410:32414/udp|1900/udp|32469/tcp
Save and exit the file.
- Now, run the following command to update your firewall with the new profile:
- Enable the application profile using the following command:
We enabled the application profile “plex-all”. You can choose other profiles based on your preferences.
- Now, you can verify if the profile is enabled and all the rules are in place using the following command:
You will see the output similar to this that shows all the rules added successfully.
Step 4: Configure Plex Media Server
In this step, we will perform some basic configurations such as naming the server, creating and setting up the media libraries.
- We need to create the directory to store the Plex media files. Here, we ceate the library directories named movies and dramas under the ~/plexmedia directory.
- Our next step is to access the Plex media server. The Plex media server can be accessed and configured through its web interface using Port 32400.
To access the Plex media server from the same system into which the Plex server is installed, open the following address in your browser:
To access the Plex media server web interface from another system on the local network, use the IP address of the Plex server instead of the localhost:
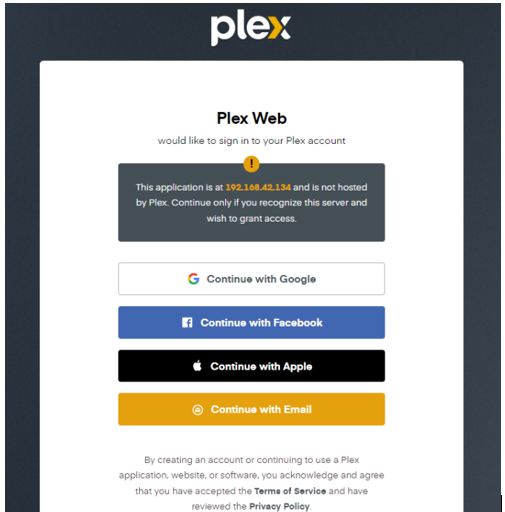
- The first time you access the Plex server web interface, the following view appears. Here, you are required to sign in using Google, Facebook, Apple, or an email account.
- Once signed in, you will see the following page which contains the information about how Plex works. Click on the GOT IT! button.

- On the next page, type a custom name for your Plex server. Make sure that the box Allow me to access my media outside my home is checked. Then, click Next.

- Now, you can add libraries. Click on the ADD LIBRARY button.

- From the following pop-up window, choose the library type and click Next.

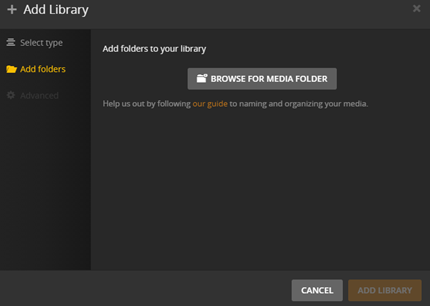
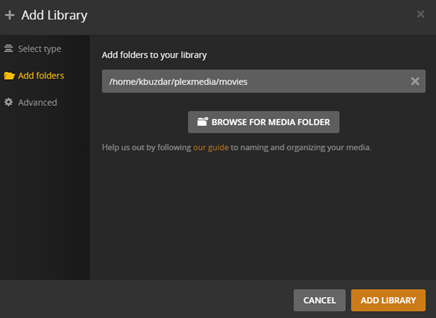
- Add folders to your library by clicking the BROWSE FOR MEDIA FOLDER button.
- Add the path to the media directory that you created in the Step 1 of this section. Or you can click BROWSE FOR MEDIA FOLDER to browse the media directory. Here, we added the ~/plexmedia/movies directory. Once done, click ADD LIBRARY to add this directory to your library.
- You will be able to see the added libraries in the Plex web dashboard. Similarly, you can add other directories to the same or different libraries.

- On the next screen, click Done to close the server setup.
Access Plex Media Server with Client Application
The Plex app is available for just about every platform including Windows, macOS, Android and iOS mobiles, Apple TV, Amazon Fire TV, smart TV, Roku, Chromecast, gaming consoles, and many others. The Plex client app allows you to access all your libraries and media files available on your Plex media server.
- Go to the Plex Downloads page. Then, download and install the relevant app for your device.
- Once you have the Plex client app, sign into the app using the same account that you used to set up the Plex server in your Linux system.
- After you signed in, your app will be linked to the server and you will be able to access all your libraries and media content available on your Plex media server.
Update Plex Media Server
This step is required only if you want to update your Plex media server to the latest public release.
- Run the following command to add the Plex media server repository to your system:
![]()
- Run this command to add the repository key:

- Update your Plex Media Server to the latest public release by running the following commands:
$ sudo apt install --only-upgrade plexmediaserver
- After updating the Plex Media Server, make sure to restart the plex service for smooth operations:
Uninstall Plex Media Server
If, for any reason, you want to uninstall/remove the Plex media server from your system, you can do it using the following command:
- Run the following command to stop the Plex media server:
- Then, uninstall the Plex media server using the following command:
- Also, remove the Plex Media Server data directory:
Conclusion
That is all there is to it! With Plex, you can store all your movies, shows, videos, and photos in one place and make them accessible from any device, anywhere. In this article, you learned how to install and set up the Plex media server in Ubuntu 22.04.
Source: linuxhint.com