How to Install Java on Linux Mint
Our guide today focuses on installing Java on Linux Mint. We will detail the step-by-step guide that you should follow to install OpenJDK and JRE on Linux Mint quickly. Read on!
Installing Java on Linux Mint
When you want to install Java, there are two options that you can select from. First, you can opt for Oracle Java which comes with a commercial license that you must pay for to use it. This option mainly works with enterprises. Alternatively, you can focus on OpenJDK which is free and open-source. For this guide, we will work with OpenJDK.
Here are the steps to install OpenJDK on Linux Mint.
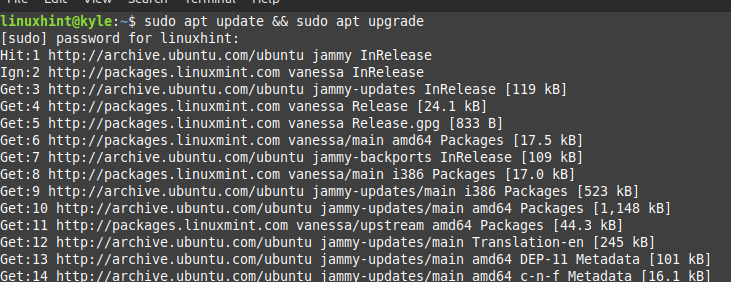
Step 1: Update and Upgrade
For a seamless installation, you should first update and upgrade the repository to ensure that all repositories are updated. For that, use the following command:
Step 2: Check If Java Is Installed
Sometimes, you can find that you already have Java installed. However, the installed version may not be what you wish to use for your project.
Check the Java version to confirm if Java is already installed on your system.
The following output shows that we already have OpenJDK 11 installed. Your case may be different. Nonetheless, we will proceed with the steps and install a different OpenJDK version.

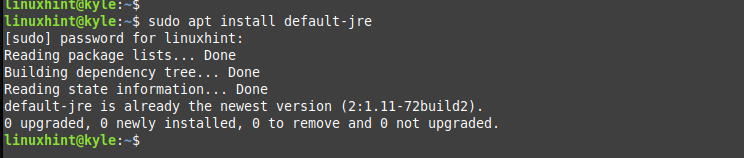
Step 3: Install JRE
You must have the Java Runtime Environment(JRE) to run the Java-based applications. Even if you don’t need to do the coding part but you want to run the Java-based applications, you should have JRE running on your Linux Mint.
Luckily, you can install it with the following simple command:
Here, we set the JRE to install the default version and not a particular version. We can see that we already have JRE installed on our system. If you didn’t have it installed, running the previous command will quickly install it, and you can proceed with the installation steps.
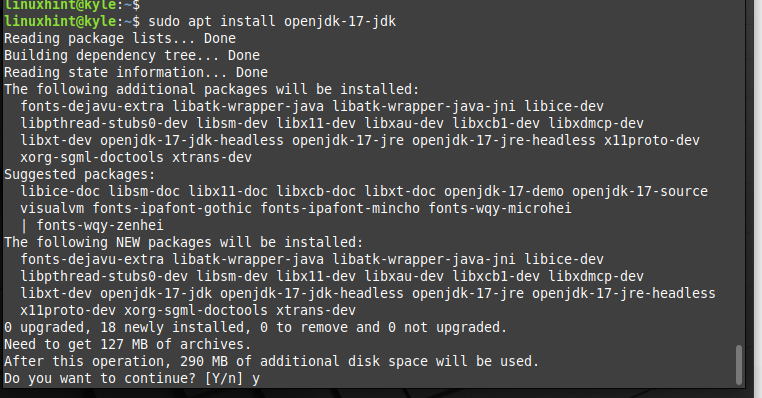
Step 4: Install the OpenJDK
The last step to install Java on Ubuntu is to install the OpenJDK. Here, you can use the default OpenJDK or specify the version that you want to install. For our case, we learned that we already have OpenJDK 11. So, let’s install OpenJDK-17.
For that, our installation command would proceed as follows:
Once you press “y”, the installation will begin, and Java will be installed on your Linux Mint.
To confirm that Java is successfully installed on your Linux Mint, recheck its version. If you selected OpenJDK-17, as we did in this post, you will get an output like the one in the following. If you choose a different version, it will reflect on your terminal output.

You now have Java on Linux Mint and can begin using it to build your project. You only need an IDE, such as Eclipse, to write your code.
Conclusion
Java is a powerful programming language for developing desktop, web, and mobile apps. There are plenty of uses and applications that require Java. To get started with Java, you must know how to first install it on your system. This blog focuses on installing Java on Linux Mint. We detailed the steps to follow and explained each in detail. With that, you now have Java installed on Linux Mint.
Source: linuxhint.com