How To Install and Use Eclipse IDE for Java
Content:
- Install OpenJDK and JRE
- Install the Latest Version of Eclipse
- Select Workspace
- Create a Java Project
- Open an Existing Java Project
- Create a Java Class
- Run the Java Project
- Uses of Some Important Eclipse Features
- Run the Java Project
- Write Simple Java Code
Install OpenJDK and JRE
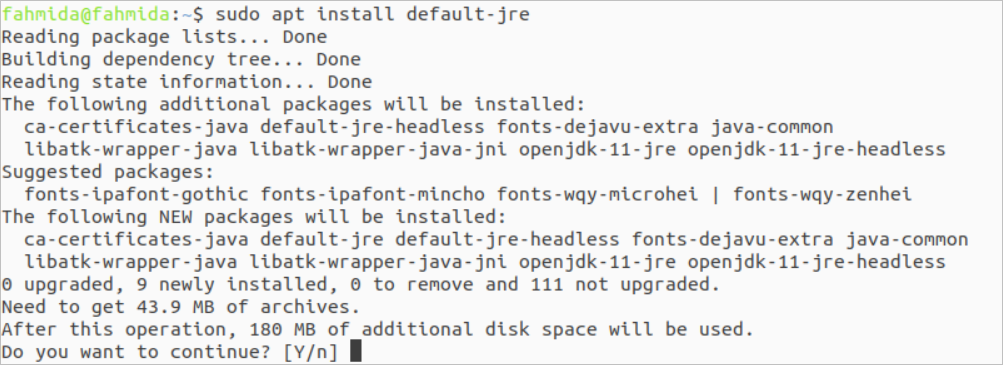
Before installing Eclipse in your Ubuntu operating system, the latest version of OpenJDK with JRE is essential to install. If it is not installed before, then run the following commands to update the system, install the OpenJDK with JRE, and check the installed version of Java.
The following command will update the operating system:
The following command will install the latest version of OpenJDK with JRE:
Type “y” to start the installation process after executing the previous command.
After completing the installation successfully, run the following command to check the installed version of Java.
The following output shows that OpenJDK 10.0.16 version has been installed in the system.

Install the Latest Version of Eclipse
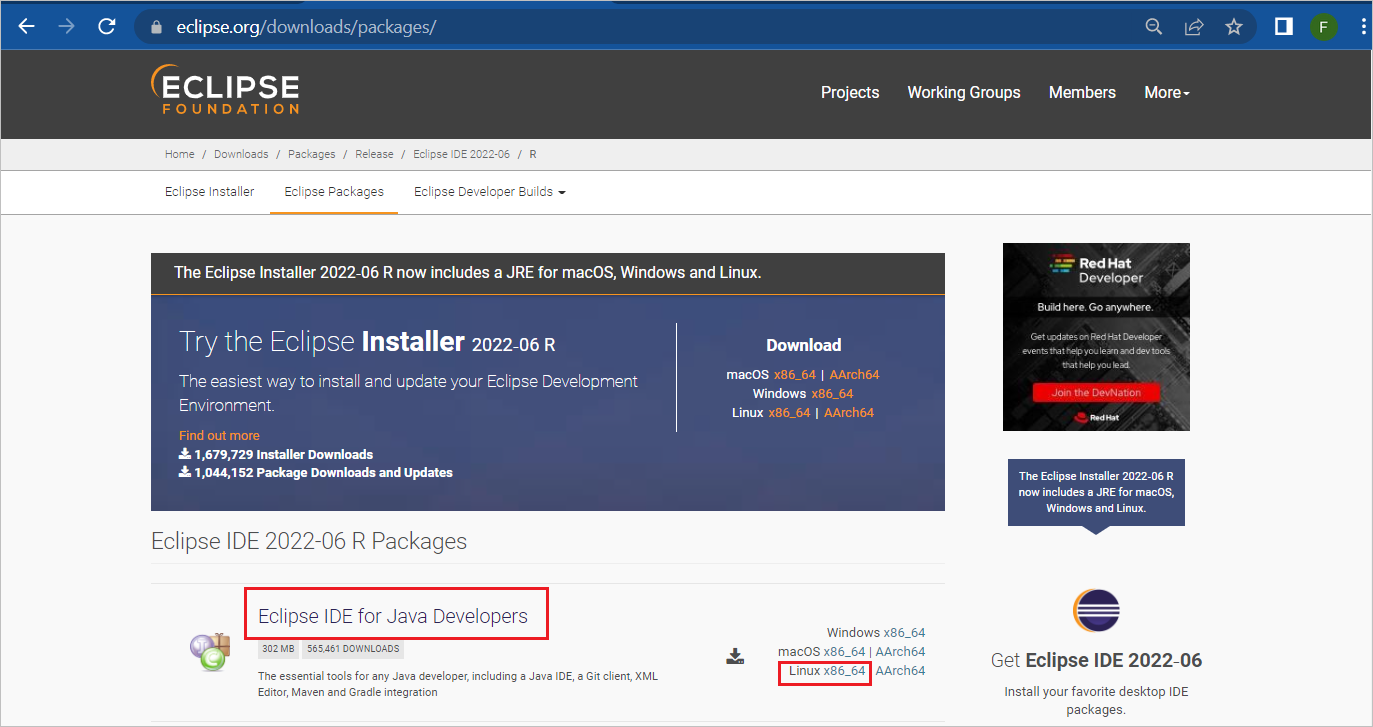
As mentioned, you can install Eclipse in different ways on Ubuntu. The easiest way to install Eclipse for Java development on Ubuntu has been shown in this tutorial. Here, the Eclipse application has been installed manually. Go to the following URL location by using any browser and download the latest version of Eclipse IDE for Java Developers for Linux.
https://www.eclipse.org/downloads/packages/
The various packages of Eclipse are available on this website. Click on the Linux x86_64 link highlighted in the following image to download the latest Eclipse package for the Linux operating system:
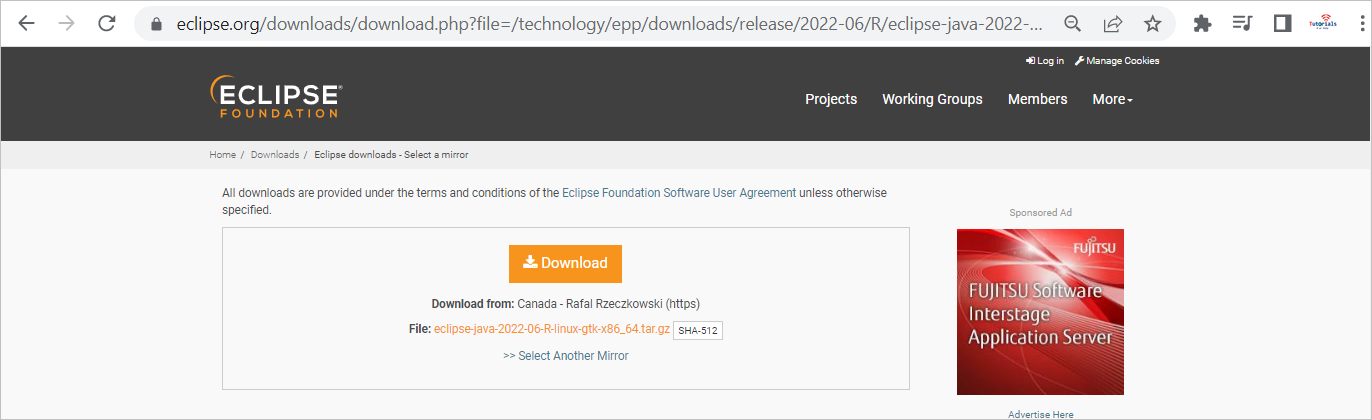
The following page will appear after selecting the Eclipse IDE package for installation. Click on the Download button to start the installation.
Go to the download location where the Eclipse IDE package has been downloaded. It will be installed inside the Downloads folder by default. You can extract the downloaded compressed file by executing the following command from the terminal:
If any error appears after executing the previous command, you can extract the compressed file by opening the following window after double-clicking on the downloaded file.
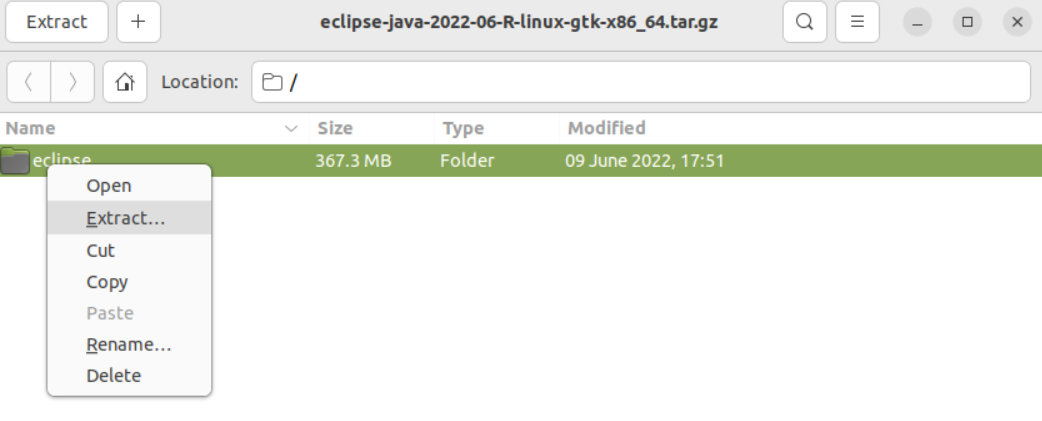
Right-click on the eclipse folder and select Extract from the pop-up menu.
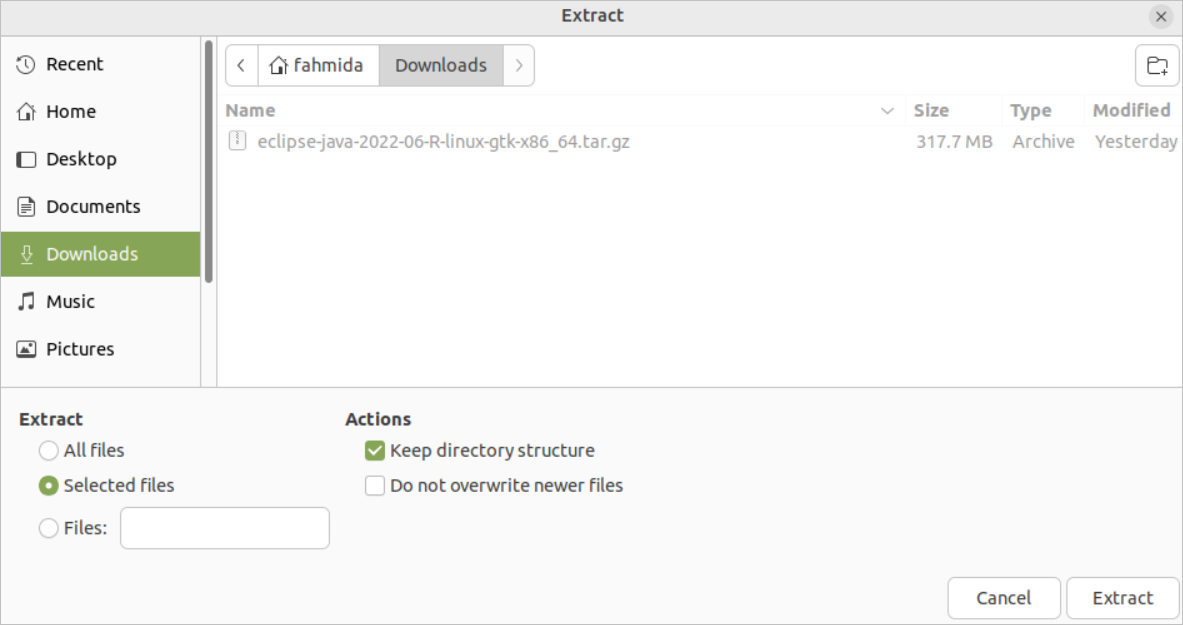
The following window will appear to extract the file. Select the path for storing the eclipse folder after the extraction and click on the Extract button.
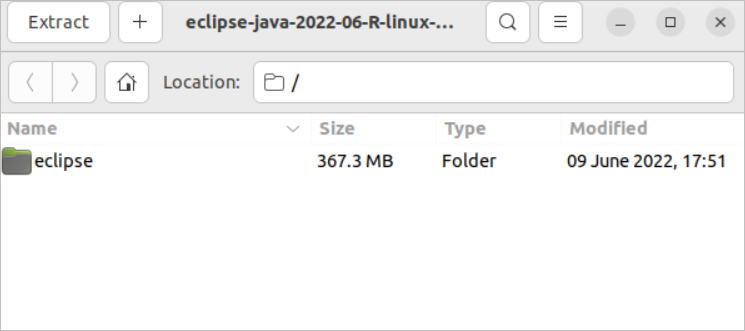
If the compressed file is extracted successfully, the eclipse folder will be created at the selected location. Run the following commands to go to this folder location and run the eclipse application:
$ cd eclipse
$ ./eclipse

Select Workspace
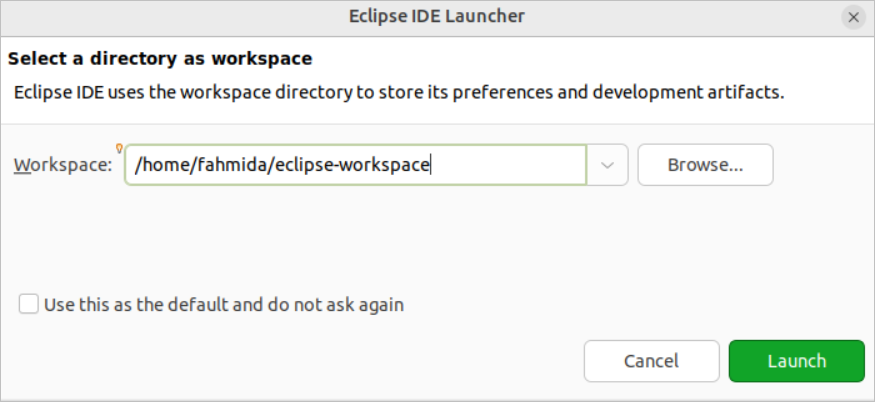
The following window will appear after running the Eclipse application to select the directory for the Workspace. It is the directory where the files and folders of the Java project will be stored, and this directory location is required to select before starting the Eclipse IDE. The Java developer can work with multiple workspaces by using this IDE. The developer can work with multiple Java projects simultaneously by using Workspace. Click on the Launch button after selecting the Workspace directory.
The following window will appear to show that Eclipse IDE is starting:

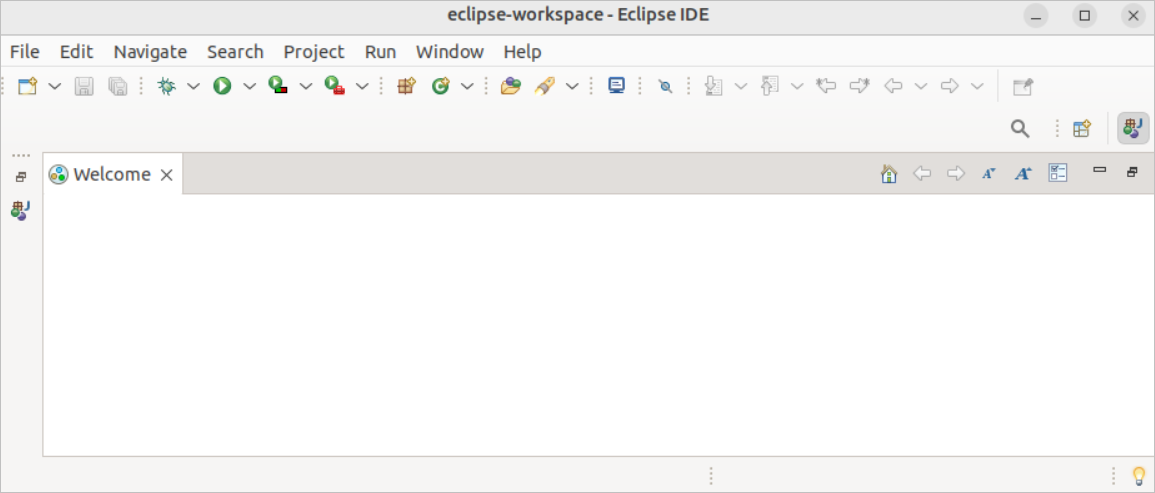
The following window will appear if the Eclipse IDE is opened for the first time. It contains the menu bar and toolbars to perform different types of operations while developing Java applications. The uses of some menu items and tools have been shown in the next part of this tutorial. This window is called the Workbench of Eclipse IDE, which may contain one or more perspectives that have been explained later. The Workbench is used to create, manage and navigate the Workspace resources.
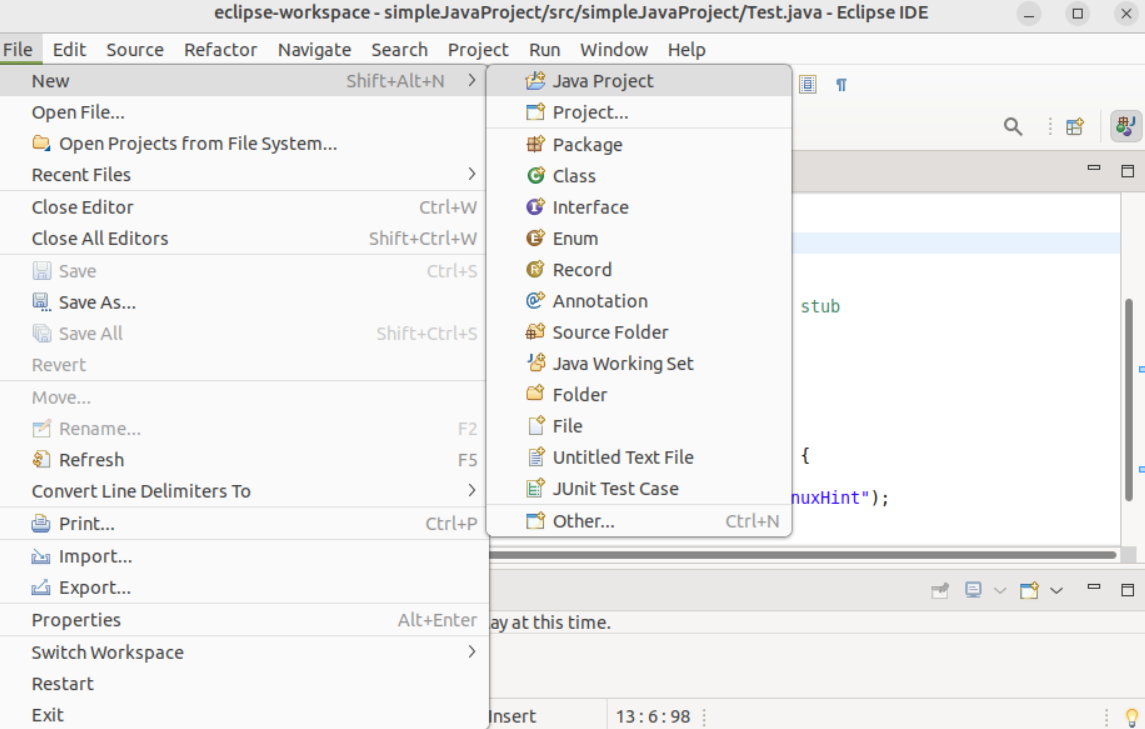
Create a Java Project
Select the Java Project menu item from the File-> New -> Java Project to create a new Java project shown in the following image:
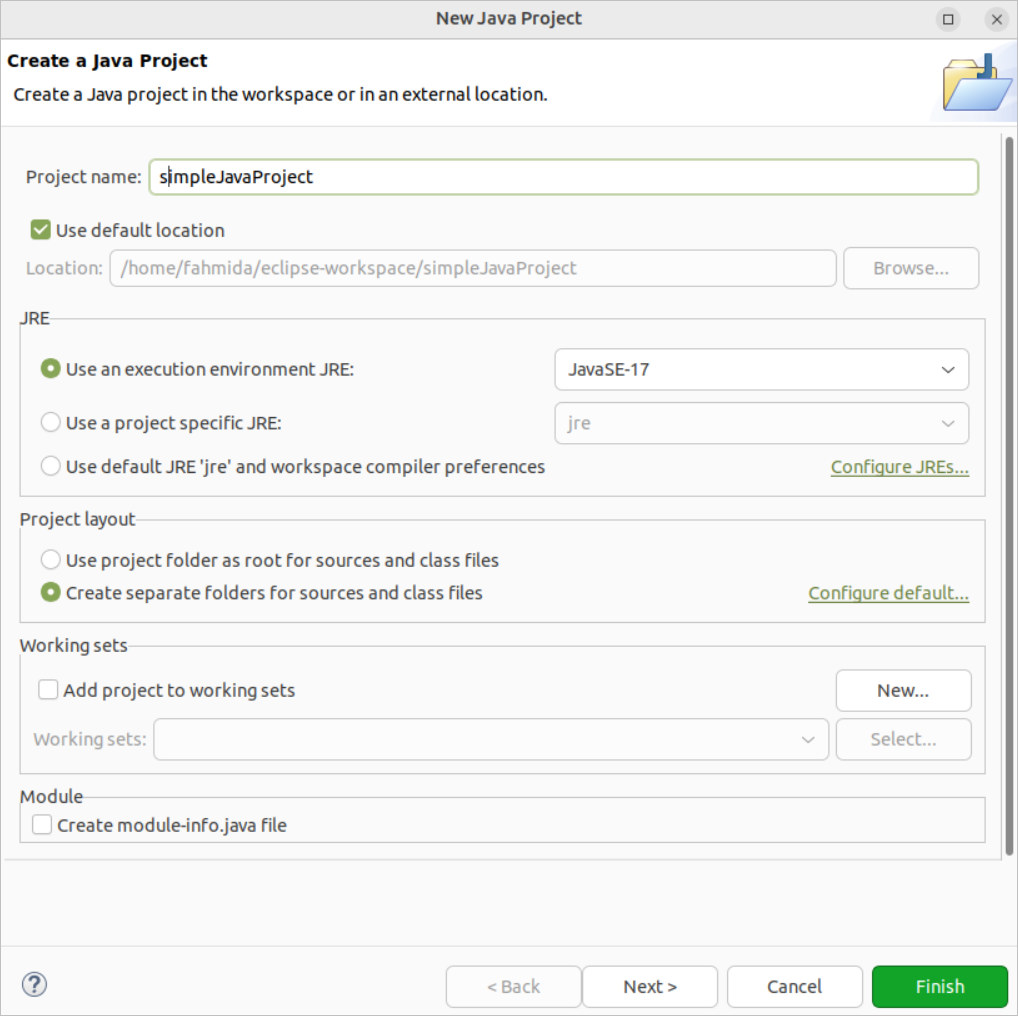
The following window will appear to set the Java project name, select project location, and other necessary options for creating the Java project. According to the following image setting, a Java project named simpleJavaProject will be created without a module after completing the project creation task. Click on the Next button to open the next window.
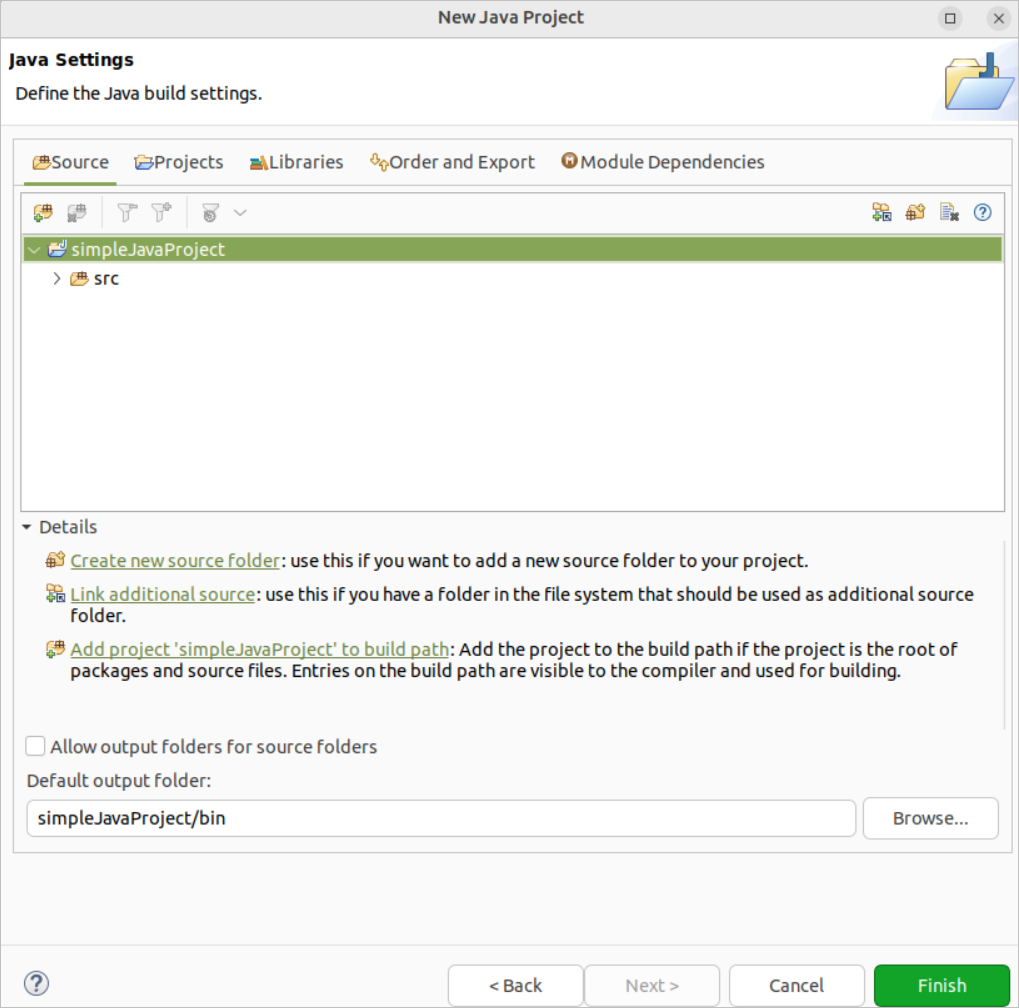
The following window will appear after pressing the Next button. The src folder will be created under the project folder, and the content of this folder will be shown later by using the Project Explorer window of the Eclipse IDE. You can change the output folder location of the project. Here, the default location has been used. The Java project will be created after clicking on the Finish button.
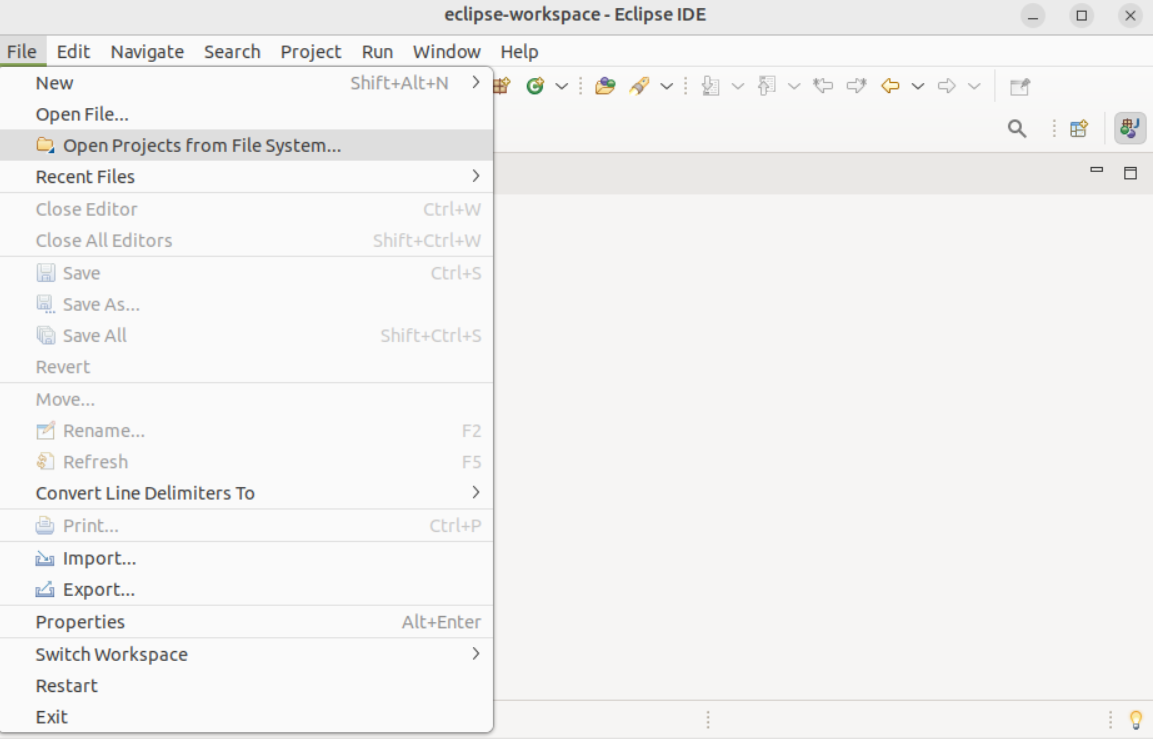
Open an Existing Java Project
Click on the File-> Open Projects from File System… to open any existing Java project.
Select the source folder of an existing Java project that you want to open. Here, the src folder of the simpleJavaProject has been selected. Click on the Finish button to open the project.

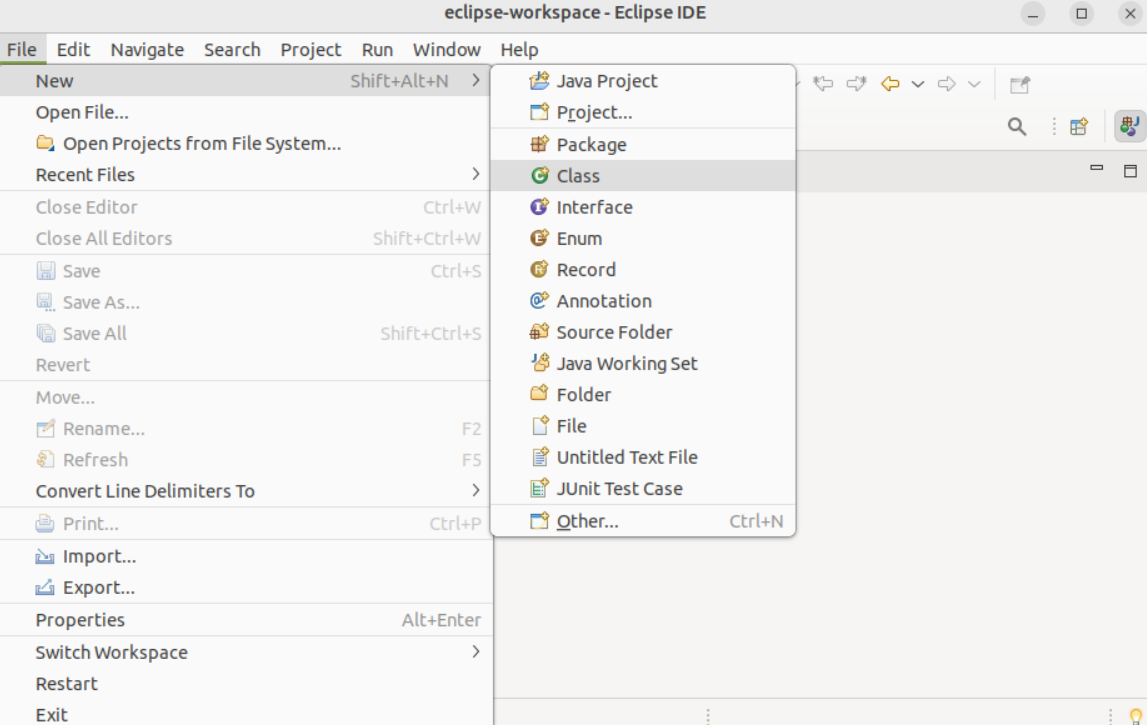
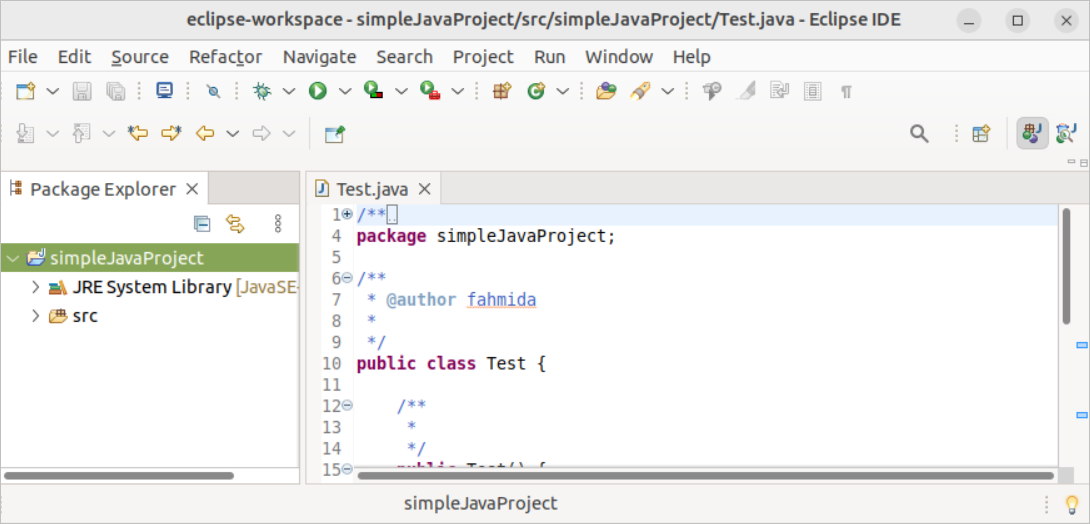
Create a Java Class
You have to create the Java class after selecting the project’s source folder. Click on File>New->Class to create a Java class.
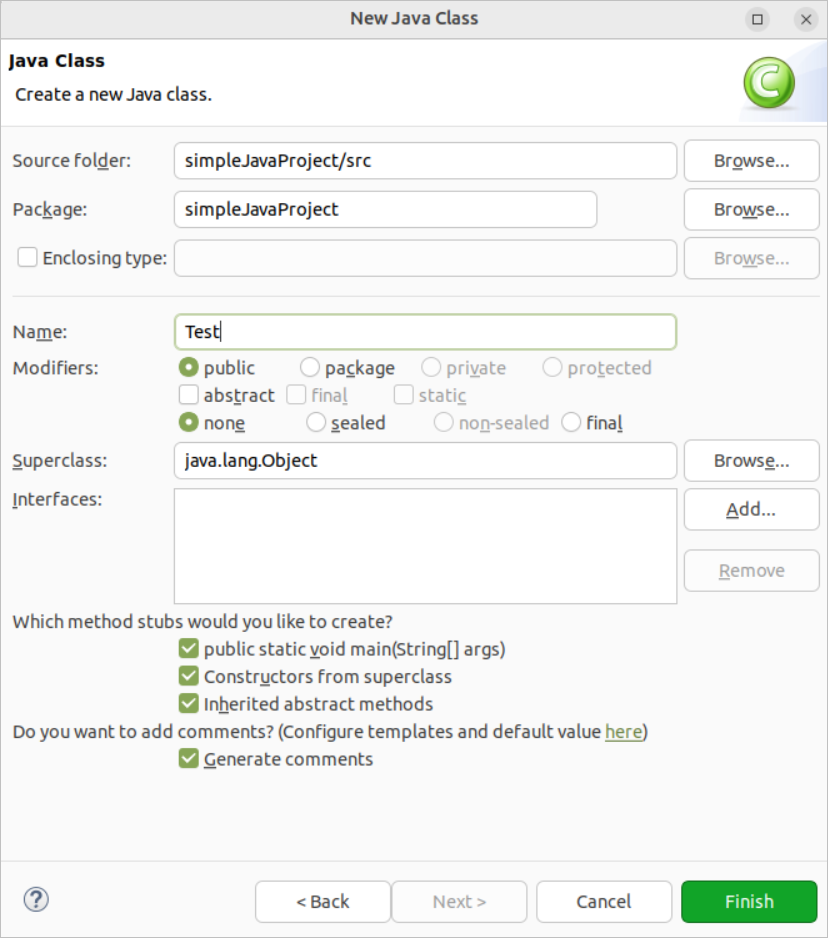
The following window will appear to set the class name. The first letter of the class name must be capitalized for the Java class. Here, the class name has been set to Test, and other necessary options have been checked. The methods of the class will be generated automatically based on the selected method stubs options. Click on the Finish button to create the class.
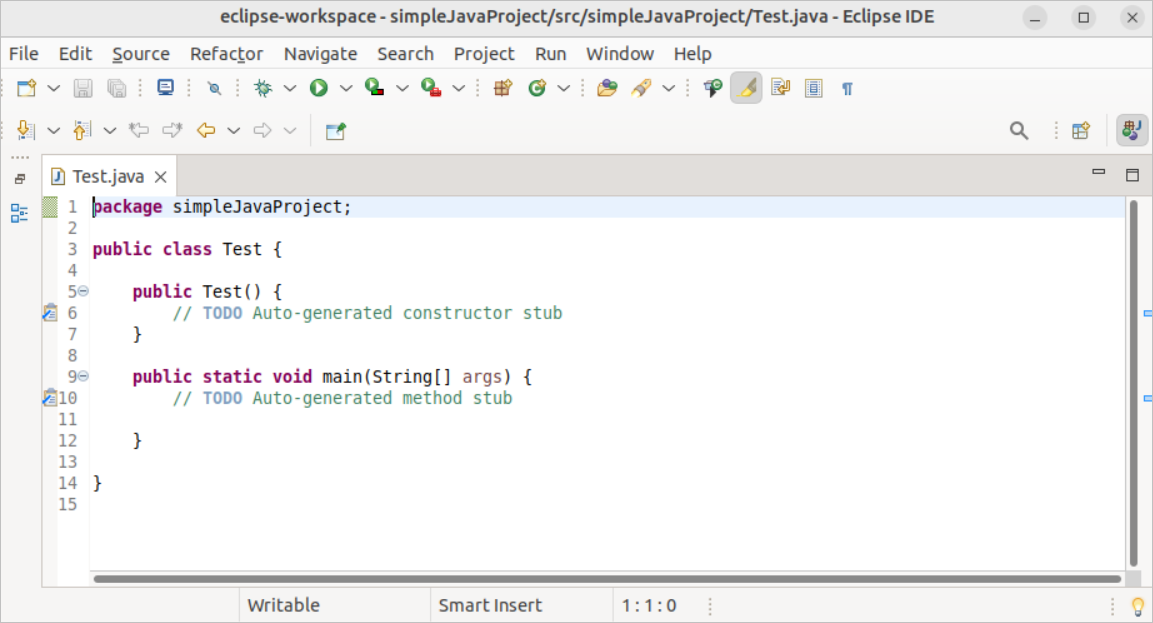
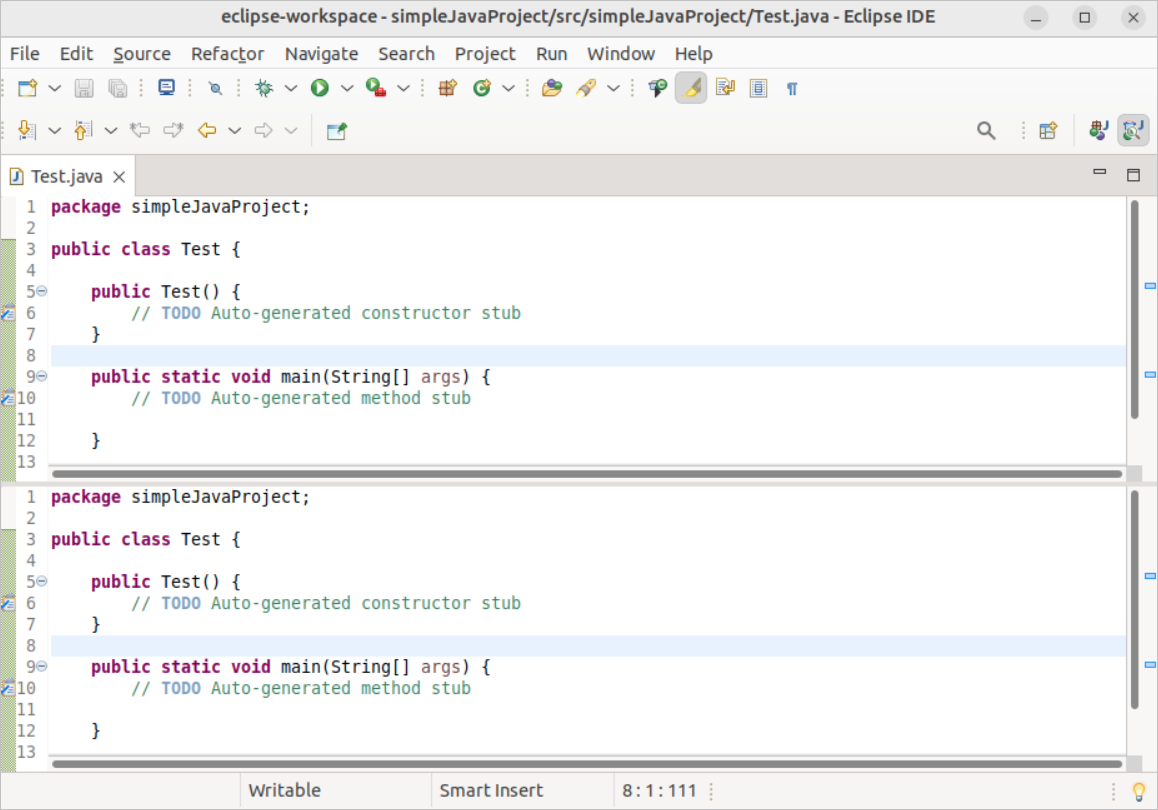
The following editor with the code will be opened after creating the Java class. Two methods have been created in the class by default. These are the constructor method named Test() and the main() method. The default comments have been added to the class.
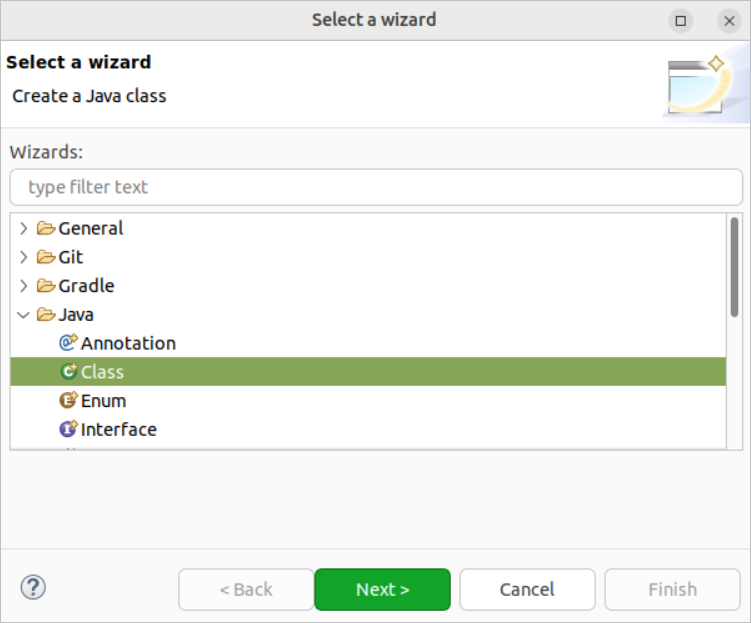
You can also create the Java class using the New tool of the toolbar. The following image will appear after clicking the New tool on the toolbar. After selecting the Class under Java, click the Next button to open the New Java Class window like before.
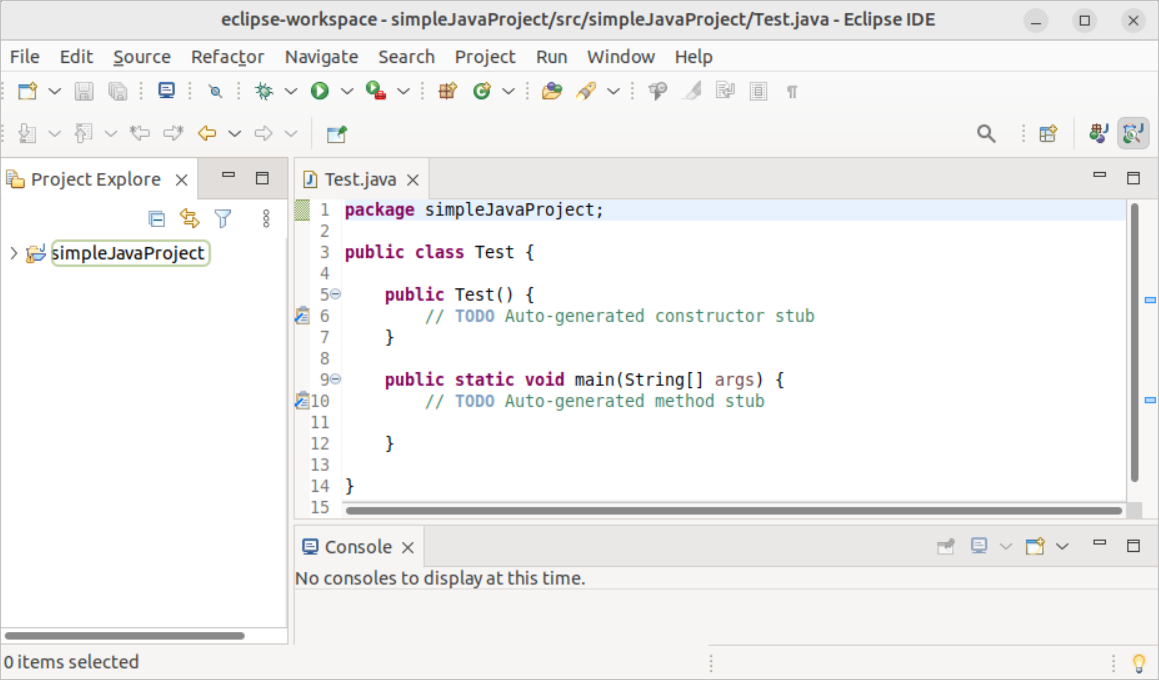
Run the Java Project
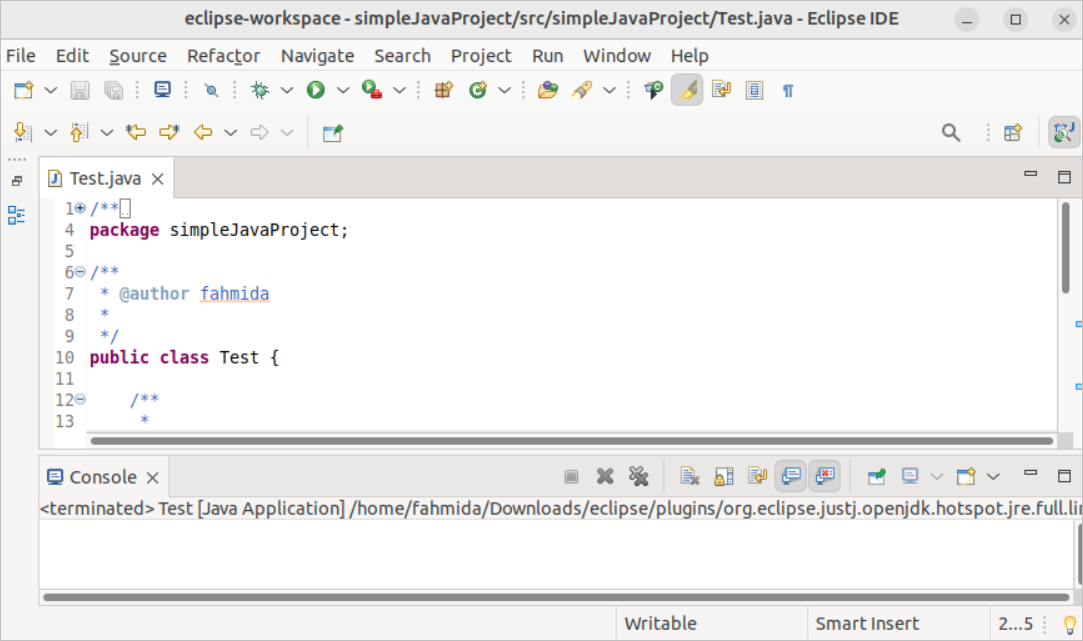
The Java project can run using the Run menu or the Run Test tool on the toolbar. The following output will appear after executing the Java project. The console window contains no output because no code is added in the main() method.
Uses of Some Important Eclipse Features
Eclipse IDE has many features for making Java application development easier. Several are Editor, Appearance, Show View, Perspective, and Navigation. The uses of these features have been explained in this part of the tutorial.
Editor
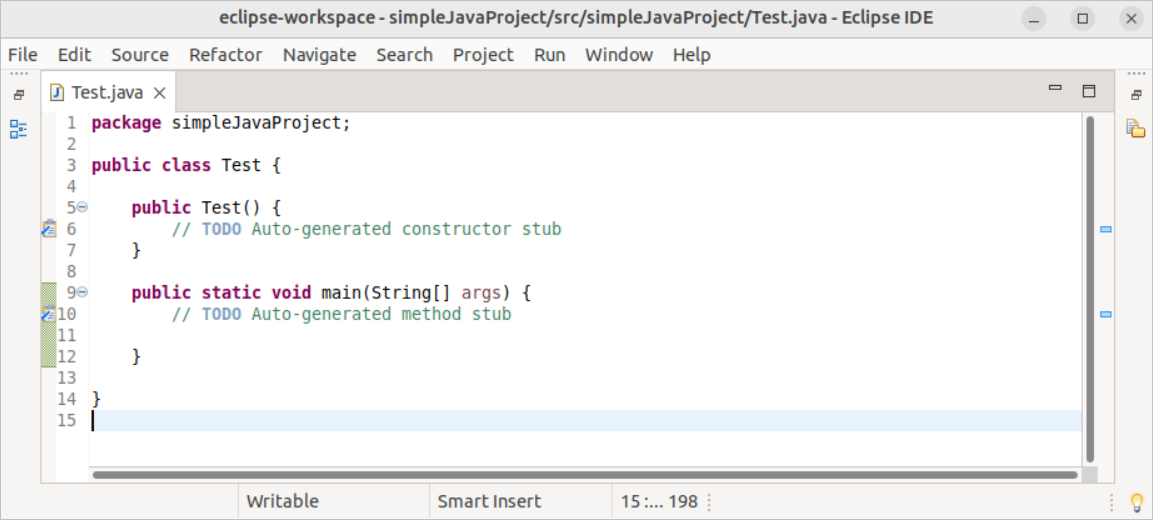
The main part of the Workbench is the Editor. The Java source code is edited by using the Editor. More than one editor can be opened simultaneously by using the Eclipse editor. The Ctrl + F6 is the shortcut key for opening an editor. The Editor menu item under the Window menu contains many options to change the editor’s look. You can toggle the editor vertically or horizontally and zoom in or zoom out of the code view.
The editor will look like the following image if the Windows->Editor->Toggle Split Editor (Horizontal) menu is selected. You can disable it by selecting the same menu.
The font size of the code can be increased or decreased by selecting the Windows->Editor->Zoom In or Windows->Editor->Zoom Out menu. The shortcut key of Zoom In is Ctrl++, and Zoom Out is Ctrl– like other standard editors.
Appearance
It is used to change, hide, or show the toolbar or status bar and maximize or minimize the size of the active editor. It is also used to toggle the size of the Workbench. If the Window->Appearance->Hide Toolbar has been selected, the Workbench toolbar will be hidden like the following image. In this way, the status bar can also be hidden.
The Toolbar or status bar can be shown by selecting the same option from the Appearance menu.
Show View
It is used to get different information from the Workbench. The Show View menu is under the Window menu that contains the view-related options. Some commonly used view options are Console, Package Explorer, Project Explorer, Outline, Search, and Tasks. The uses of these view windows have been described below.
Console
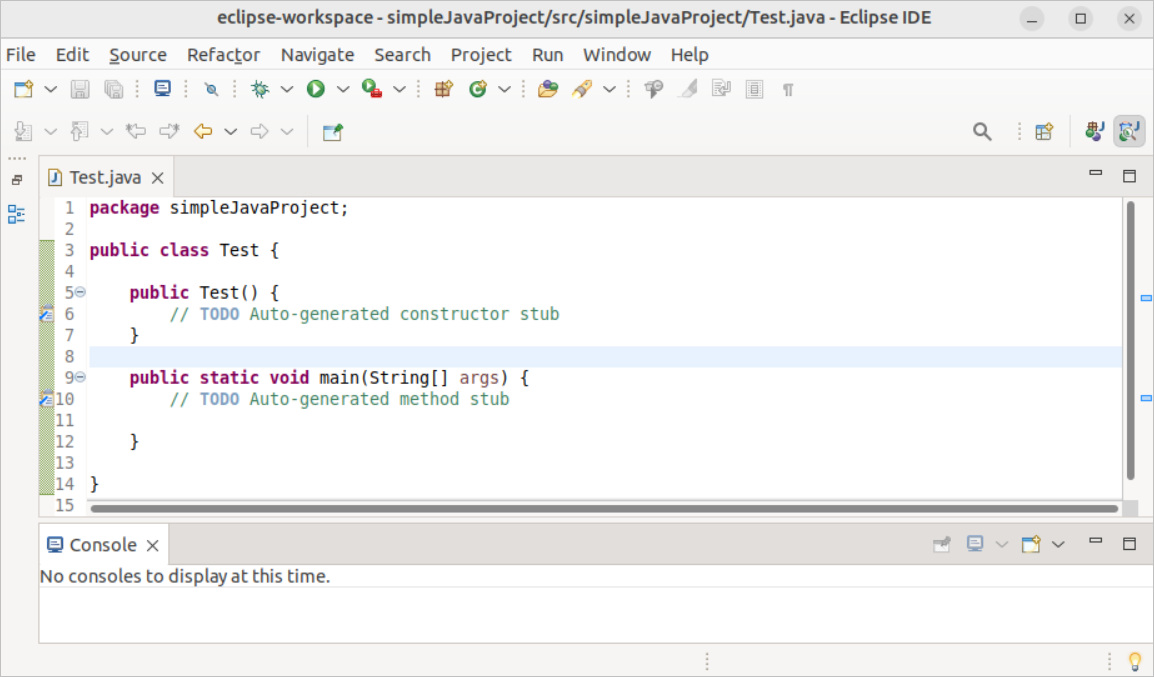
It displays the output, exception, and error after executing the Java program. No code is added in the main() method of the Test class. So, the console window will look like the following image before executing the program:
Package Explorer
It is used to display the package information of the Java project. The Package Explorer window will look like the following image for the simpleJavaProject. If the project folder is expanded, then the other files and folder will be shown. The Package Explorer view helps to search any particular file or folder of the project easily for modification.
Project Explorer
It is used to display the files and folder structure of the project. The Project Explorer window will look like the following image for the simpleJavaProject:
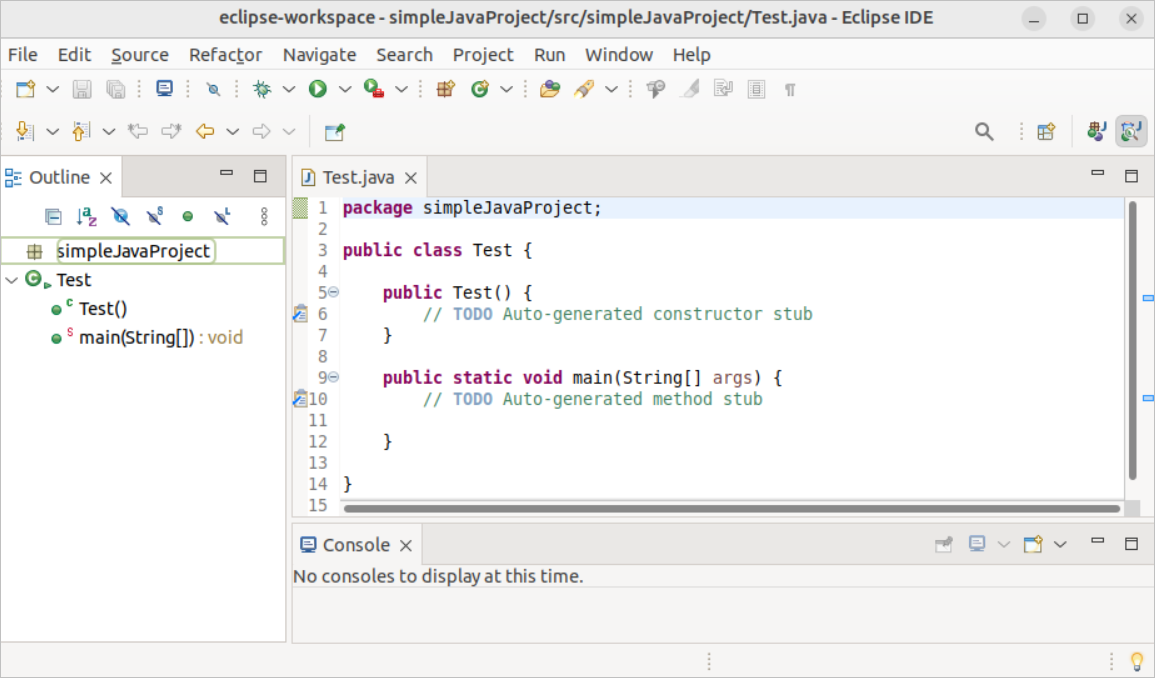
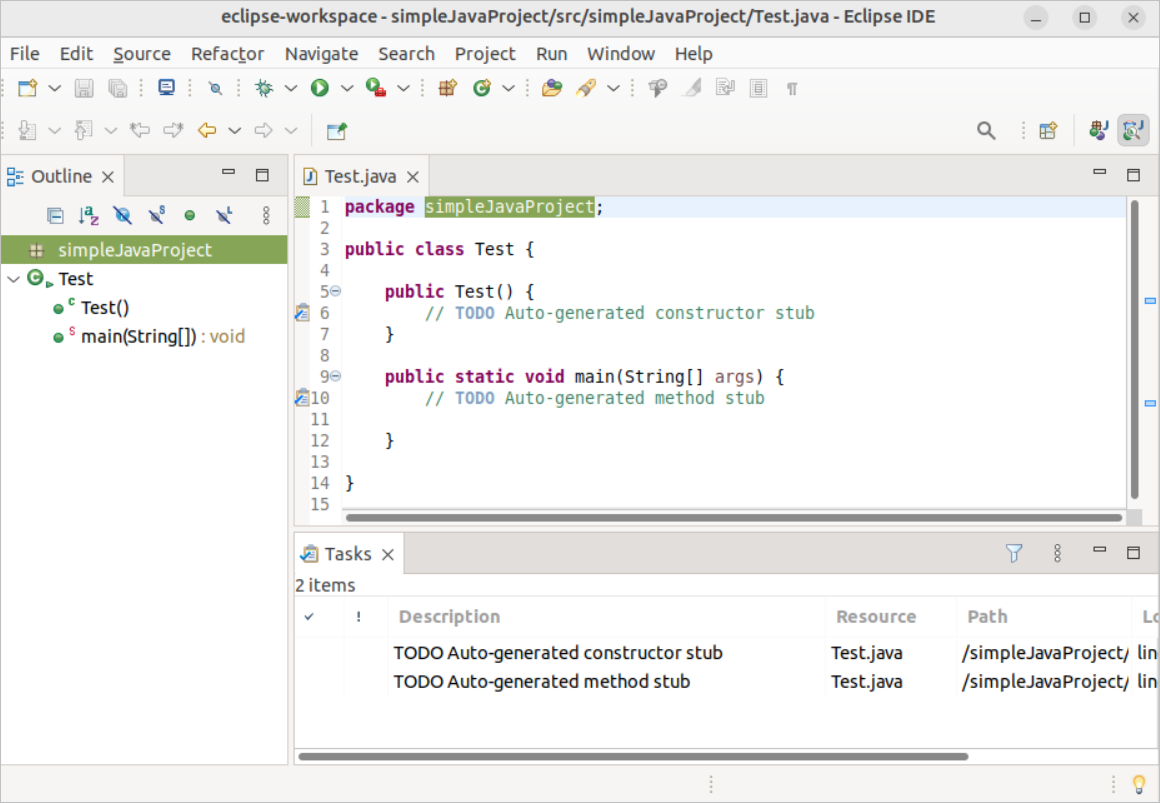
Outline
It is used to display the structure of the active source files in detail, such as classes and methods. The following output will appear for the Java project named simpleJavaProject. According to the output, the Test class contains two methods, which are the constructor method called Test() and the main() method.
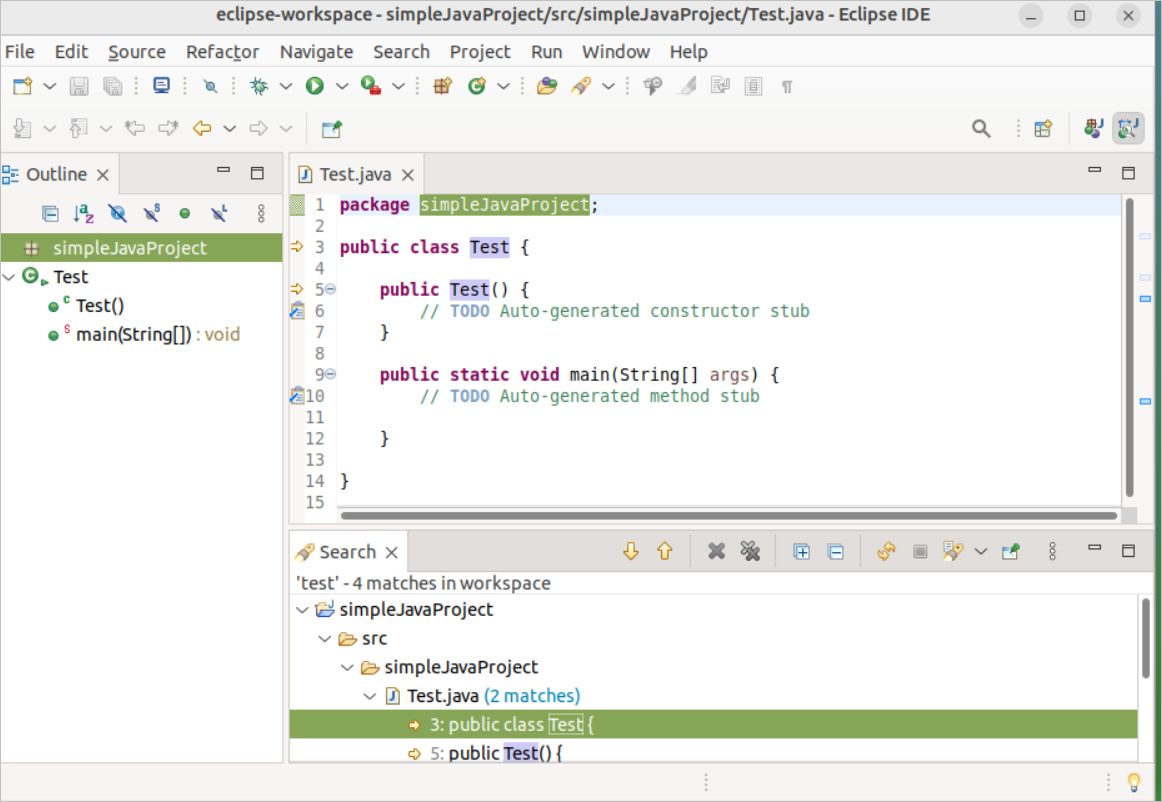
Search
It is used to search for anything in the code editor. The following output will appear in the search window for searching the word, test. According to the output of the Search window, four words were found that match the word Test.
Tasks
It is used to get information about the tasks done by the project. The following output will appear in the task window for the Test.java class. Two methods are generated automatically when the Test.java class has been created. So, the entries of two tasks have been shown in the Tasks window.
Many other menu options exist in the Show View menu, which are used for other purposes of Java programming.
Perspectives
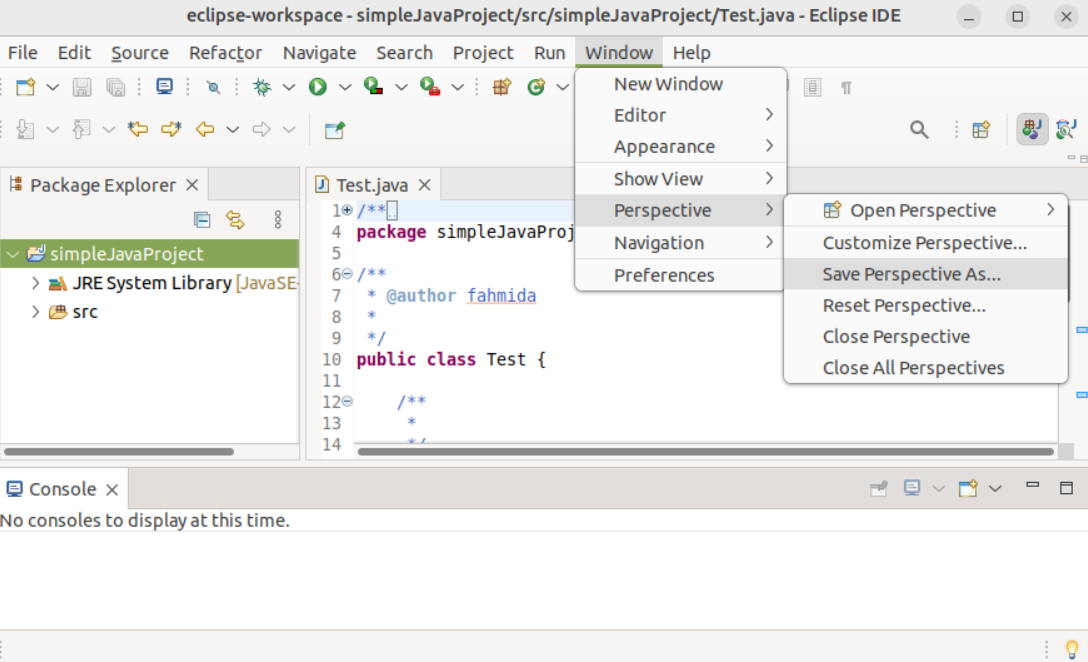
It is used to set the layout of the Workbench that may contain different views and editors. The perspective can be customized, reset, saved, and closed. Suppose you want to save the perspective that contains Package Explorer view, Console view, and an Editor like the following image. Click on the Window->Perspective->Save Perspective As… to save this layout. Type the name of the perspective and click on the Save button. Here, the name of the perspective has been set to Java layout-1.
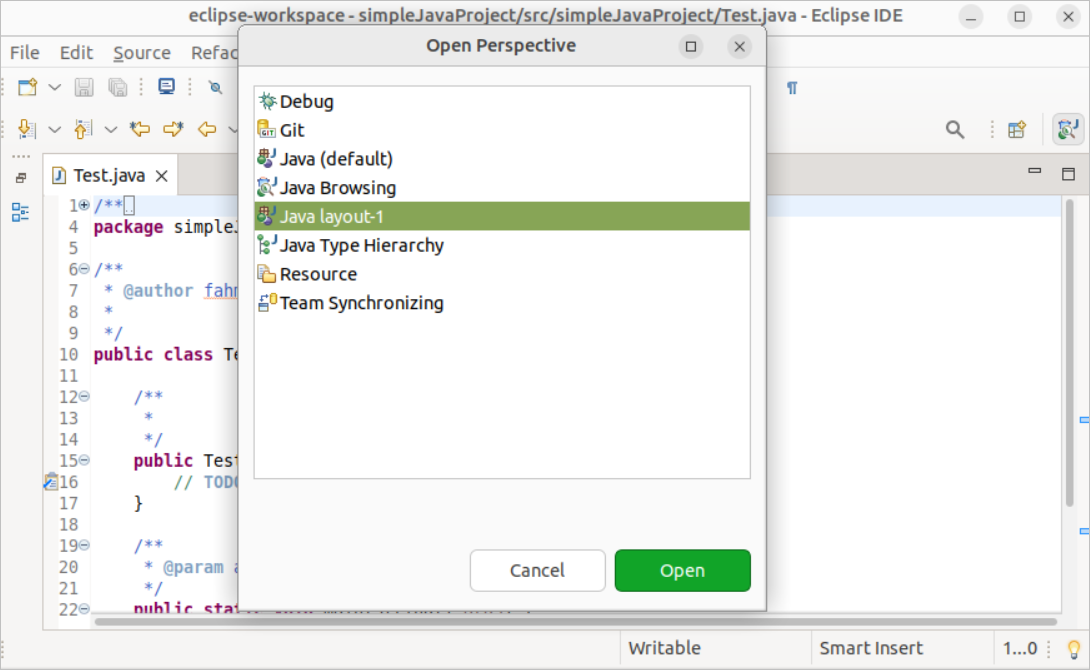
Now, change the layout of the Workbench and open the perspective named Java layout-1 by selecting the perspective from the following window, which has been opened by clicking Window->Perspective->Open Perspective->Other… menu. The layout of the Workbench will be changed according to the selected perspective. If you select the saved perspective named Java layout-1 and click on the Open button, then the Workbench will look like the previous image.
Any existing perspective can be closed by clicking on the Window->Perspective->Close Perspective, and all existing perspectives can be closed by clicking Window->Perspective->Close All Perspectives. The Window->Perspective->Reset Perspective… menu option is used to reset the perspective.
Navigation
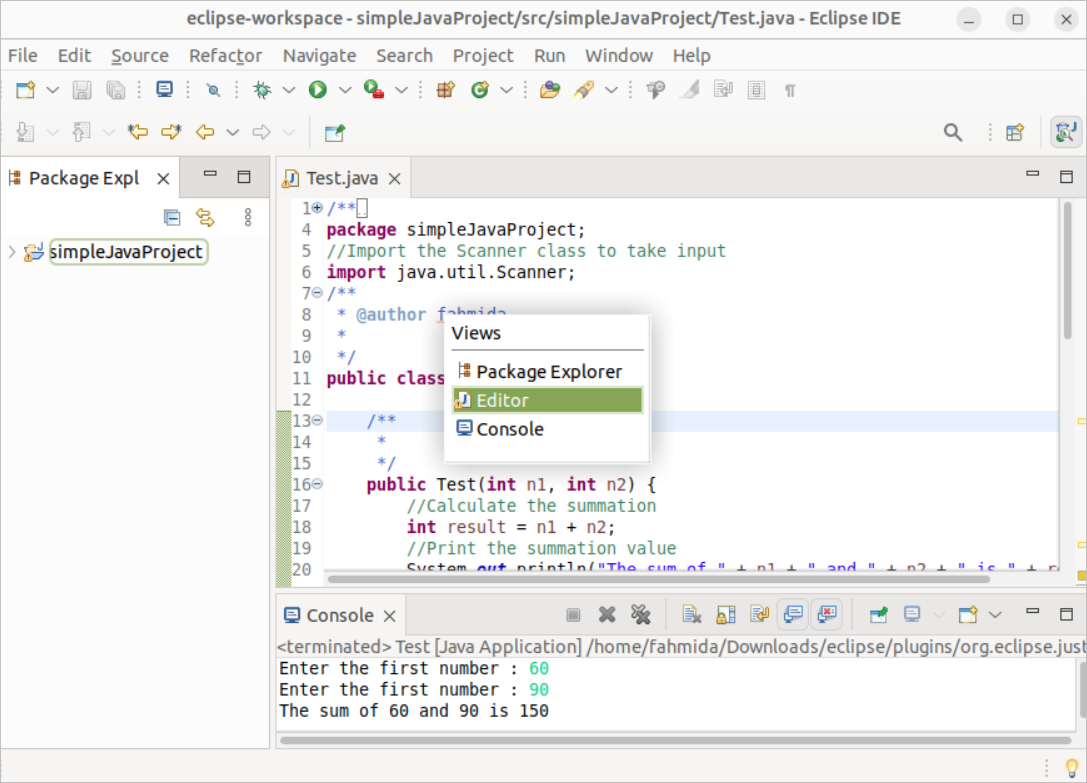
It is used to show System and View menus and switch among the views, editors, and perspectives when multiple views, editors, and perspectives are used in the Workbench. The way to switch among the multiple views has been shown here. Suppose three views are opened in the IDE, like the following images: Package Explorer, Editor, and Console. The Package Explorer is active. Click on the Window->Navigation->Next View to go to the next view, which can be Editor or Console.
The user can move from one editor to another editor, like the views, by using the Navigation window.
Write Simple Java Code
The way of printing string data in the console, taking input from the user, and using the constructor method has been shown in this part of the tutorial.
Print String Into the Console
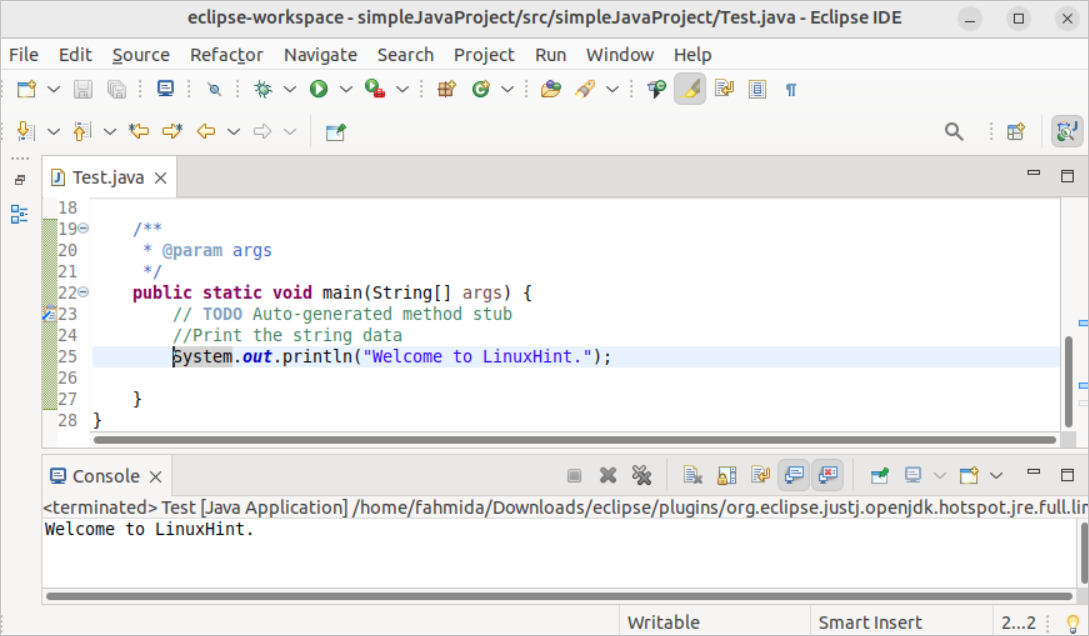
The Java class starts execution from the main() method. Add the following code inside the main() method to print a simple string, “Welcome to LinuxHint”. The System.out.println() function is used to print the string with the newline into the console.
System.out.println("Welcome to LinuxHint.");
The following output will appear after executing the Java project. The string has been printed in the Console window.
Take Input From the User
Java has many built-in classes to take input from the user. Modify the Test.java file with the following code to take string input from the user and print the input value with other string values. The Scanner class has been used in the code to take the user’s input. To use this class, java.util.Scanner has been imported into the class. This class contains many functions to handle different types of data, such as Integer, Float, Double, and String. The nextLine() function of this class has been used to take the string input from the user. Next, the input value is stored into a variable and printed into the output by combining it with another string.
//Import the Scanner class to take input
importjava.util.Scanner;
/**
* @authorfahmida
*
*/
publicclass Test {
publicTest() {
// TODO Auto-generated constructor stub
}
/**
* @paramargs
*/
publicstaticvoidmain(String[] args) {
// Create the object of the Scanner class
Scanner Obj = newScanner(System.in);
// Print a message for the user
System.out.print("Enter your name : ");
// Read input from the user and store the value into a variable
String name = Obj.nextLine();
//Print the input value by adding other string values
System.out.println("Welcome to LinuxHint, " + name);
}
}
The user prompt, “Enter your name:” will appear after running the above Java class. According to the output, “Fahmida Yesmin” has been taken from the user, and this value has been printed with the string value, “Welcome to LinuxHint”.

Use of Constructor Method
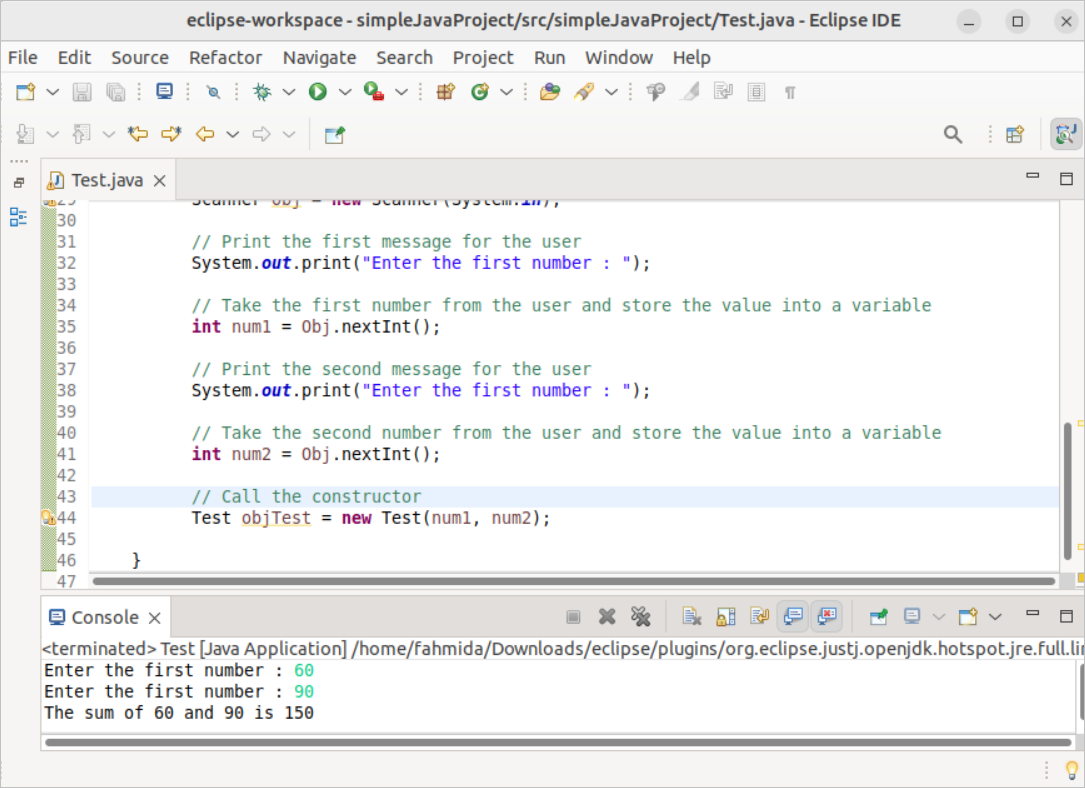
The constructor method is mainly used to initialize the object variables and other tasks required to be completed at the time of object creation. The constructor can be defined without a parameter and with a parameter. You can learn more details about the Java constructor from here. Now, modify the Test.java class with the following code where the parameterized constructor has been used. The Scanner class has been imported into the code to take two numbers from the user. The parameterized constructor method has been used to calculate the sum of the input values and print the summation result. In addition, the nextInt() function has been used to take integer input from the user.
//Import the Scanner class to take input
importjava.util.Scanner;
/**
* @authorfahmida
*
*/
publicclass Test {
publicTest(int n1, int n2) {
//Calculate the sum
int result = n1 + n2;
//Print the summation value
System.out.println(“The sum of “ + n1 + “ and “ + n2 + “ is “ + result);
}
/**
* @paramargs
*/
publicstaticvoidmain(String[] args) {
// Create the object of the Scanner class
Scanner Obj = newScanner(System.in);
// Print the first message for the user
System.out.print(“Enter the first number :“);
// Take the first number from the user and store the value in a variable
int num1 = Obj.nextInt();
// Print the second message for the user
System.out.print(“Enter the first number :“);
// Take the second number from the user and store the value in a variable
int num2 = Obj.nextInt();
// Call the constructor
TestobjTest = newTest(num1, num2);
}
}
The prompt for taking two numbers will be appeared after running the previous code. According to the following output, two numbers, 60 and 90, have been taken from the user. The sum of the 60 and 90 is 150, and it has been printed in the output.
Conclusion
The Eclipse IDE is a very popular editor for any standard programming language. It has many features for Java programmers to maintain and execute the codes more efficiently. Some useful options of the Window menu have been explained in this tutorial. There are many other menu options in this IDE for different purposes, which are not explained here. Creating a new Java project with the class and executing the project using this application have been discussed for the new user of this editor. The way of taking input, printing output, and using the constructor method using the Java class was also shown. We hope the new Java developer will be able to use Eclipse IDE for Java programming on Ubuntu after reading this tutorial.
Source: linuxhint.com