How to Install and Use dig and nslookup on Ubuntu For Network Troubleshooting
The dig and nslookup command line utilities are a part of dnsutils package. These commands are used for network troubleshooting specifically collecting information about Domain Name System (DNS) on Linux/Unix based systems. Both tools are useful for investigating networks; while dig is the latest version and gives advanced outputs, nslookup is a basic tool and gives brief information about the queries.
- What is dig Command
- What is nslookup Command
- How to Install dig and nslookup on Ubuntu
- How to use dig Command on Ubuntu – Examples
- How to Use nslookup Command on Ubuntu – Examples
- What is the Difference Between dig and nslookup Utilities
- What are DNS Record Types
- Conclusion
I will explore how to install and use dig and nslookup on Ubuntu in this tutorial. Before that, let’s have a short introduction of both commands.
What is dig Command
The dig also known as Domain Information Groper is an easy-to-use command line utility used to troubleshoot DNS servers.
What is nslookup Command
The nslookup is an older command line utility compared to the dig command line utility version but still a widely accepted tool for DNS troubleshooting. It is also used for probing the Domain Name System (DNS). It is used in two different ways: interactive and noninteractive.
How to Install dig and nslookup on Ubuntu
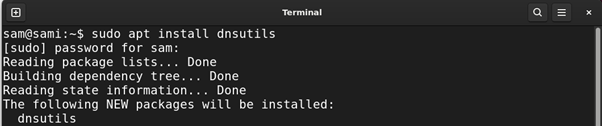
Both dig and nslookup utilities come by default in all modern Linux distributions including Ubuntu. To check whether these utilities are installed on your system or not run the command given below:

However, many older distributions do not come with these tools. To install dig and nslookup on Ubuntu install the dnsutils package which contains dig, and nslookup packages.
How to use dig Command on Ubuntu – Examples
To use the dig command in the Linux terminal, see the syntax first:
Syntax:
In the above syntax:
[domain] parameter indicates the domain name that you want to query.
[query] indicates the query types: for example, to query about specific DNS records such as SOA, MX, or NS.
[options] parameter indicates various options that format the output such as +short, +noanswer, and +nocomments.
Various types of DNS records can be accessed through the dig tool on Ubuntu. Read more about DNS records in the last section of the guide.
Let’s find out how to check various types of DNS records using the dig:
Example 1: Type A Record Query
To get a type A record of a domain use:
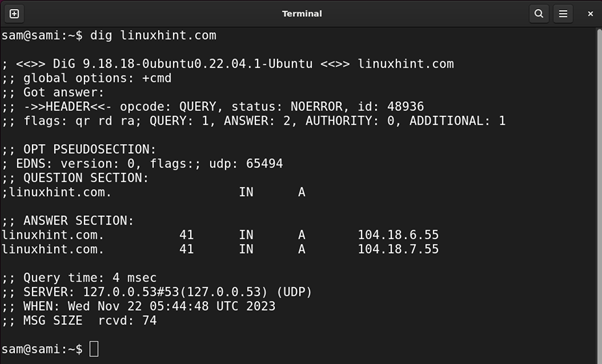
By default, the dig command displays the A record which is an IPv4 record.
Let’s discuss the output:
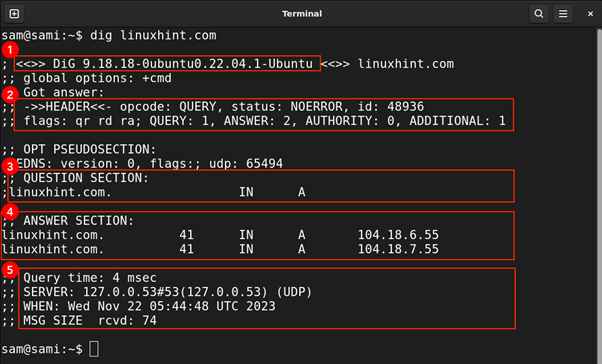
- It is the dig version which is 9.18.18.
- It is the header of the response containing various flags.
- Next comes the QUESTION SECTION that simply indicates the query; in this case, the query is for A type DNS record of domain linuxhint.com. The IN indicates the internet class. Some other classes are CH (chaos class), HS (Hesiod class), and ANY (wildcard).
- The ANSWER SECTION indicates the domain and its corresponding IP addresses. In this case, the domain is linuxhint.com and its Ips are 104.18.6.55 and 104.18.7.55.
- This section provides some stats related to the query such as server DNS, protocol type, query time, and message size.
Note that the lines in the response starting with semicolons (;) are comments.
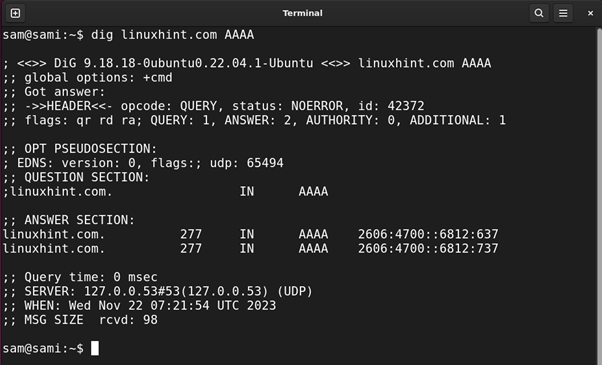
Example 2: Type AAAA Record Query
This is also a type A record but with IPv6.
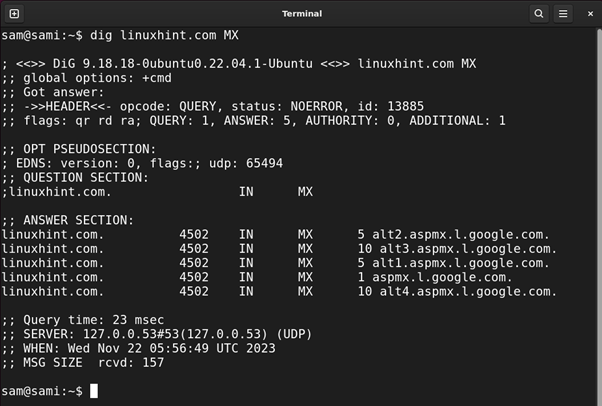
Example 3: Type MX Record Query
The MX or mail exchange record provides information about mail servers.
Example 4: Type SOA Record Query
The SOA known as the Start of Authority indicates the authority of the zone starting at a specific point on the global record of DNS.

Example 5: For Multiple Sites Query
You can also get the DNS information of multiple domains using the dig command:

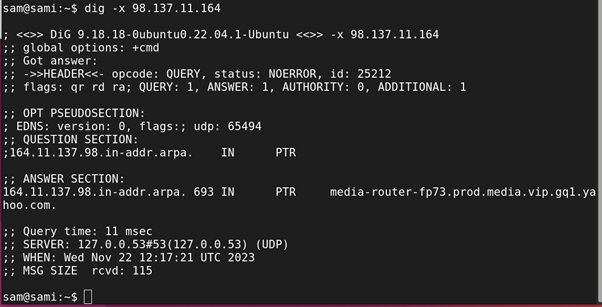
Example 6: For Reverse Lookup Query
For the reverse lookup use the -x option with the IP address:
Other Options
There are various options that can be incorporated with the dig command to format the output.
| Query Options | Description |
| +answer and +noanswer | It +answer shows only answer section while +noanswer eliminates it. |
| +all and +noall | The +all option sets all the display flags while +noall removes them. |
| +comments and +nocomments | These options toggle between displaying comments. |
| +question and +noquestion | These option toggle between displaying question section. |
| +short and +noshort | The default response of the query is always verbose, using +short gives a more specific answer. |
| +stats and +nostats | This query toggles between displaying stats and no stats. |
Using +short query option for specific output:

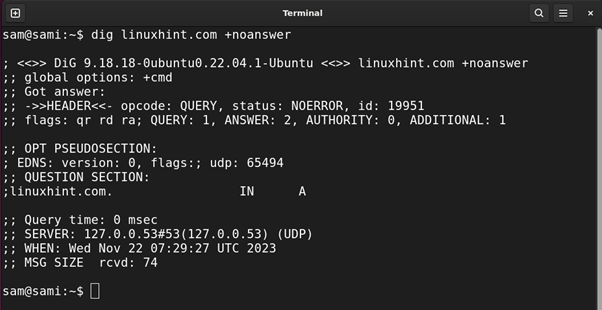
Using +noanswer to omit the ANSWER SECTION from the response:
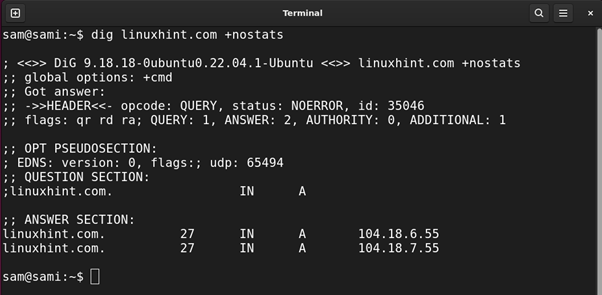
Use +nostats query option to omit the stats section.
For more options and details read the manual page through the terminal using:
How to Use nslookup Command on Ubuntu – Examples
The nslookup command can also be used to query DNS record types. The nslookup has two modes:
Interactive Mode
Let’s understand how to use nslookup in interactive mode:
To enter the interactive mode type nslookup:

Now to apply any option the set command will be used in the interactive mode.
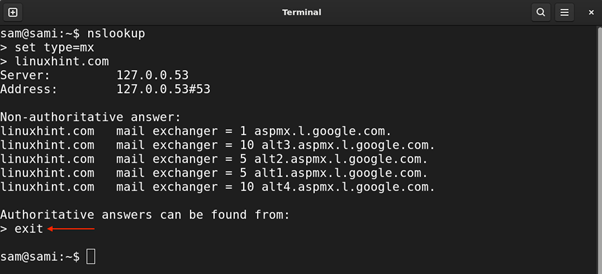
Let’s understand it with an example, suppose I want to look at the MX record of the linuxhint.com domain. Type nslookup, to set the DNS record enter set type=mx, lastly, enter the domain name.
The output would be:

To close the interactive mode type exit and press Enter.
In the interactive mode, you have to type each option one by one, on the other hand, in the noninteractive mode the query is passed in one go which is easier to work with.
Noninteractive Mode
Let’s learn how to use nslookup in non-interactive mode. The syntax of using nslookup command with parameters is mentioned below:
Syntax:
Example 1: Type A Record Query
Use the following command to display type A DNS record with nslookup command:

Example 2: Type AAAA Record Query
For IPV6 DNS record use:

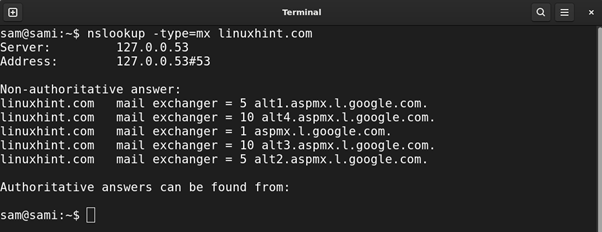
Example 3: Type MX Record Query
Use the following command to get MX type DNS record information with nslookup:
Example 4: Type SOA Record Query
Similarly, for type, SOA DNS record the following command will be used:

What is the Difference Between dig and nslookup Utilities
The key difference between these two command line utilities is that dig is an advanced version of nslookup and covers a wider range of record types while nslookup and specifically used for DNS interrogation.
The dig is much smarter and covers more options for in-depth investigation of the network while nslookup is a basic utility.
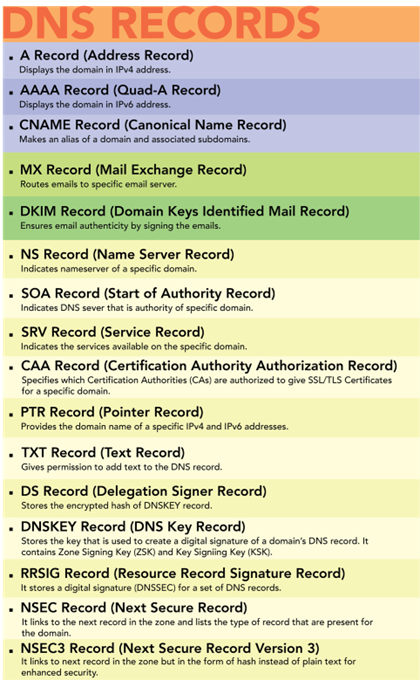
What are DNS Record Types
There are various DNS records, for a better understanding of both dig and nslookup commands you must understand all the DNS records. The following image presents all the DNS record, their names, and descriptions.
Conclusion
The dig and nslookup commands are useful network troubleshooting commands. The purpose of both commands is pretty much similar i.e., giving information about the domain name system. The nslookup command is easy to understand and quite handy for basic troubleshooting while dig is an advanced version of nslookup and gives an in-depth output compared to nslookup. The nslookup was deprecated but the decision was reversed, however, it is recommended to use dig because nslookup will give you quick one-line output but dig will give you more options and verbose outputs.
Source: linuxhint.com