How to Install and Setup Windows Performance Analyzer?
Windows Performance Analyzer, better known as WPA, is a performance analysis tool available in the Windows ADK (Assessment and Deployment Kit). It is a convenient tool that generates graphs and data tables of Event Tracing for Windows (ETW) events. These events can be recorded using various tools such as the Windows Performance Recorder (WPR) and Xperf. WPA lets us open any event trace log file to monitor and analyze it.
This blog presents a comprehensive guide on downloading, installing, and setting up the Windows Performance Analyzer.
How to Install Windows Performance Analyzer (WPA)?
WPA, developed by Microsoft, is a performance monitoring and analyzing tool that is used to analyze Windows performance. To use WPA, users need to download and install it on their PCs. For this purpose, first, visit the official website of Microsoft and click on the “Windows Assessment and Deployment Kit”:

To access the downloaded file, click on the file or visit the “Download” directory:

Launch the downloaded “.exe” file, specify the location, and click on the “Next” button:

Review the privacy policies, select “Yes” or “No” according to your requirements, and hit the “Next” button:

Accept the license agreement by clicking on the “Accept” button:

Select the “Windows Performance Toolkit” and “Windows Assessment Toolkit” from the available features and hit the “Install” button to install them on your PC:

Clicking the “Install” button will ask you for the “Admin” privileges. Grant the privileges and wait for a few minutes to complete the installation process:

Hit the “close” button to finish the installation process.
How to Use Windows Performance Analyzer?
Follow the given steps to use “Windows Performance Analyzer” on your Windows operating system without any hassles:
Step 1: Launch WPA
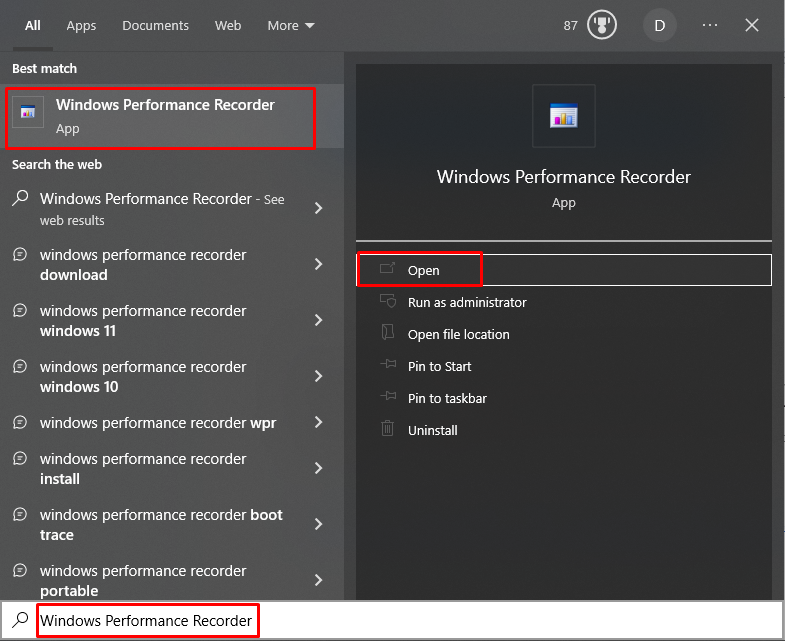
Search “WPA” or “Windows Performance Analyzer” in the Windows search bar and hit the “Open” button to launch it:

On successful launching of WPA, you will be navigated to the following “Getting Started” page:

Step 2: Record the System Information
Launch the “Windows Performance Recorder” as well to record the system information for analysis:
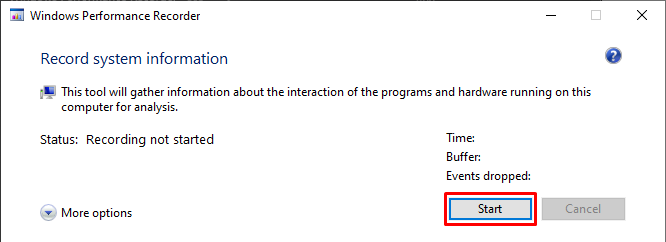
Clicking the “Open” button will navigate you to the following screen that shows an alert message and the recording status. Click on the “Start” button to begin the recording:
Click on the “Save” button to save the recordings:

“Windows Performance Recorder” will ask you to specify the path where the recorded event needs to be saved and hit the “Save” button:

The following screen shows that the recording is being saved:

If everything goes fine, users will be shown the following confirmation message:

Once the recorded file/event is saved, you can open it in “Windows Performance Analyzer” by clicking on the “Open in WPA” button.
Step 3: Analyze the Recorded Information
Clicking on the “Open in WPA” button will start loading the recorded file:

When a user opens the recorded file(event trace log) in WPA, the following window will appear containing a “Graph Explorer” tab on the left side and an “Analysis” tab on the right side:

The “Graph Explorer” tab of the WPA shows information about the trace file in different groups. For instance, Graph Explorer shows anything related to the CPU in the “Computation” window, anything related to the hard disk in the “Storage” section, etc.
Note: To learn the usage of WPA, read the “How to Use Windows Performance Analyzer” article.
Conclusion
To install Windows Performance Analyzer, visit the official website and download the “Windows Assessment and Deployment Kit”. After that, launch the downloaded “.exe” file, specify the location, review the privacy policies, accept the license agreement, select the “Windows Performance Toolkit” and “Windows Assessment Toolkit” from the available features, and hit the “Install” button to install them on your PC. This write-up has explained a comprehensive guide on installing and setting up the Windows Performance Analyzer.
Source: linuxhint.com