How to Install and Enable SSH Multi-Factor Authentication for Linux Systems
However, using just a username and password to access SSH can leave your systems vulnerable to brute-force attacks, password guessing, and other security threats. That is where the Multi-Factor Authentication (MFA) comes in handy.
It is an additional layer of security that requires the users to provide two or more forms of authentication to access a system. By requiring the users to present multiple factors, MFA can significantly improve the security of SSH access.
MFA is vital for systems that handle sensitive or confidential data as it helps prevent unauthorized access and data breaches. By implementing MFA, you can significantly improve the security of your Linux system and better protect your data and assets.
This article illustrates on installing, configuring, and enabling MFA for SSH access on Linux systems. We will outline the required steps to set up a supported MFA method such as Google Authenticator or Duo Security, and test the setup for SSH access.
Preparing Your Linux System for MFA
Before installing and configuring MFA on your Linux system, ensuring that your system is up-to-date and has the necessary packages installed is crucial. Update your system using the following utility:
Once your system is up-to-date, you must install the PAM (Pluggable Authentication Modules) package which enables MFA for SSH.
Installing and Configuring a Supported MFA Method
Several MFA methods are available for SSH access including Google Authenticator, Duo Security, and YubiKey. In this section, we will focus on configuring the Google Authenticator which is a widely-used and easy-to-setup MFA method for SSH.
Here are the steps to install and configure the Google Authenticator for SSH MFA:
Step 1: Create a New User
First, you need to create a new user for SSH access. You can create a new user by running the following code:
Replace <username> with the appropriate name of the user that you want to create.
Step 2: Switch to the New User
Next, switch to the new user by running the following command:
Your system will prompt you to enter the password for the new user.
Step 3: Install Google Authenticator
Install Google Authenticator using this utility:
The following is a sample output for the previous command:
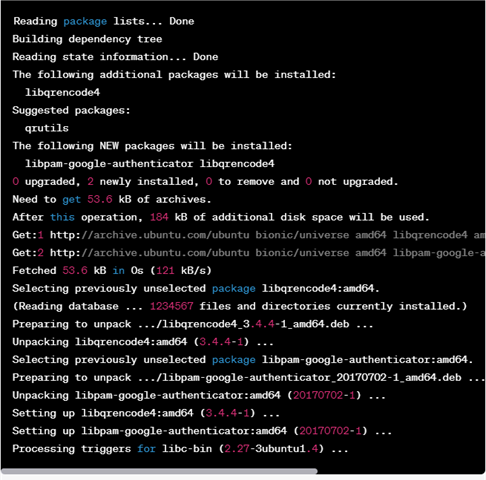
This output shows the package manager which is “apt”, installing the “libpam-google-authenticator” package and its dependencies which is “libqrencode4”. The -y option automatically confirms the installation prompt. The result also shows the progress of the installation process, including downloading and installing the packages and any additional disk space that will be used. Finally, it shows that the installation and any relevant triggers for post-installation processing are successful.
Step 4: Generate a New Secret Key
This utility will help you to generate a new secret key for the user:
Your system will prompt you to answer a few questions, including the following:
- Do you want the authentication tokens to be time-based (y/n)? y
- Do you want me to update your “/home/yourusername/.google_authenticator” file (y/n)? y
- Do you want to disallow multiple uses of the same authentication token? (y/n) y
- Do you want to enable rate-limiting? (y/n) y
You can accept the default values for most of the questions. However, for the question, “Do you want me to update your “/home/<username>/.google_authenticator” file?“, select “y” to update the configuration file.
The previous command line generates a new secret key for the user which are used to create one-time passwords for MFA.
Step 5: Open the Authenticator App on Your Phone
Open the Google Authenticator app on your smartphone and scan the QR code which is displayed on the screen. This adds the new user to your Google Authenticator app.
Step 6: Edit the Configuration File
Edit the SSH configuration file by running the following command:
Add the following line at the end of the file:
This line enables the Challenge-Response authentication for SSH.
Step 7: Edit the PAM Configuration File
This command edits the PAM configuration file for SSH:
Add the following line at the end of the file to complete this step:
This utility enables the Google Authenticator module for SSH.
Step 8: Save Your Changes
Save the changes to the configuration files and restart the SSH service using the following command:
This command restarts the SSH service with the new configuration.
When you log in to your Linux system using SSH, you will be prompted for a one-time password which is generated by the Google Authenticator app. Enter the one-time password to complete the login process.
Testing Your MFA Setup for SSH Access
Once you installed and configured the MFA for SSH on your Linux system, it’s important to test the setup to ensure that it works correctly. Here are the steps to test your MFA setup for SSH access:
1. Open a new terminal window and connect to your Linux system using SSH, as you normally would. For example:
Replace the <username> with the exact name of the user that you created earlier and the <ip_address> with the IP address or hostname of your Linux system. In this case, we use Victoria as the username. The output looks like what is in the following figure:
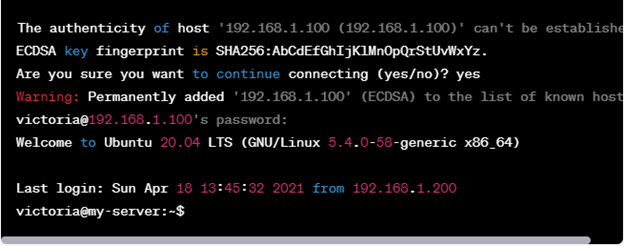
In this example, we use the ssh command to log in to a remote machine with the IP address of 192.168.1.100 as the user, “victoria”. The command prompts for confirmation of the remote host’s authenticity and then asks for the password for the user, “victoria”. Once authenticated, we are greeted with the shell prompt on the remote machine, indicating that we successfully established an SSH session.
2. Enter the password for the user when prompted.
3. After entering the password, you should be prompted for a one-time password from your MFA app. Open the Google Authenticator app on your smartphone and enter the code that corresponds to the user that you created earlier.
4. If the one-time password is correct, you should be logged in to your Linux system. If the password is incorrect, you will be prompted to enter another code from the MFA app.
5. Once you logged in successfully, you can verify that MFA is working correctly by checking the SSH logs. Run this utility to view the logs:
The previous command displays the SSH authentication logs in real-time.
Look for a line in the log that says “Accepted publickey for <username>” followed by “Accepted keyboard-interactive/pam for <username>”.
Apr 17 10:45:27 server sshd[2998]: Accepted keyboard-interactive/pam for victoria from 192.168.0.2 port 57362 ssh2
For example:
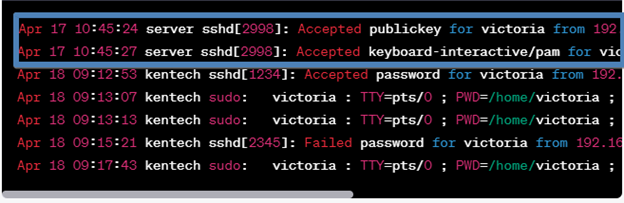
The first two lines show that the user “victoria” is successfully authenticated via a public key and keyboard-interactive methods from the IP address of 192.168.0.2.
If everything is working correctly, you can log in to your Linux system using SSH with enabled MFA.
Conclusion
Implementing the Multi-Factor Authentication (MFA) for SSH access on your Linux system can significantly enhance the security of your system by adding an extra layer of authentication. By requiring the users to provide a one-time password in addition to their regular password, MFA makes it much harder for attackers to gain access to your system.
Source: linuxhint.com