How to Import and Export Scheduled Tasks Using PowerShell
Task Scheduler application is used to create, run, and manage tasks. It schedules tasks such as launching programs, files, or scripts. These tasks are then scheduled to be launched at a particular time. Additionally, PowerShell and Command Prompt can mimic its functionality too. Microsoft has empowered both PowerShell and Command Prompt to perform the tasks that a normal GUI-based user can’t.
The most important feature of the Task Scheduler is its ability to import and export scheduled tasks. Importing and exporting the tasks feature is very useful when it comes to moving scheduled tasks from one computer to another. The benefit of the exported or imported tasks is that they can be used on multiple computers.
In case your Task Scheduler application is not working or you are unable to use it then, PowerShell can be used to import and export scheduled tasks.
Quick Outline:
How to Import and Export Scheduled Tasks Using PowerShell
Bonus Tip: How to Import and Export Scheduled Tasks Using Command Prompt (CMD)
Conclusion
How to Import and Export Scheduled Tasks Using PowerShell?
As discussed earlier, tasks in Windows can be imported and exported using Task Scheduler, PowerShell, and Command Prompt. But, in this article, we will focus on importing and exporting tasks using PowerShell. Tasks that are imported or exported are saved with the XML (Extensible Markup Language) file extension.
Import Scheduled Tasks Using PowerShell
Importing scheduled tasks means, injecting scheduled tasks within the Task Scheduler program that were already exported in the form of an XML file. Alongside the Task Scheduler application, PowerShell can also be used to import scheduled tasks. Importing scheduled tasks is a priority task that needs the administrator’s permission. To import scheduled tasks using PowerShell check the instructions provided below.
Syntax
Here is the syntax to import scheduled tasks using PowerShell:
According to the above code:
-
- First, let’s register a scheduled task using the Register-ScheduledTask
- Then, use the -xml parameter and assign the Get-Content command to get the scheduled task XML file and pipe it to the Out-String command to convert it to the strings.
- After that, use the -TaskName parameter to assign the scheduled task name.
- Use the -TaskPath to specify the path of the task.
- Use the -User parameter to assign the user’s computer name from which the task will be imported.
- Lastly, use the -Force parameter to overwrite the import if there exists any with that name already.
Note: Replace “Task-Path-to-be-Imported” with the real task path, “Task-Name” with the real task name, “Task-Path-TaskScheduler” with the real Task Scheduler’s path, and finally, add your username to the -User parameter.
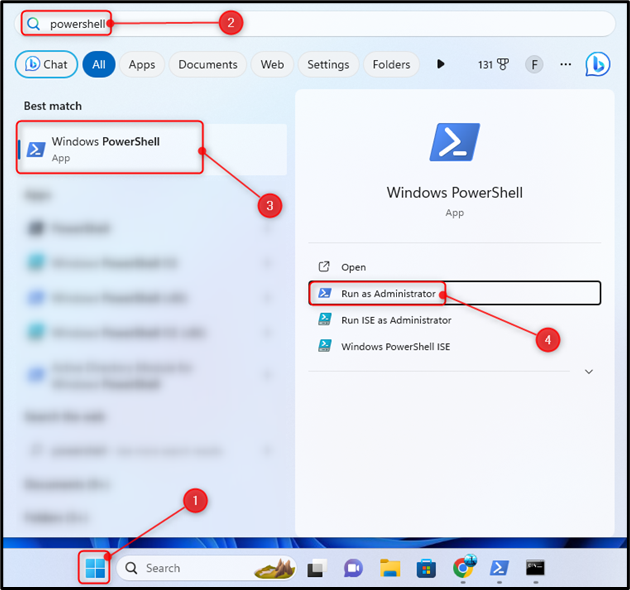
Step 1: Hit the Windows button to open the Start menu:
Step 2: Search PowerShell and click Run as administrator:
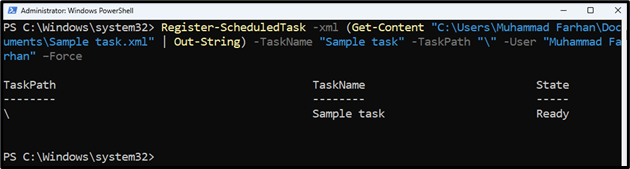
Step 3: Type the given command and press Enter to import the scheduled tasks:
Export Scheduled Tasks Using PowerShell
Exporting a task means that already scheduled tasks can be exported to an XML file. These scheduled tasks can also be exported using PowerShell. For that purpose, Microsoft has a dedicated command Export-ScheduledTask. To export scheduled tasks using PowerShell check the steps mentioned below.
Syntax
Here is the syntax for exporting a task using PowerShell:
According to the above code:
-
- First, use the Export-ScheduledTask command to initiate the exporting process of the scheduled task.
- Then, use the -TaskName parameter and assign the task name and use the -TaskPath parameter to assign the scheduled task path.
- After that pipe or export that information to another path using the Out-File
Note: Replace “Task-Name” with the real task name, “Task-Path-Where-it-is-Located” with the real location of the task, and “Path-Where-Task-Will-be-Exported” with the targeted file path where the scheduled tasks will be exported.
Step 1: Press Windows + X to open the Quick Access Menu, and select Windows PowerShell (Admin) or Terminal (Admin):

Step 2: Execute the below code in the console to export scheduled tasks:

Bonus Tip: How to Import and Export Scheduled Tasks Using Command Prompt (CMD)?
Just like PowerShell, Command Prompt can also import and export scheduled tasks with the help of certain commands. Command Prompt has its own dedicated commands for importing and exporting tasks.
Import Scheduled Tasks Using Command Prompt (CMD)
Importing scheduled tasks from an XML file to the computer can be done by using the Command Prompt.
Syntax
Here is the syntax for importing scheduled tasks using CMD:
According to the above code:
-
- First, use the SCHTASKS /Create /xml command to create a new xml task.
- Then specify the XML file path.
- After that use /tn to assign the task name.
- Lastly, use the /ru to assign the user name of the computer.
Remember: Replace “Task-Path.xml” with the real task, “Task-Name” with the real task name, and “Computer-Username” with your computer’s username.
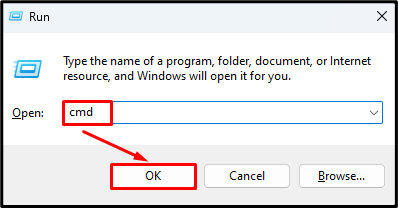
Step 1: Press Windows + R to launch the Run application.
Step 2: Type CMD and press Ctrl + Shift + Enter to open PowerShell as an administrator:
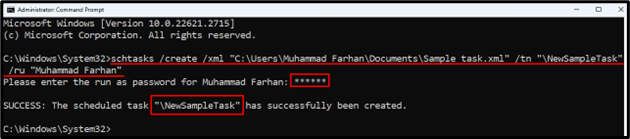
Step 3: Type the mentioned command in the console to import the scheduled tasks:
Executing the above command will ask user’s password, so, enter the password when asked to complete the operation:
Export Scheduled Tasks Using Command Prompt (CMD)
Alongside importing scheduled tasks can be exported to an XML file using Command Prompt. To export the scheduled tasks using CMD, check the mentioned steps.
Syntax
Here is the syntax for exporting scheduled tasks using PowerShell:
According to the above code:
-
- First, use the schtasks /query /xml command to display one or more scheduled tasks in XML format.
- Then, use the /tn command to specify the task name.
- After that, use the > (greater than) sign and assign the targeted file path where the scheduled task will be exported.
Remember: Replace “Scheduled-Task-Name” with the scheduled task name, and “TASK-EXPORT-NAME.xml” with the targeted file path where you want to export the scheduled task.
Step 1: Open CMD as an administrator:
Step 2: Execute the given code in the PowerShell console:

Conclusion
To import the scheduled tasks using PowerShell, first, press Windows + X to open the Quick Start Menu and select Windows PowerShell (Admin). Type Register-ScheduledTask -xml (Get-Content “Task-Path-to-be-Imported” | Out-String) -TaskName “Task-Name” -TaskPath “Task-Path-TaskScheduler” -User Computer-User-Name -Force command. Make sure to update these parameters “Task-Path-to-be-Imported”, “Task-Name”, and “Task-Path-TaskScheduler” before executing this command. To export the scheduled tasks using PowerShell, execute this Export-ScheduledTask -TaskName “Task-Name” -TaskPath “Task-Path-Where-it-is-Located” | Out-File “Path-Where-Task-Will-be-Exported” command. Make sure to update the “Task-Name”, “Task-Path-Where-it-is-Located”, and “Path-Where-Task-Will-be-Exported” parameter values before executing this command. Additionally, the method to import and export schedules using the Command Prompt.
Source: linuxhint.com