How to Get Started With Kubernetes and Kubectl on Windows
In software development, building, managing, deploying, and shipping the application in containers is one of the most used and isolated approaches. Different container runtimes are used to containerize the applications such as Docker engine, CRI-O, Podman, containerd, and so on. To manage the containers in container runtime, roll out changes, monitor the applications, or operate multiple container runtimes, the developers usually consider and use Kubernetes.
In this article, we will demonstrate:
- What is Kubernetes?
- Kubernetes Architecture
- How to Get Started With Kubernetes and Kubectl Using Docker Desktop?
- How to Get Started With Kubernetes and Kubectl Using Minikube?
- Conclusion
What is Kubernetes?
Kubernetes is a free open-source container composition or orchestration (coordination of multiple containers) system that is used to develop, manage, and deploy applications and software. The Kubernetes is used by the developers to automate the operational task, roll back the changes, and monitor and scale the applications and software.
Kubernetes Architecture
Kubernetes offers an adaptable and flexible architecture that consists of different components. It is used to discover the services and maintain loose connections within the Kubernetes cluster. The major components of Kubernetes architecture are listed below:
Kubernetes Cluster
When the user starts working with the Kubernetes, it creates a cluster known as the Kubernetes cluster. It is a primary component of Kubernetes. It consists of a Master and multiple slave node or at least one node that acts as master and slave at one time. The master node is also known as the Control Plane in Kubernetes used to manage the slave node and schedule the container efficiently. In contrast, the slave node manages the containers in pods, Kubelets, and Kube-proxy:

Kubernetes Control Plane
The Kubernetes Control Plane is a master node in the Kubernetes cluster that is responsible for making decisions for the cluster such as scheduling the containers or nodes according to configuration, exposing API, and communicating with working nodes:
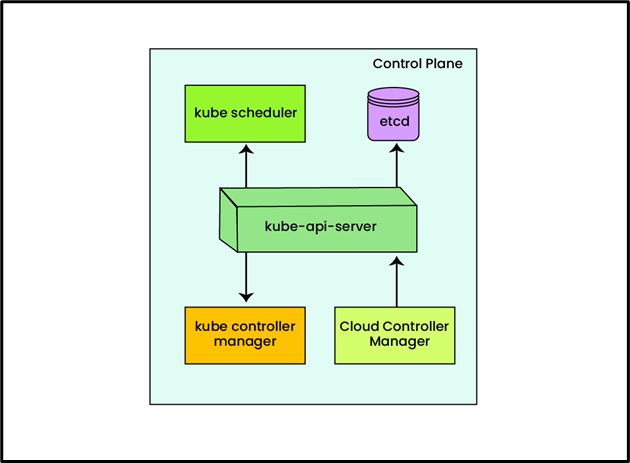
The Kubernetes control plane contains the following components:
-
- kube scheduler
- kube controller manager
- cloud controller manager
- kube-api-server
- etcd
kube scheduler
The kube scheduler is one of the control plane components that is used to monitor the newly created pod that currently is not part of any node. It selects or allocates the node to that pod to execute it. It is responsible for scheduling the resource requirements, applying hardware, software, or policy constraints, data locality, deadlines, and inter-workload interference.
kube controller manager
The kube controller manager is used to run the controller processes. Actually, it runs the different processes or controllers within a single binary process. Its main task is to match or align the desired and current state of the object within the node.
There are different types of controllers and some of them are listed below:
-
- Node Controller: It is used to manage the working nodes. Basically, it notices the node and responds when the node goes down.
- Job Controller: It is used to monitor the idle job or task that needs to be run. Then, it creates a pod to fulfill the task.
- Replication Controller: It monitors and maintains the desired container count within the replication cluster.
- Service Control Controller: It creates and manages the new service account for the new namespace.
- EndpointSlice Controller: It is used to populate the endpoint object to provide the link between pods and services.
cloud controller manager
The cloud controller manager is another important element of the Kubernetes control plane that is only available in the cluster that is running on the user cloud provider. If users are using the Kubernetes on a personal computer, the cluster does not include any cloud controller manager.
The cloud controller manager is used to embed the cloud-specific control logic and enable the user to link the cluster to their cloud provider’s API. The cloud controller manager also has different types of controllers such as “Node Controller” to manage the node, “Route Controller” for setting up the route, and “Service Controller” to manage the services of the cloud provider such as creating, deleting or updating load balancer.
kube-api-server
The Kube api server is considered as a front end of the Control plane through which all components within a cluster can interact. It sends the REST operations, performs administrative tasks, and exposes the Kubernetes API.
etcd
The etcd is considered as the storage unit of the Control plane. It is a distributed, consistent Key value store that is used to store all cluster data such as cluster state and configurations. It is the place where Kubernetes stores all its information.
Kubernetes Node
Kubernetes nodes are also known as working nodes that provide the Kubernetes runtime environment. These nodes are responsible for managing and running applications within container runtimes. These nodes are controlled and managed by the Control plane(master node). Each node can operate and run multiple pods and containers:
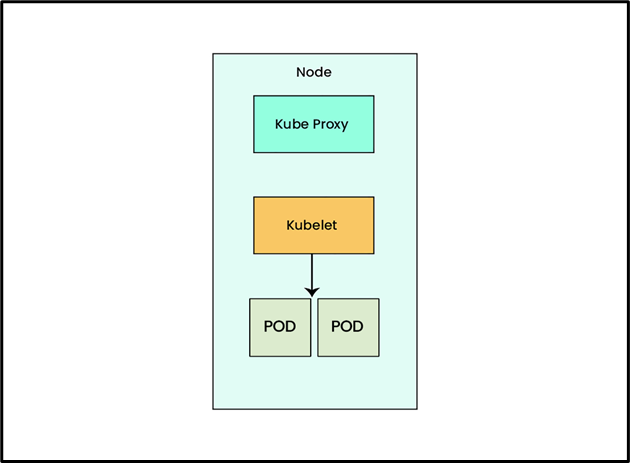
The major components of the Kubernetes node are listed below:
-
- Kube proxy
- Kubelet
- Pod
Kube proxy
The kube proxy in Kubernetes is a network proxy that executes on each node of the Kubernetes cluster. It manages and controls the network rules and allows the network communication to Pod or containers from network sessions within or outside of the Kubernetes cluster.
Kubelet
Kubelet is an agent of Kubernetes that runs on each node of the Kubernetes cluster. It is basically used for interaction purposes and is also responsible for the execution of containers within pods. It makes sure that containers described in pods are executed and in a healthy state. The communication between the Control plane and the working nodes is also done through kubelet.
Pod
Pods are another major component of the Kubernetes cluster that execute multiple container applications or software.
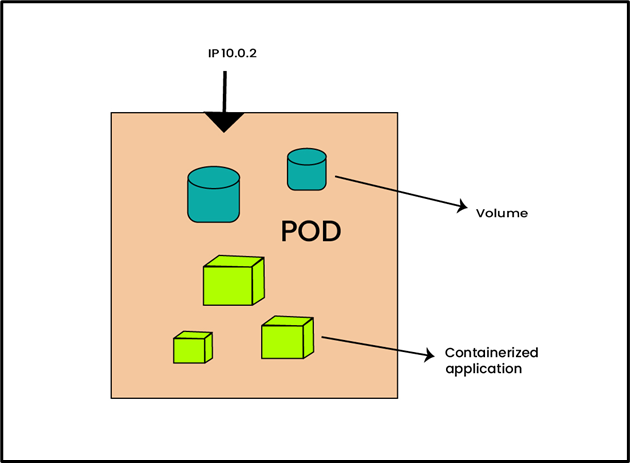
Kubernetes Pod
Kubernetes Pod is another small deployable component of the Kubernetes cluster that executes within the working node. Each Kubernetes node can execute multiple pods. Each Kubernetes Pod consists of multiple containers with shared network and storage resources. These pods provide isolation just like the container’s isolation. Within each Kubernetes pod, the two major components exist that are:
-
- Volume: Volume is referred to as a shared file system or storage option that persists the container data. It is an external storage mechanism that connects the containers to a persistent storage unit.
- Container: Containers are lightweight executable packages that encapsulate that program along with dependencies and configurations. It is an isolated virtual environment that uses OS level of virtualization and shares OS among applications:
How to Get Started With Kubernetes and Kubectl Using Docker Desktop?
To get started with Kubernetes, users need to start the Kubernetes node. For that particular purpose, users can use the Docker Desktop application as it is one of the well-liked container runtimes. To start development with Kubernetes, first, install the required tools and start playing with Kubernetes with the help of the following steps:
Step 1: Install Docker Desktop
Docker Desktop is the GUI platform and containerization system that permits developers to build, run, and ship applications and software in an isolated environment. Users can use it as a Kubernetes container runtime as well to start the Kubernetes node inside the Kubernetes cluster. To install and set up a Docker environment on Windows, go through our associated “Install Docker Desktop on Windows” article.
Step 2: Install Kubernetes
After installing the Docker Desktop application, launch the app and install Kubernetes by enabling it from the Docker Desktop settings. For illustration, follow the provided procedure.
Launch Docker Desktop Application
First, launch the Docker Desktop application by searching it in the Windows Startup menu:

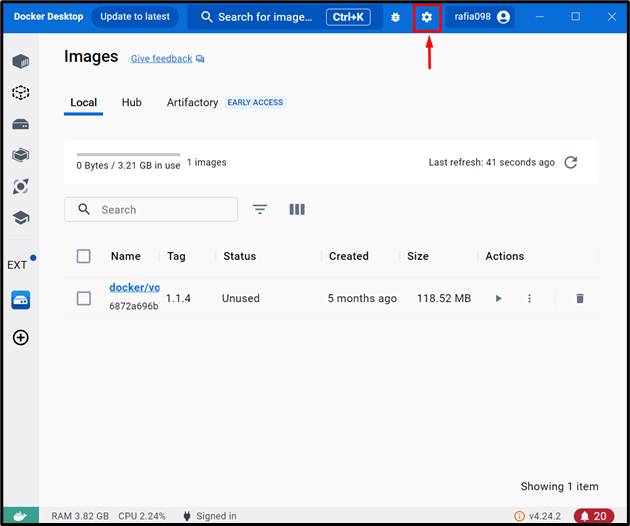
Navigate to Docker Settings
Next, click on the “Settings Gear” icon to open the Docker Desktop settings:
Install Kubernetes
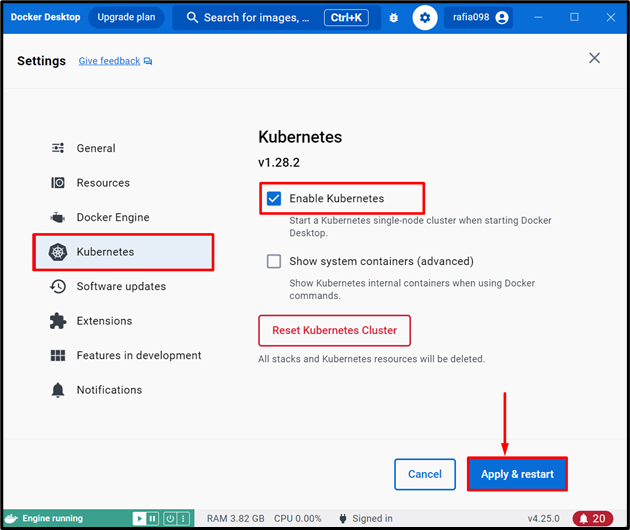
Navigate to the “Kubernetes” option from the left pane. After that, mark the below pointed “Enable Kubernetes” icon and hit the “Apply & restart” button:
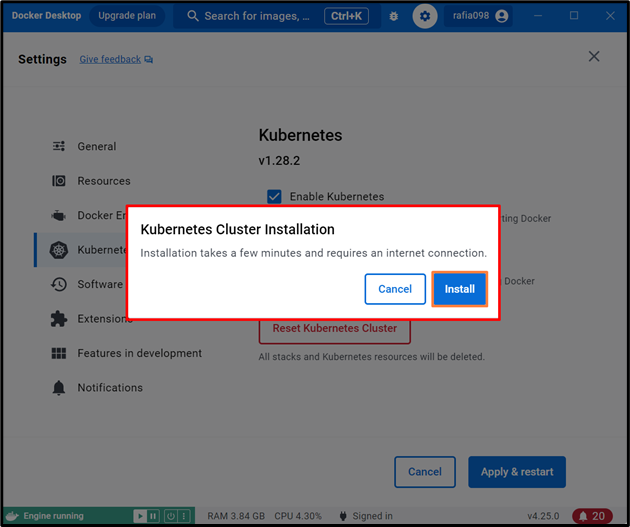
Upon doing so, the “Kubernetes Cluster Installation” box will appear on the screen. Hit the “Install” button to install Kubernetes:
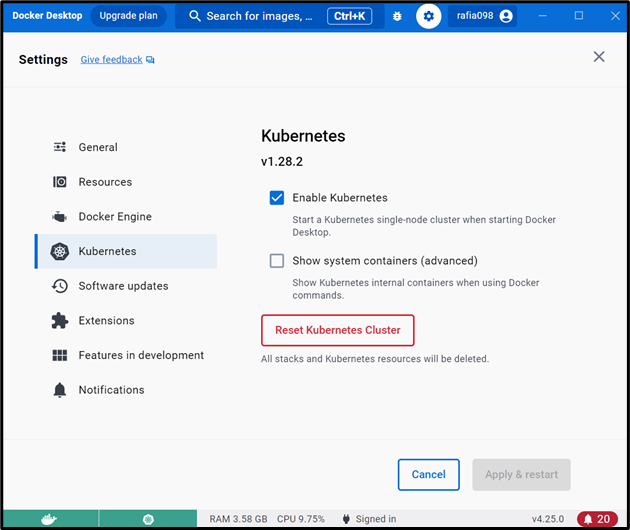
The below output indicates that we have successfully installed and started the Kubernetes cluster using the Docker Desktop application:
Step 3: Install Kubectl
The kubectl is a Kubernetes command line tool that is used to manage and operate the Kubernetes cluster. To perform any operation within Kubernetes, users are required to have the kubectl tool on their system. To install kubectl on Windows, first, download the “kubectl.exe” file. After that, set the Path environment variable to use the “kubectl” command in the Windows terminal.
For illustration, go through the following steps.
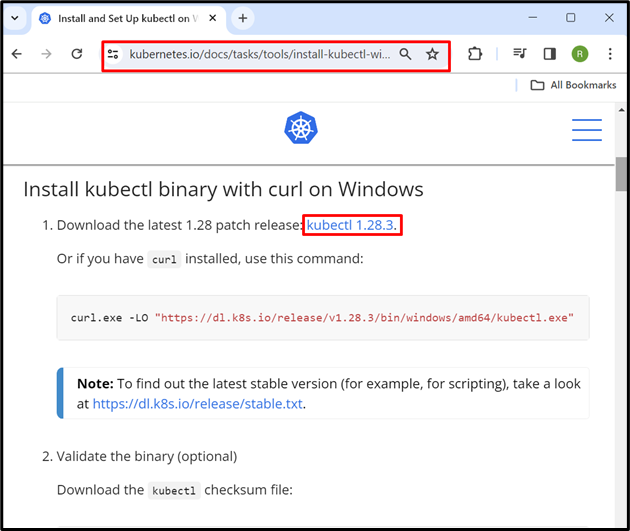
Download Kubectl For Windows
To download the latest and stable version of the kubectl tool for Windows, navigate to the Kubernetes official website and click on the below-highlighted link:
Alternatively, the user can use the “curl” command to download the “kubectl.exe” file. For this purpose, first launch the Windows terminal such as PowerShell or Command Prompt. After that, execute the below-given command:

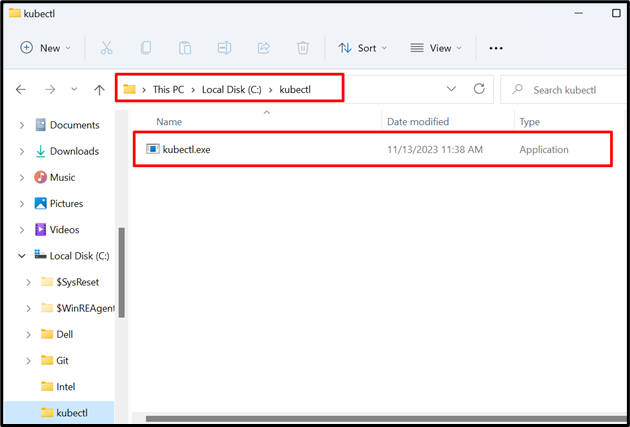
Move Kubectl Execution File to C Drive
By default, the tool will be downloaded in the “Downloads” directory. It is better to move its executable file to the “C” local disk. For this purpose, first, create a new folder named “kubectl” in the “C” local disk. After that, move the “kubectl.exe” file into the newly created directory:
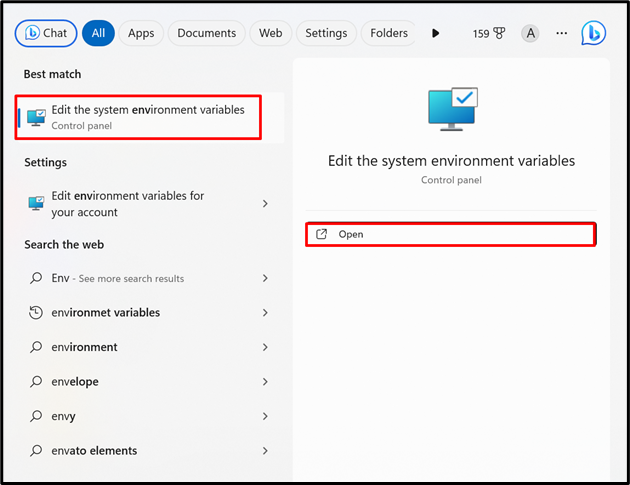
Open Environment Variable Control Panel Settings
Next, launch the “Environment variable” Control panel settings by searching it in the Startup menu:
Add Kubectl to Windows Path Variable
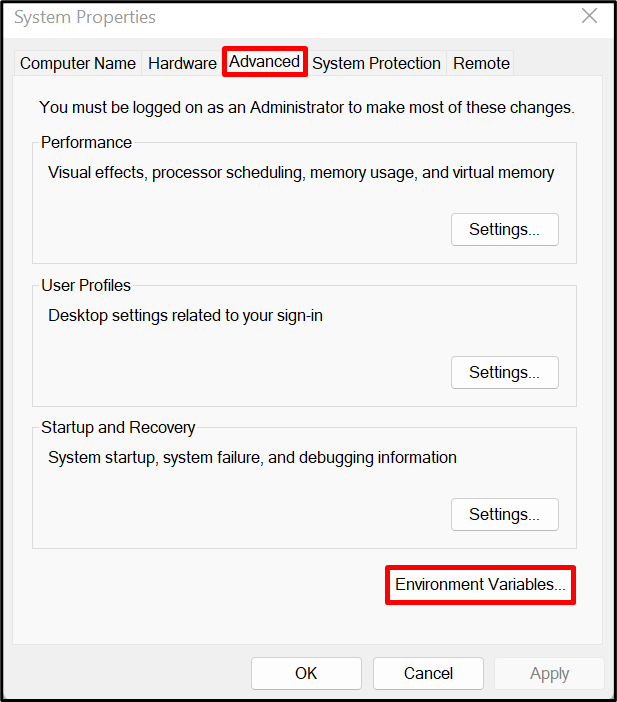
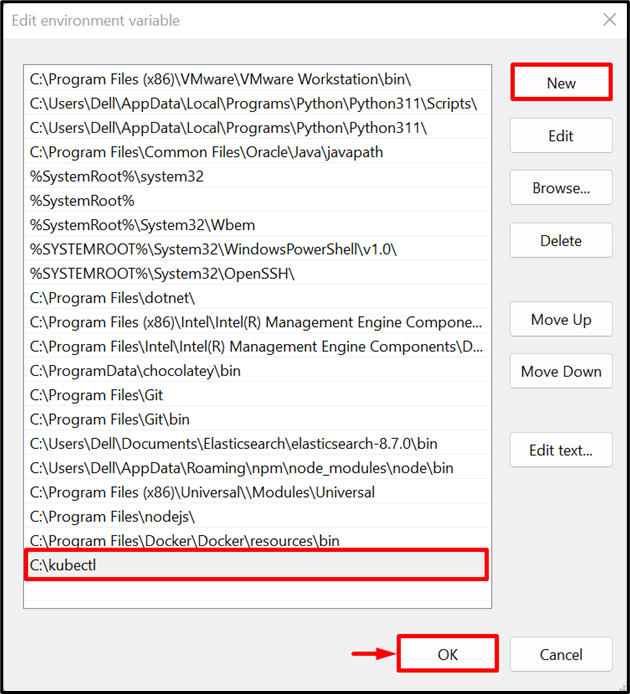
In order to access the kubectl command from the Windows command line, users are required to add the kubectl path to an environment variable. For this purpose, click on the “Environment Variables” button from the “Advanced” menu:
Click on the “Path” option under the “System variables” and hit the “Edit” button:
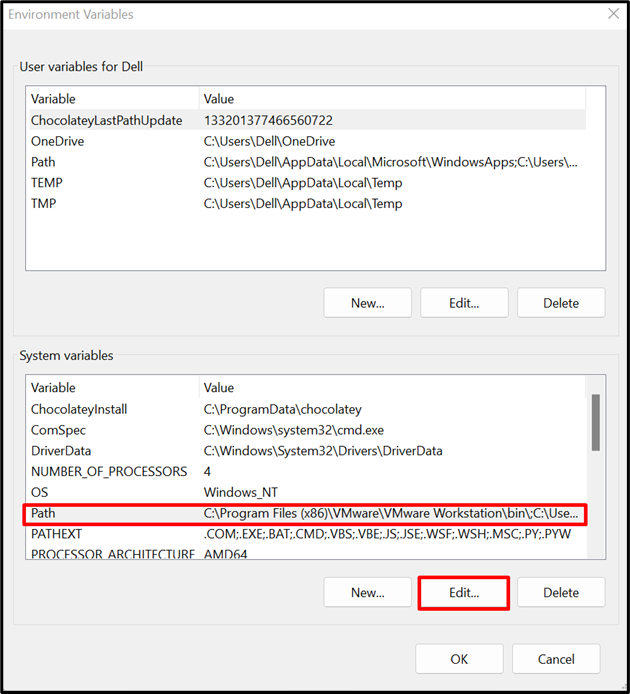
Next, first press the “New” button, paste the path where the “kubectl.exe” file exists, and hit the “OK” button:
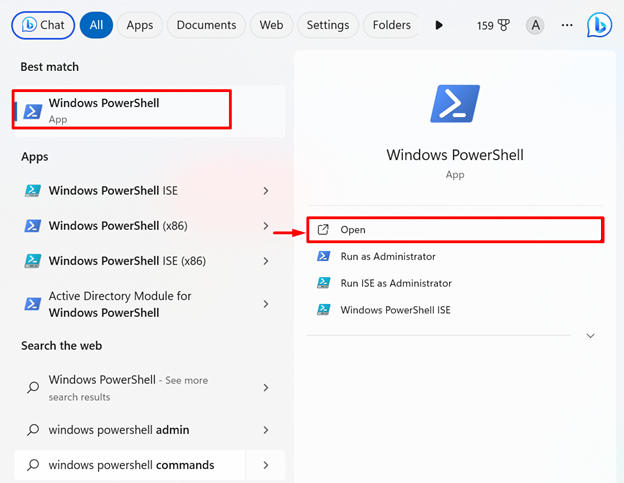
Verification
For verification, launch the Windows PowerShell via the Start menu:
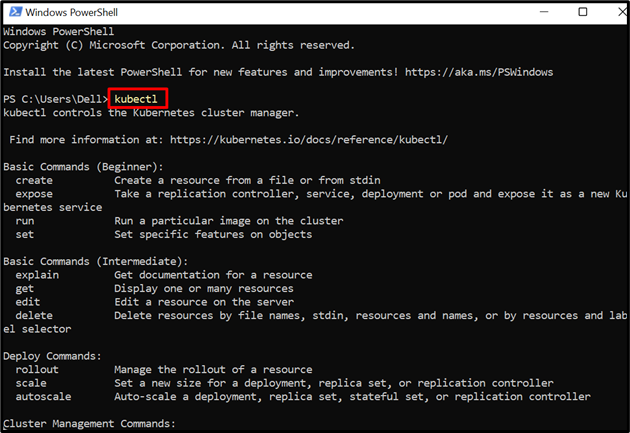
After that, run the “kubectl” command to confirm if we have effectively installed the Kubectl or not:
The below output indicates that we have installed the command successfully:
Use kubectl Command to Check Current Context
The “kubectl config current-context” command is used to access the current Kubernetes cluster context. When the user installs the Kubernetes on the system, this command will point to the Kubernetes cluster executing on the system. To access the current Kubernetes context, execute the below command.
Here, you can see we are using Docker desktop to operate and run the Kubernetes server:

Step 4: Use Kubectl to Create and Run the First Pod
To run the first application in Kubernetes pod and to use the kubectl command, follow the below demonstration.
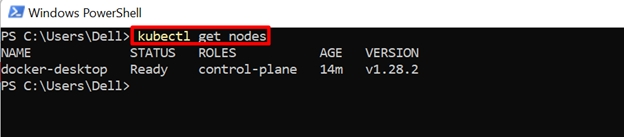
Get Kubernetes Nodes
First, access the current executing nodes using the “kubectl get nodes” command:
The output shows that currently, only one node is running which is “docker-desktop” and it is a master node and also works as a working node:
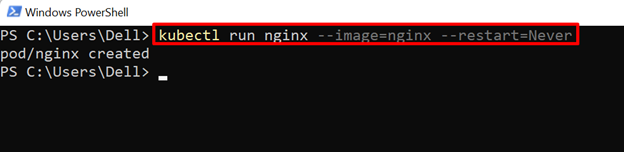
Create a New Pod
Next, build a new pod to containerize the simple Nginx application. For this purpose, utilize the given command:
In the above command, the “–image” option is used to specify the image that isolates the application within the container, and this container will execute inside the “nginx” pod. The “–restart” option is utilized to specify the restart policy of the Kubernetes pod:
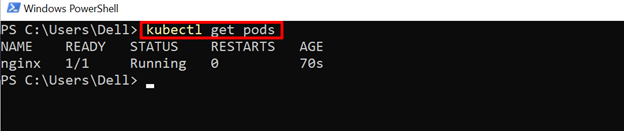
Get Pods
After creating the kubectl pod, verify that if the pod is successfully running or not. For this purpose, access the Kubernetes pods using the “kubectl get pods” command:
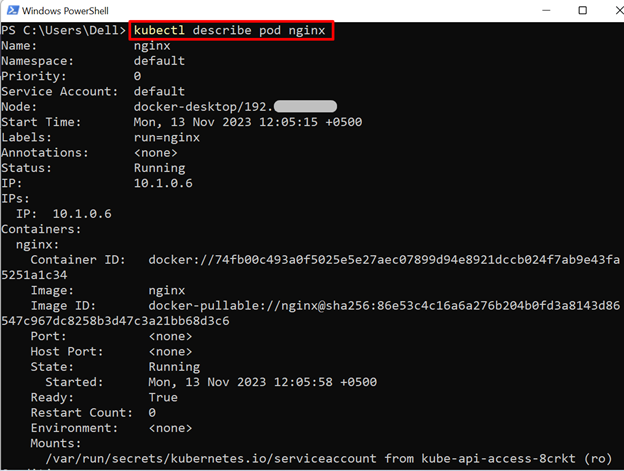
Describe Pod
In order to access the detailed configuration of the executing pod, describe the pod using the “kubectl describe pod <pod-name>” command:

Access Application Running in Pod
To verify if the application is running inside the pod, the user needs to have the IP address of the pod where the application is executing. For this purpose, access the pod with complete status using the “-o wide” that shows the entire information of the pod including the IP address:

Access the Kubernetes Pod
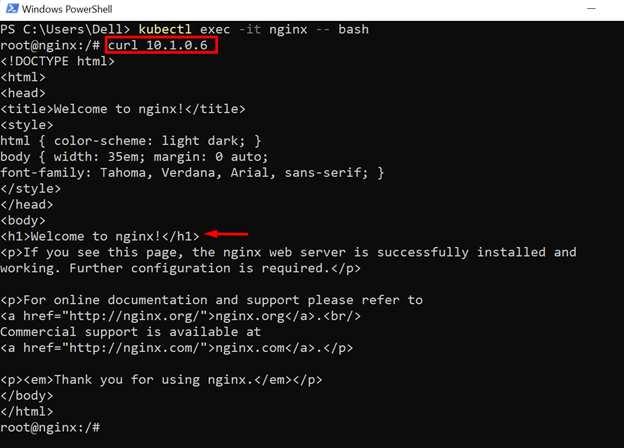
To access the application that is running inside the container of the pod, first access or login to the pod using the “kubectl exec -it <pod-name> bash” command:

Note: In the above output, this command is running but deprecated as well in kubectl utility and may be removed in an upcoming version.
To run the latest command to access the Kubernetes pod, use “kubectl exec -it <pod-name> — <command>” command:

After accessing the pod shell, ping the IP address of the command to verify whether the Nginx application is effectively running inside the container or not:
The below output indicates that the application is effectively running inside the Kubernetes pod:
That is all about getting started with Kubernetes and kubectl using the Docker Desktop application on Windows.
How to Get Started With Kubernetes and Kubectl Using Minikube?
To start working with Kubernetes and to use the kubectl command line utility to operate the Kubernetes cluster, users need to have a platform on which they can operate and execute the Kubernetes cluster. For this purpose, they can use the minikube Kubernetes implementation software.
To get started with the Kubernetes cluster using minikube, follow the below-listed steps:
Step 1: Install Minikube
Minikube is a lightweight Kubernetes implementation that creates a simple virtual machine to execute the Kubernetes cluster that can only operate and run a single Kubernetes node. It is mostly used by developers for experimenting or testing purposes. It is also used by beginners to understand the Kubernetes works.
To install the “minikube” on Windows, the user can use the following approaches:
Method 1: Install Minikube Using Installer
To install the minikube installer on Windows, first, go to minikube official website. Scroll down to the installation step, choose the “Windows” operating system, system architecture according to system specification, “Stable” release, and “.exe download” installer type. After that, click on the below highlighted “latest release” link to install the minikube installer:

Run the Installer
By default, the installer will be downloaded in the “Downloads” directory. After downloading, navigate to the “Downloads” directory, double-click on the minikube installer to execute it:

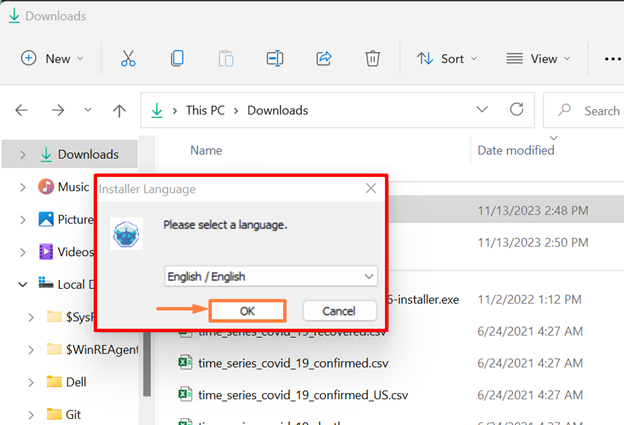
Next, choose the language in which you want to access the installation configuration and instructions. Then, press the “OK” button:
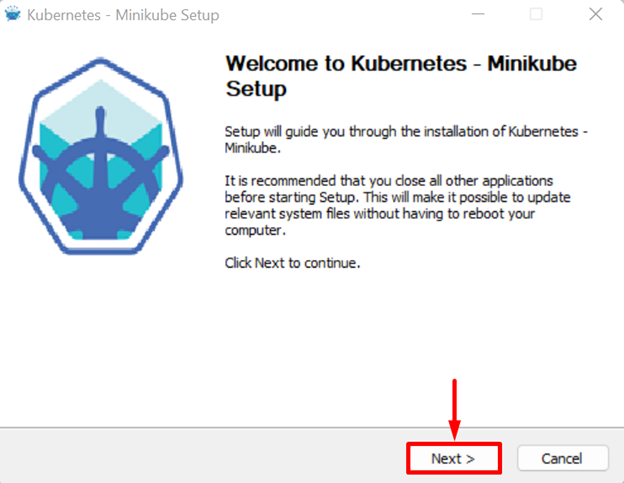
Install Minikube
The “Kubernetes Minikube setup” window will appear on the screen. Hit “Next” to proceed with the installation process:
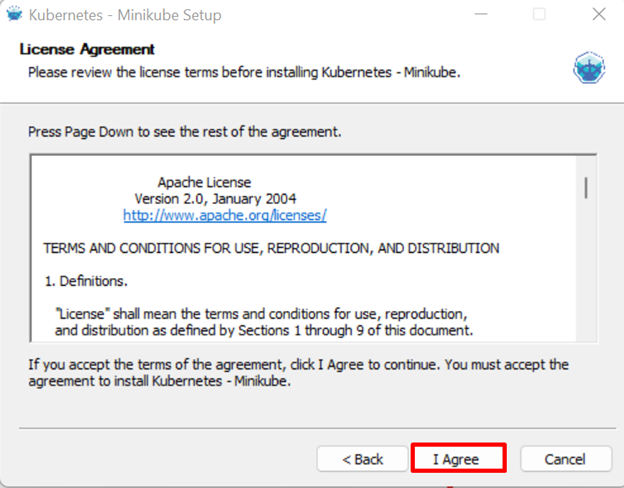
First, accept the license agreement by clicking on the “I Agree” button:
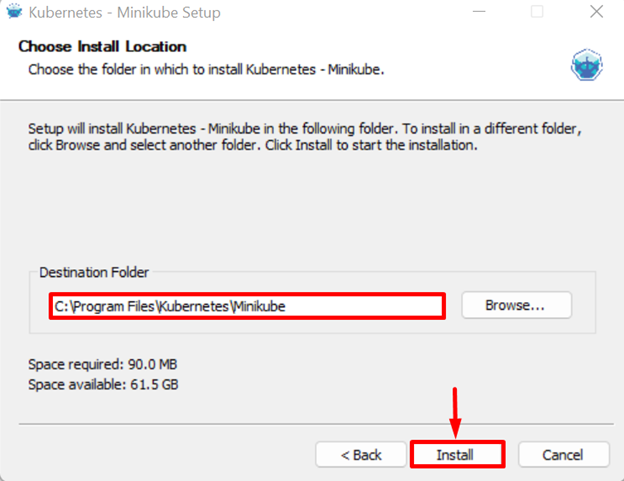
Next, browse the location where you want to install minikube and hit the “Install” button:
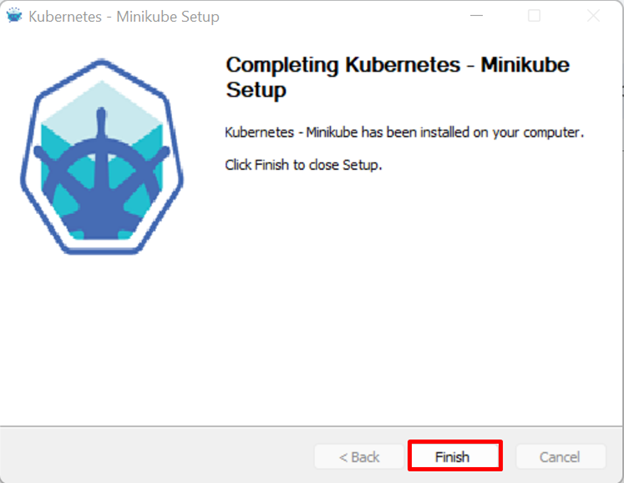
After completing the installation process, hit the “Finish” button:
This will install the minikube on the system and also automatically set its path to the Windows path variable.
Verification
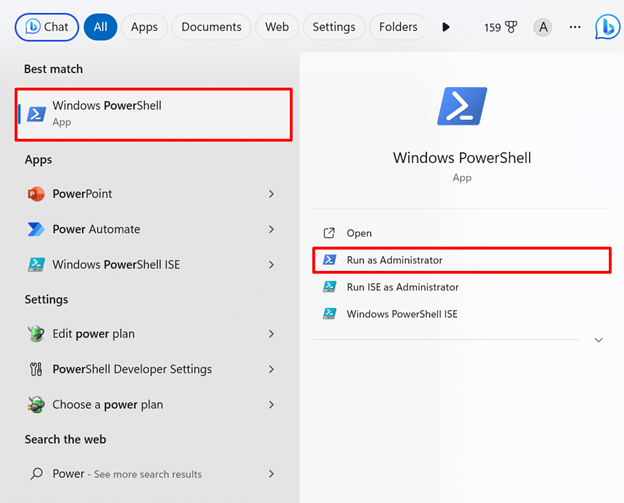
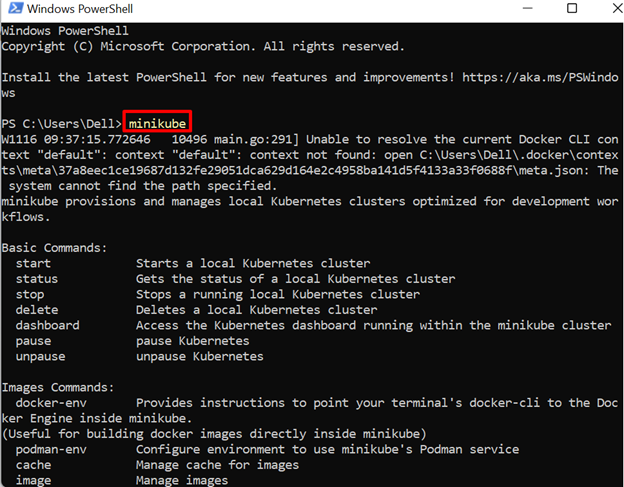
To verify if we have installed the minikube on the system correctly or not, first launch the Windows PowerShell terminal as an administrator:
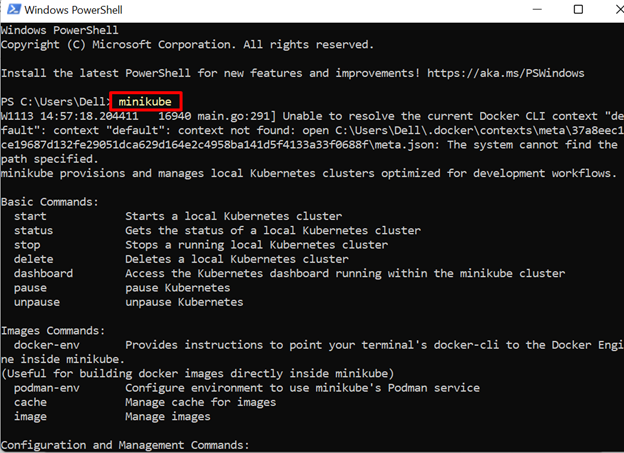
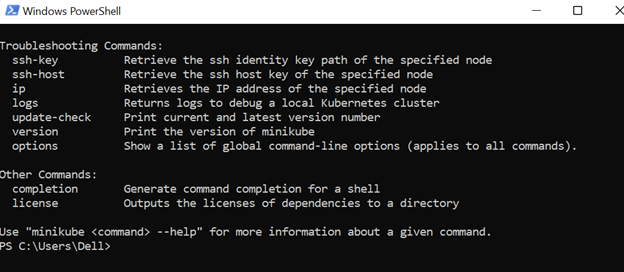
Next, execute the “minikube” command. This should show you the minikube supported commands:
The below output shows that we have effectively installed the minikube on the system:
Method 2: Install Minikube Using PowerShell
To install minikube on Windows using the command line, first, launch the Windows PowerShell with administrative privileges. After that, execute the below commands.
Create “minikube” Directory
First, create a new directory in the Windows “C” disk. To do so, utilize the below command:

Download minikube Executable File
Next, run the below command to download and install minikube on the system. In the below command, the new “minikube.exe” file will be created, and the configurations are written in that file from provided setup:

Add minikube to Windows Path
After installing the minikube, the user needs to add it to the Windows Path environment variable. For this purpose, execute the following commands:
if ($oldPath.Split(';') -inotcontains 'C:\minikube'){
[Environment]::SetEnvironmentVariable('Path', $('{0};C:\minikube' -f $oldPath), [EnvironmentVariableTarget]::Machine)
}

Note: After completing the process, the user needs to close the Windows PowerShell and relaunch it to use minikube commands:
For verification, execute the “minikube” command:
That is all about the installation of Minikube on Windows.
Step 2: Install kubectl
The kubectl is a Kubernetes command line tool that manages and operates the Kubernetes cluster. To install kubectl on Windows, follow the procedure that is described in the above section “How to Get Started With Kubernetes and Kubectl Using Docker Desktop?”.
Step 3: Enable Windows HyperV
Virtual support is necessary to run the Kubernetes cluster on minikube Windows. Because Minikube required the container or virtual machine to run the Kubernetes cluster on Windows. To use the Windows built-in virtualization (HyperV), users are required to enable it first on the system. To do so, go through the following instructions:
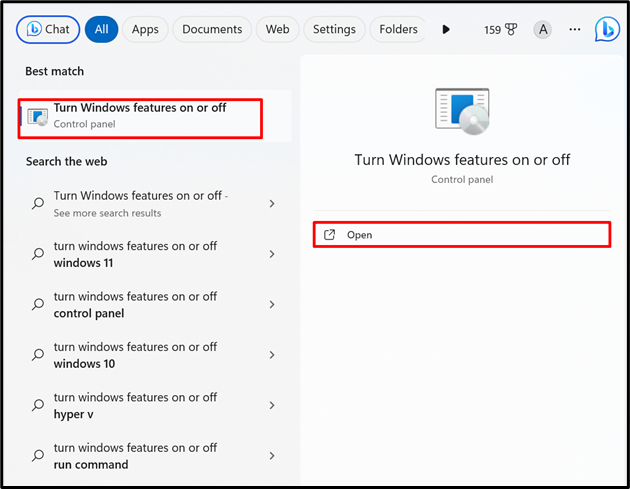
Launch “Turn Windows features on or off” Settings
First, open the Windows Start menu, search for the “Turn Windows features on or off” Control panel setting, and launch it from the search the results:
Enable HyperV Virtualization
Next, mark the below highlighted “Hyper-V” checkbox and hit the “OK” button:
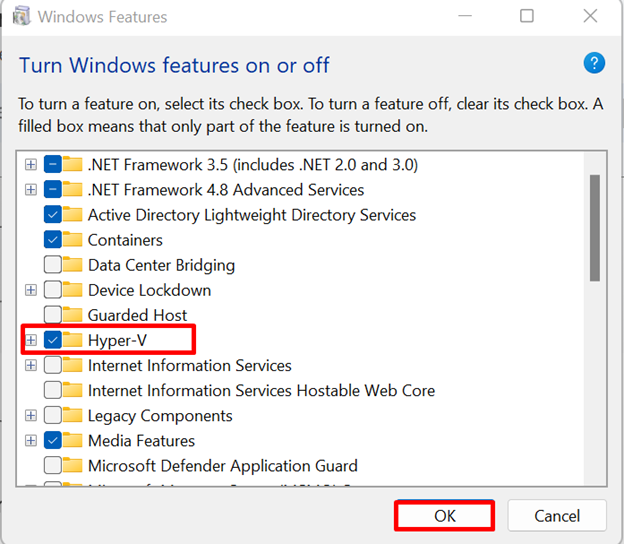
After enabling the Hyper-V on Windows, restart the system to implement the changes.
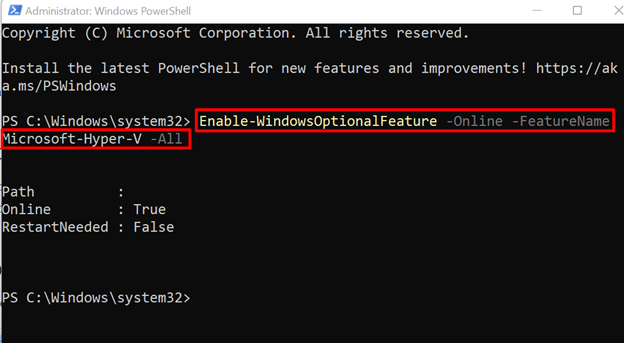
Enable Virtualization Via PowerShell
Alternatively, the user can enable the Hyper-V virtualization via Windows PowerShell. For this purpose, first, launch the PowerShell as administrator. After that, run the following command:
Step 4: Start Kubernetes Cluster or Node
After completing the installation process of Minikube and kubectl, start the first instance or Kubernetes node inside the Kubernetes cluster. For this purpose, simply execute the “minikube start” command:
At that point user may encounter some error and fail to start the Kubernetes instance on minikube as highlighted below:
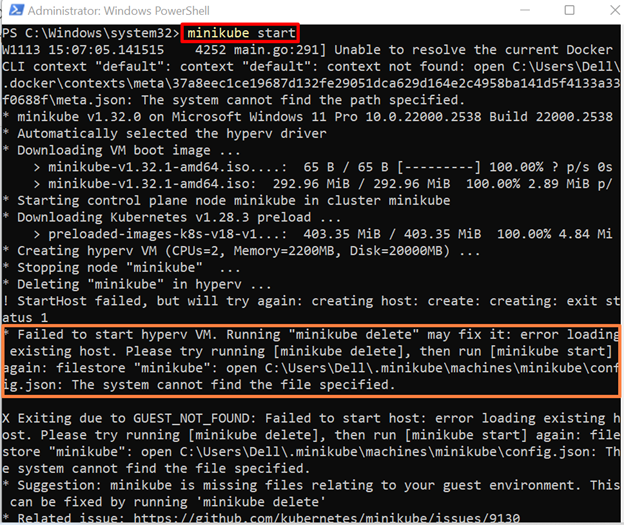
Resolve the “Failed to start hyperv VM” Error
To resolve the “Failed to start hyperv VM” error, the user needs to delete the Kubernetes node from minikube using the “minikube delete” command:
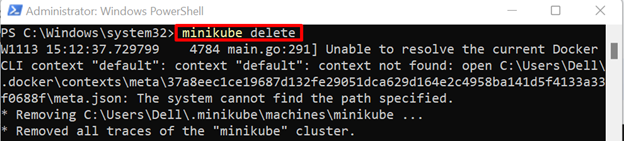
After that, again run the “minikube start” command to start the new Kubernetes cluster:
Here, you can see we have resolved the encountered error and effectively start the minikube cluster (Kubernetes cluster):
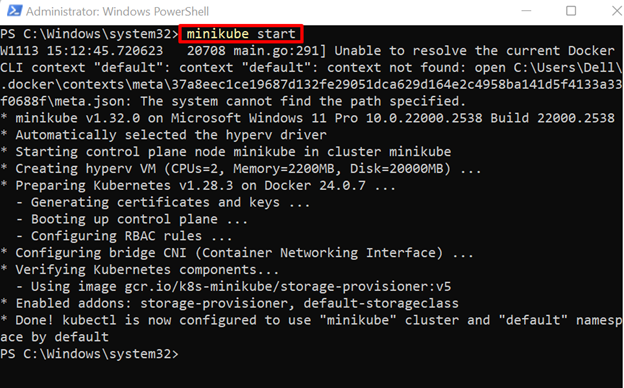
Note: Minikube can run only one node in the Kubernetes cluster. The corresponding node will act as both the Control plane node and the working node.
Verification
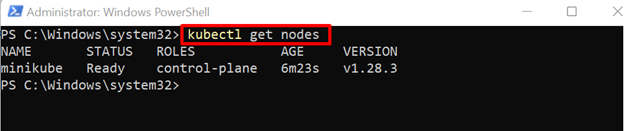
For verification, check the Kubernetes node to verify if the Kubernetes cluster is executing on minikube or not:
Here, you can see we have successfully started the “minikube” Kubernetes node on Windows:
Step 5: Use Kubectl to Create and Run the First Pod
Execute the first application in the Kubernetes Pod using kubectl command line utility by following the below instructions.
Create a New Pod
To create a new pod and to containerize the Nginx application, execute the below command:

View the Pod IP Address
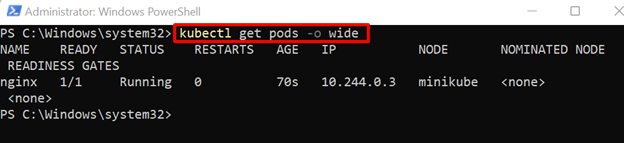
For verification, view the Kubernetes pods using the “kubectl get pods” command. Note the IP address of the pod to access the encapsulated Nginx application:
Login to Minikube Cluster
To access the application running in a pod, the user needs to access the Kubernetes node in which the pod is executing. To do so, use the “minikube ssh” command:

Verify Application is Executing in Pod
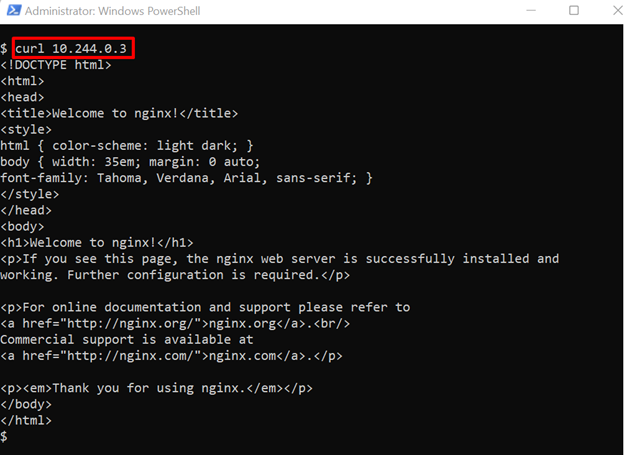
After accessing the shell of the Kubernetes node, utilize the “curl” command along with the IP address to verify if the Nginx default page is executing or not:
The output shows that we have successfully executed the new application within Pod of Kubernetes node:
That is all about Kubernetes and kubectl on Windows.
Conclusion
To use Kubernetes and kubectl on Windows, users can run the Kubernetes cluster as a server on the Docker Desktop application and also on minikube. To get started with the Kubernetes cluster, users need to install Docker Desktop or minikube on the system. On Docker Desktop, enable and install the Kubernetes. On minikube, there is no need to install Kubernetes. Next, install the “kubectl” command line tool to operate the Kubernetes cluster and start playing with the Kubernetes cluster. This blog has illustrated how to get started with Kubernetes and kubectl on Windows.
Source: linuxhint.com