How to Generate a Docker Image From a Container
Sometimes, users make changes in container and configuration settings, but these changes are not committed in the Docker image. To save the container changes to the image or to create the container backup, users are required to build a new image from the container. For that specific purpose, the “docker commit” command can be utilized.
This guide will demonstrate:
- What is the “docker commit” Command?
- How to Generate an Image From a Docker Container?
- How to Set the Author of an Image?
- How to Set the Commit Message of the Image?
- Conclusion
What is the “docker commit” Command?
The “docker commit” command is one of the command line utilities of Docker that is used to commit the container changes and settings into the Docker image. It is also used to create the container backup when users are required to declutter the Docker by removing the Docker containers. However, the docker commit command only includes the container file and configuration changes in the Docker image, it will never save the data of the volume that is mounted with the container.
Syntax
Options
The following options are used with the “docker commit” command to create an image from a container in different ways:
<td><strong>Description</strong></td>
</tr>
<tr>
<td><strong>-a, –author </strong></td>
<td>It is used to specify the name of the author that is committing the container’s changes in the image.</td>
</tr>
<tr>
<td><strong>-c, –change </strong></td>
<td>Add the Dockerfile instructions to commit the changes in an image.</td>
</tr>
<tr>
<td><strong>-m, –message</strong></td>
<td>Add the commit message or comment while generating an image from the container.</td>
</tr>
<tr>
<td><strong>-p, –pause</strong></td>
<td>While committing the container, by default, the container will be stopped or paused. To stop the container from pausing, the “<strong>–pause=false</strong>” option is used.
How to Generate an Image From a Docker Container?
When the user makes changes in the Docker container directly through the container shell or non-interactively, these changes do not modify the container snapshot. To save or commit modifications, the user can generate a new image from the container using the “docker commit” command. This is also helpful for creating the backup of the container.
To create an image via the Docker container, go through the following illustration.
Step 1: Make Dockerfile
First, make a new file named “Dockerfile” and do not add any file extension with the file name. After that, paste the following commands into the “Dockerfile”
COPY index.html /usr/share/nginx/html/index.html
ENTRYPOINT ["nginx", "-g", "daemon off;"]
Here, the “FROM” command is utilized to define the container base image, the “COPY” command copies the program file to the container specified path, and the “ENTRYPOINT” command sets the default executables of the container.
Step 2: Make Program File
Next, create another file “index.html” and add the following HTML code to the file:
<head>
<style>
body{
background-color:rgb(9, 4, 4);
}
h1{
color:rgb(221, 219, 226);
font-style: italic;
}
</style>
</head>
<body>
<h1> This is First HTML page </h1>
</body>
</html>
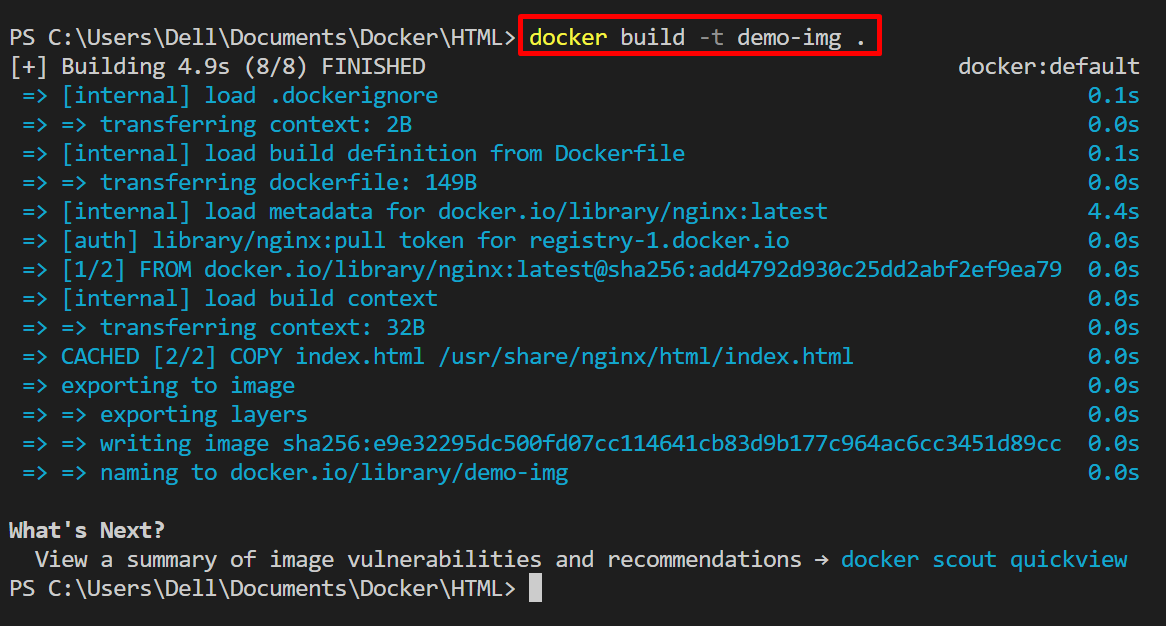
Step 3: Build Container’s Snapshot
Now, generate the container’s snapshot from the Dockerfile using the below command. Here, the “-t” option is utilized to set the name of the snapshot:
Step 4: Run Snapshot to Start Container
Next, start the container by executing the container image. For this purpose, utilize the “docker run <snapshot-name>” command:
In the above command, the “-p” option sets the exposing port of the container, “–name” specifies the container name and the “-d” option runs the container in detached mode:

After executing the container, navigate to the “http:/localhost:80” URL and check if the containerized program is accessible on the exposing port or not:
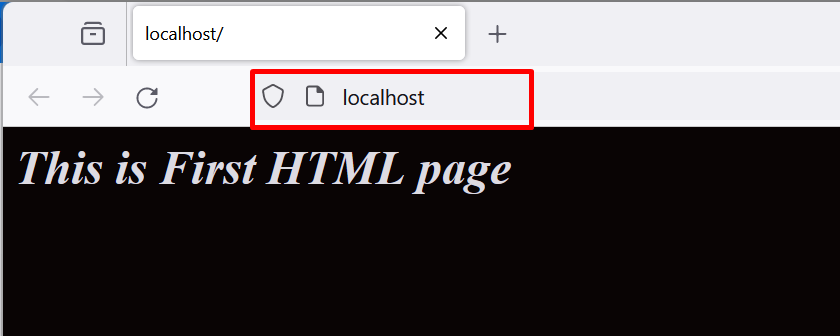
The above output shows that we have successfully started the container.
Step 5: Create a New Program File
Sometimes, users may be required to add additional functionalities to the running application. For this purpose, the user may need to make changes in the program file or may add additional files to the application.
For this purpose, let’s create another file named “index1.html” and paste the following code into the file:
<head>
<style>
body{
background-color:rgb(106, 103, 103);
}
h1{
color:rgb(221, 219, 226);
font-style: italic;
}
</style>
</head>
<body>
<h1> This is Second HTML page </h1>
</body>
</html>
Step 6: Copy New Program File in Container
To copy the new file into the container path, utilize the “docker cp <file-name> <cont-name>:<destination path of container>” command. Here, we have copied the “index1.html” file to the “demo-cont” container’s specified path:

Step 7: Commit the Container Changes in New Image
After making changes in a container, users are required to commit the changes to a new Docker image. This image will be generated through a Docker container. For this purpose, run the “docker commit <cont-name> <image-name>” command:

Note: Making changes in the Docker container before generating the image through “docker commit” command is not compulsory. Users can directly use the “docker commit” to generate the backup of the container by creating the image.
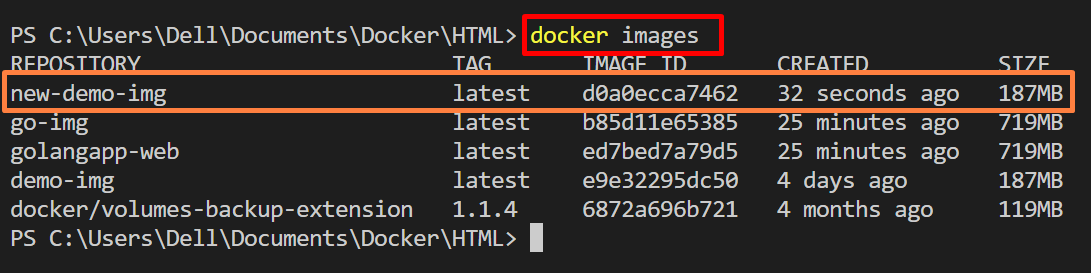
Step 8: Confirmation
To check whether the image is created or not through the container, list down Docker images by utilizing the “docker images” command:
The below output shows that we have successfully generated the “new-demo-img” from “demo-cont” container:
Note: To push the Docker image to the Docker hub registry, the user can also tag the image using the “docker tag” command:
Step 9: Remove Old Container
Now, remove the older container. For this purpose, first, stop the Docker container using the “docker stop <container-name>” command:

After stopping the container, utilize the “docker rm <container-name/container-id>” command to remove it from Docker:

Step 10: Run New Container From New Committed Image
Now, start the new instance or Docker container using the newly generated image through the “docker run” command:

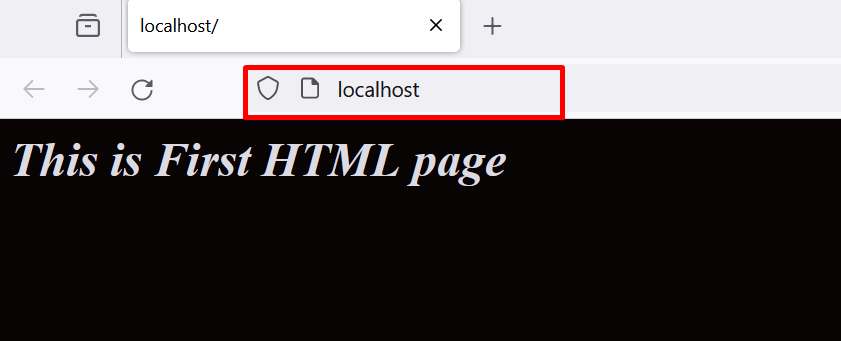
Now, navigate to the “localhost:80” port and check whether the HTML application is running effectively or not:
To check the newly copied file that is “index1.html”, utilize the “http://localhost/index1.html” URL:
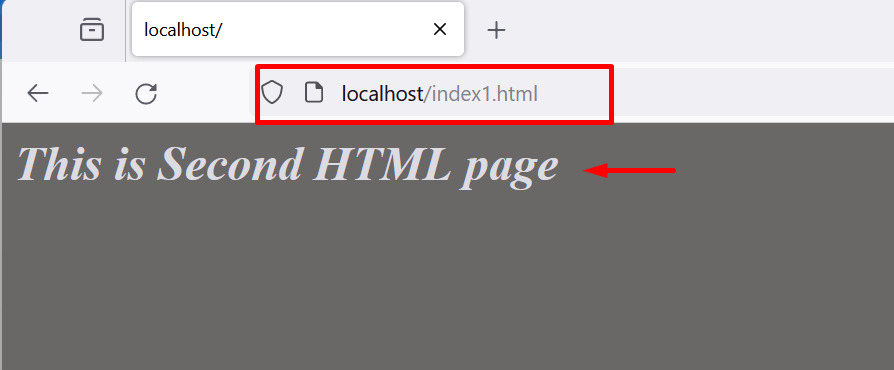
The above output shows that the committed changes are successfully saved in the “new-demo-img” Docker image and we have effectively run the modified container.
How to Set the Author of an Image?
The “docker commit” command also supports different options to add additional information along with committed changes such as the author of the new changes, commit message, and so on.
To specify the author of the image that is committing the new changes, go through the given steps.
Step 1: Set the Author of the Image
To specify the author of the image who is making the changes, utilize the “-a” or “–author” option along with “docker commit” command:

Step 2: Inspect the Image
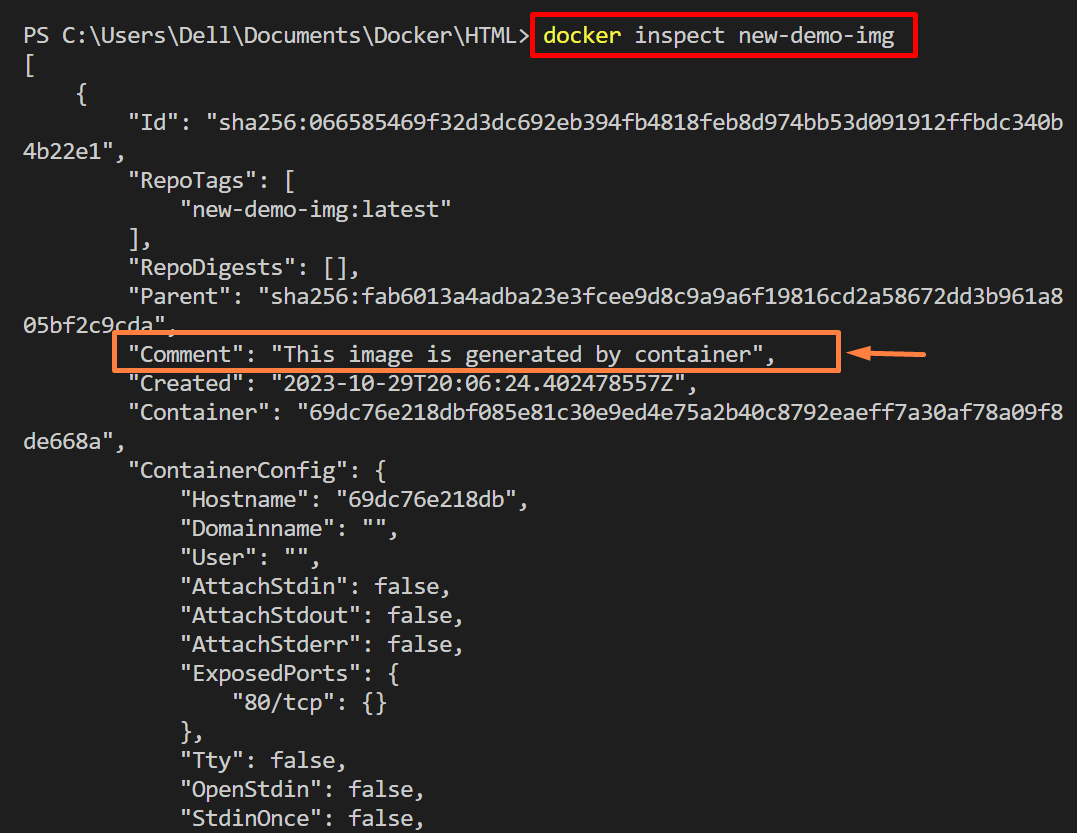
To verify whether the author of the image is set or not, inspect the newly generated image using the “docker inspect <image-name>” command:

The output shows that we have effectively set the author of the image:
How to Set a Commit Message of Image?
To set the commit message along with commit changes, utilize the “-m” option. For illustration, follow the below instructions.
Step 1: Set Commit Message of Image
To set the message along with committed changes, utilize the “docker commit -m <“message”> <cont-name> <img-name>” command:

Step 2: Inspect the Image
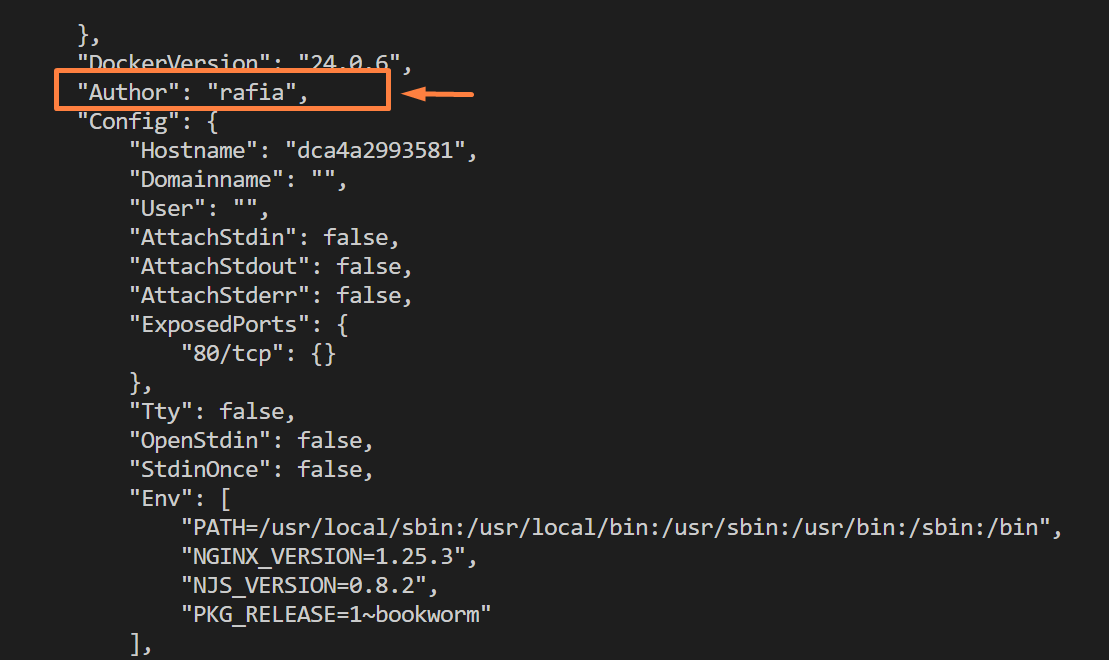
To check the commit message, inspect the image through the “docker inspect <image-name>” command:
Under the “Comment” key, the user can see the commit message as shown below:
That is all about generating a Docker image from a container.
Conclusion
To generate a Docker image from a container, first, make the changes in the Docker container. After that, utilize the “docker commit <cont-name> <image-name>” command to generate the image from the container. Now, remove the older container and start the new instance through the newly generated image. Users can also set the author name of the image using the “-a” option and commit the message using the “-m” option. This blog has illustrated how to generate images from a Docker container.
Source: linuxhint.com