How to Fix “High CPU Usage by audiodg.exe” in Windows 10
High CPU usage is carried out due to insufficient RAM or a process utilizing too many system resources that slow down the Windows. The “audiodg.exe” process is allocated for “Windows Audio Device Graph Isolation”. More specifically, the “High CPU Usage by audiodg.exe” limitation can be encountered due to the enabled audio effects, outdated sound driver, etc.
This write-up will state the approaches to resolve the “High CPU Usage by audiodg.exe” issue in Windows 10.
How to Fix “High CPU Usage by audiodg.exe” in Windows 10?
To fix “High CPU Usage by audiodg.exe” issue in Windows 10, utilize the below-given fixes:
Fix 1: Disable Audio Effects
Disabling the audio effects can help to lower the CPU usage and so it can resolve the discussed issue by applying the following steps.
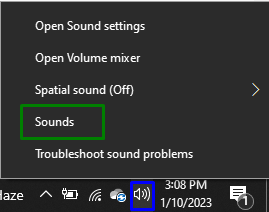
Step 1: Navigate to “Sounds”
First of all, right-click on the “Speaker” symbol at the right-bottom of the taskbar and hit “Sounds”:
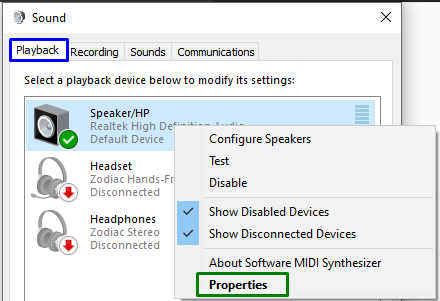
Step 2: Disable Audio Effects
Right-click on your audio device in the “Playback” tab and hit “Properties”:
In the opened pop-up, mark the “Disable all sound effects” checkbox in the “Enhancement” tab to eliminate the discussed issue.
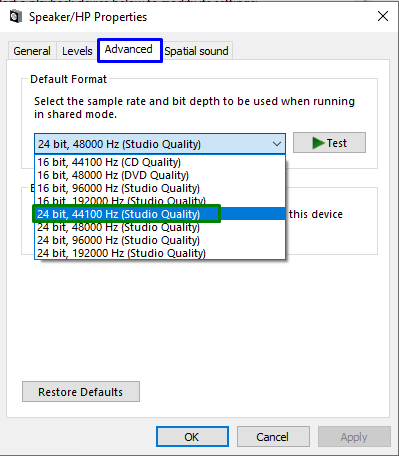
Fix 2: Configure the Audio Sample Rate
Lowering the audio sample rate can also limit CPU usage. Hence, apply this approach to cope with the encountered issue. To do so, follow the given steps:
-
- Simply navigate to the “Properties” of your audio device, as discussed.
- After that, switch to the “Advanced” tab.
- Lastly, opt for the highlighted quality to configure the audio sample rate:
After doing so, observe if the CPU usage is controlled now. Otherwise, proceed to the next approach.
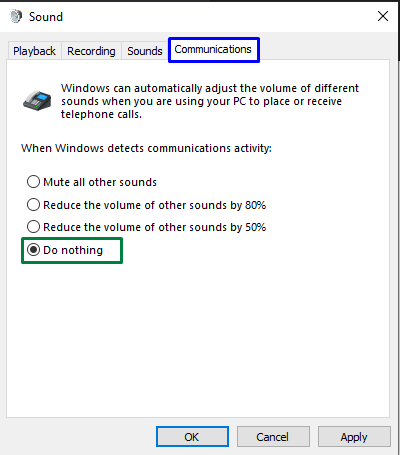
Fix 3: Disable Volume Adjustment
Disabling the automated volume settings can also pave the way for the CPU to act normally. Therefore, adjust the volume settings by switching to the “Communications” tab and mark the highlighted radio button in the “Sound” settings. After that, hit “Apply-> OK” to save the made changes:
After doing so, see if this approach made a difference.
Fix 4: Update Sound Card Driver
The updated drivers help the devices to communicate more effectively. Therefore, this fix is effective in coping with the discussed limitation.
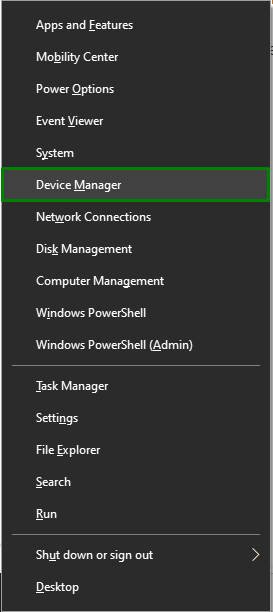
Step 1: Open “Device Manager”
Hit the “Windows + X” combined keys and opt for “Device Manager” to open the Device Manager:
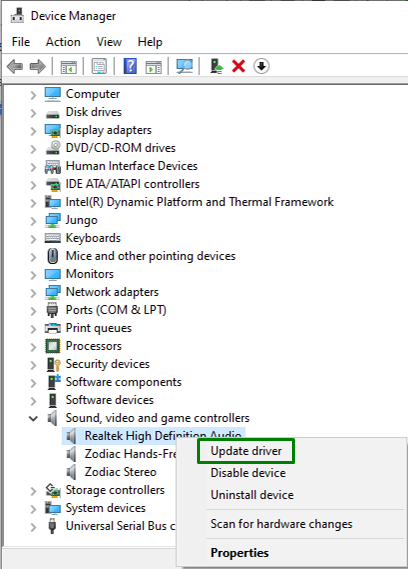
Step 2: Update the Sound Card Driver
Extend the “Sound, Video and game controllers” option, right-click your sound card driver, and opt for “Update driver”:
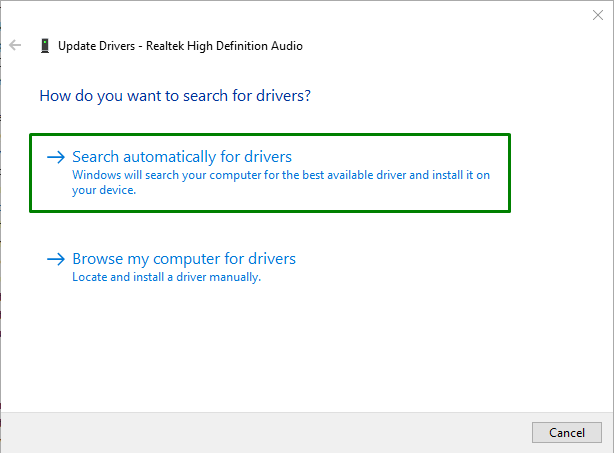
Step 3: Install the Driver
In the following window, opt for the former option to install the best available driver automatically:
Fix 5: Reinstall Sound Card Driver
If updating the sound card driver didn’t work out, try reinstalling them by utilizing the below-enlisted steps.
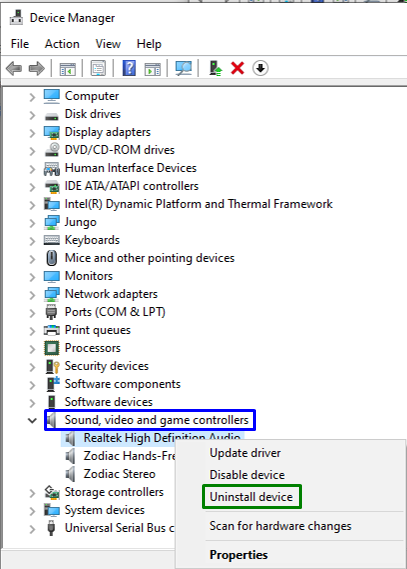
Step 1: Uninstall Sound Card Driver
Likewise, extend the highlighted option, right-click on your sound card driver, and hit “Uninstall device”:
Step 2: Reinstall the Driver
After the uninstall is completed, restart the PC, and the drivers will reinstall automatically.
Conclusion
To resolve the “High CPU Usage by audiodg.exe” issue in Windows 10, disable audio effects, configure the Audio Sample Rate, disable volume adjustment, or update or reinstall the Sound Card driver. This write-up stated the approaches to cope with the inappropriate CPU utilization by audiodg.exe limitation.
Source: linuxhint.com