How To Enable Versioning on the S3 Bucket Using Terraform
Like many other tasks, Terraform can be used to create and manage an AWS S3 bucket. Versioning means keeping several versions, or you may simply call them variants of a file. Versioning in AWS S3 can be used to maintain and restore different variants of the object stored inside it. This has many benefits. For example, we can restore accidentally deleted items.
What Will We Cover?
In this guide, we will see how to enable versioning on an S3 bucket using Terraform. We are working on the Ubuntu 20.04 system for this tutorial. Let us get started now.
What Will You Need?
- Basics of Terraform
- Access to the internet
- Terraform installed on your system. Check by running the Terraform -version.
Creating AWS S3 Bucket Using Terraform
Now that we have seen a little bit about Terraform and hopefully, you would have installed it on our local machine, we can continue our task of working with S3. As mentioned earlier, Terraform uses several configuration files for provisioning resources, and each of these files must reside in their respective working folder/directory. Let us create a directory for this purpose.
Step 1. Start by creating a folder that will contain all the configuration files, and then change your terminal directory to the following:
Step 2. Let us create our first configuration file, “variables.tf”, that will contain the information about our AWS region and the type of instance we want to use:
Now, put the following text inside it and save the file:
description = "The AWS region to create the S3 bucket in."
default = "us-east-1"
}
variable “bucket_name” {
description = “A unique name for the bucket”
default = “tecofers-4”
}
“tecofers-4” is the name of our bucket, and you can use your own name here.
Step 3. Make a “main.tf” file that will contain the definition for our infrastructure.
Now, put the following configuration inside it:
required_providers {
aws = {
source = "hashicorp/aws"
version = "~> 3.27"
}
}
required_version = ">= 0.14.9"
}
provider "aws" {
region = var.aws_region
shared_credentials_file = "/home/Your_User_Name/.aws/credentials"
profile = "profile1"
}
resource "aws_s3_bucket" "bucket1" {
bucket = var.bucket_name
tags = {
Name = "ExampleS3Bucket"
}
}
resource "aws_s3_bucket_acl" "bucket1" {
bucket = var.bucket_name
acl = "private"
}
resource "aws_s3_bucket_versioning" "bucket_versioning" {
bucket = var.bucket_name
versioning_configuration {
status = "Enabled"
}
}
Change the “Your_User-Name” to the user name of your system. Let us see the parameters used in the previous files:
bucket: It is an optional parameter when specified creates a new bucket. If this argument is not present, the Terraform will give the bucket a random and unique name. The bucket’s name needs to be in lowercase, with the length not exceeding 63 characters.
Shared_credentials_file: It is the path of the file containing the credentials of the AWS users.
Profile: It specifies the user’s profile for creating the S3 bucket.
The resource “aws_s3_bucket” and “aws_s3_bucket_acl” provides a bucket and an ACL resource (acl configuration) for the bucket. The “acl” argument is optional and provides an Amazon-designed set of predefined grants.
Similarly, the resource “aws_s3_bucket_versioning” provides a resource for version control on an S3 bucket. The versioning_configuration block defined in this block contains the required configuration for this purpose. The status argument is mandatory and can contain a single value from among: Enabled, Disabled, and Suspended.
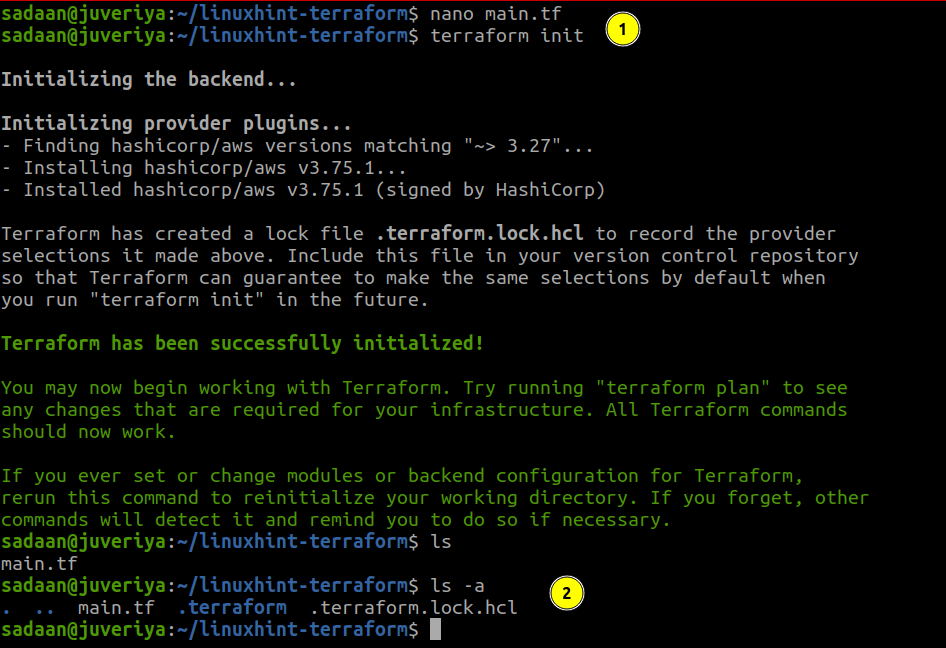
Initializing the Terraform Directory
To download and install the provider, we defined in our configuration and other files. We need to initialize the directory containing this file:
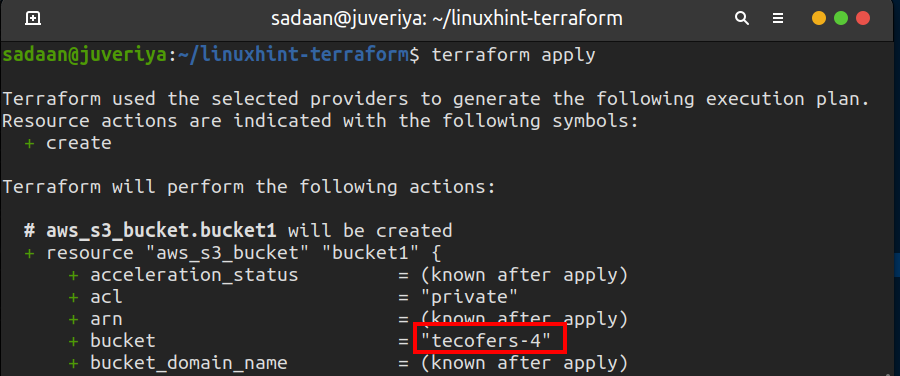
Building the Infrastructure
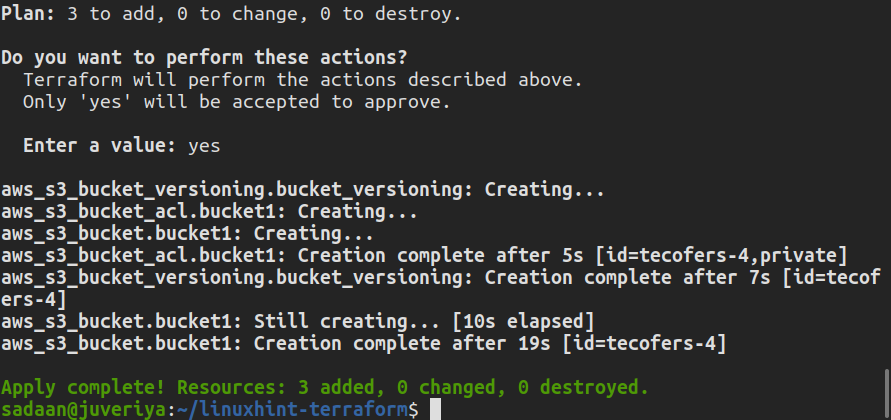
Now that we have prepared our configuration files, we can apply the changes using the following command:
Enter “yes” on the terminal when prompted. When the Terraform finishes its work, the following message appears:
Verifying the Procedure
Now, let us check if the desired S3 bucket is created. Head to the S3 console and check for the available buckets:

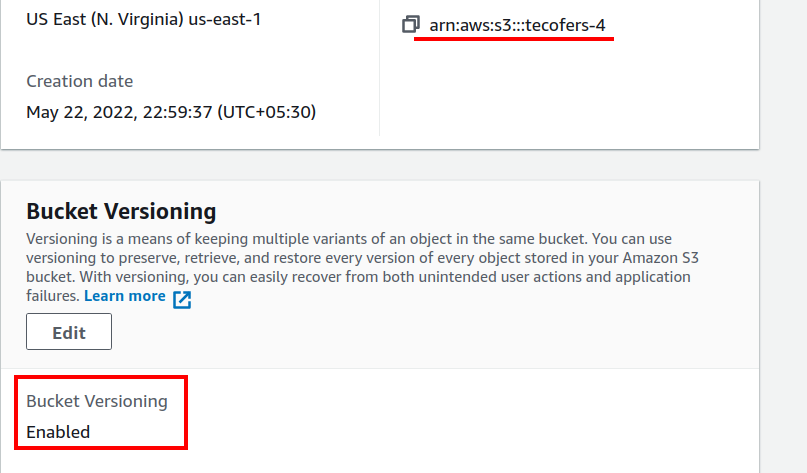
Since our bucket was created successfully, we can now upload files to it and create new folders here.
Delete the resources you created when you do not need them. This will save you from unwanted charges on AWS:
Conclusion
In this guide, we have learned about enabling versioning on an S3 bucket using Terraform. We created a bucket and applied versioning to it. There are so many things we can do using Terraform to simplify our infrastructure deployment.
Source: linuxhint.com