How to Enable and Disable GPU Acceleration in Google Chrome
With Chrome hardware acceleration, the games, animations, and movies that you may be playing in a browser are handled by the GPU. The GPU performs it more effectively and also relieves a part of the CPU’s workload, allowing it to perform more effectively.
Advantages and Disadvantages of Activating GPU Acceleration in Google Chrome
As the name suggests, GPU/Hardware acceleration means running effectively or in less time. It refers to when a program leverages a computer’s hardware to support certain operations more effectively than what the software is capable of. In short, for your software to operate more efficiently, it unloads some responsibilities to further the hardware components.
Hardware acceleration for Google Chrome certainly seems to have numerous benefits. The GPU handles any browser games, animations, or videos that you might be playing as part of Chrome hardware acceleration. In addition to doing things better, the GPU also relieves a part of the CPU’s workload, enabling the CPU to perform at its best. If you want to see what difference does the Hardware Acceleration makes, you can watch the HD videos or play video games and see if your browser slows down or works smoothly. You can also notice the variation in the picture conditions.
Hardware acceleration is often always turned on in Google Chrome. But if you want to turn it on sometimes, it is recommended to do so whenever you use the 3D graphics, high-end online games, motion games, and HD videos. It outcomes in a high frame rate (FPS).
Offloading some duties to your hardware may make your computer slower than it was if it is on the lower end of the range. Because of this, having a good video and sound card is essential for a positive online browsing experience. After turning the hardware acceleration on, if you observe that your web browser is operating slowly, consider turning it off and see whether the speed improves.
This article describes three methods on how to enable and disable the hardware acceleration in Chrome and on how to verify if it is enabled, and force acceleration if necessary. The hardware acceleration feature in Google Chrome uses your computer’s GPU to accelerate the operations and liberate the crucial CPU time.
METHOD 1: Enable the Hardware Acceleration Option in Google Chrome Settings
In this method, we will enable the hardware acceleration option in Google Chrome by going through the Google Chrome app settings.
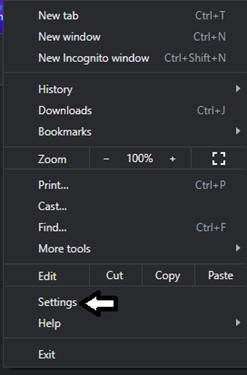
The initial step is to launch the Chrome and traverse to the Settings tab.
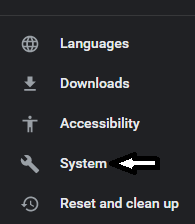
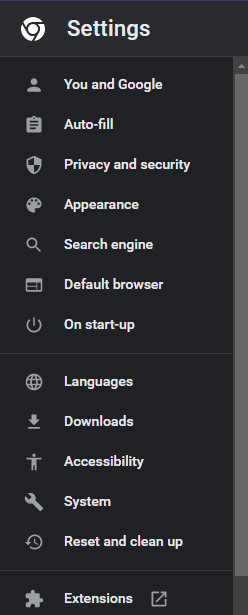
Then, locate the System in the left sidebar in the settings menu. In some versions of Chrome, System is located in the drop-down section of the Advanced setting, so make sure to expand it.
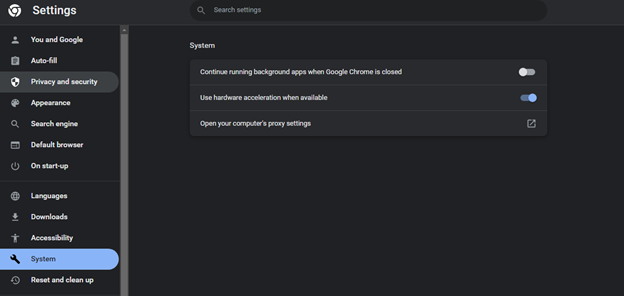
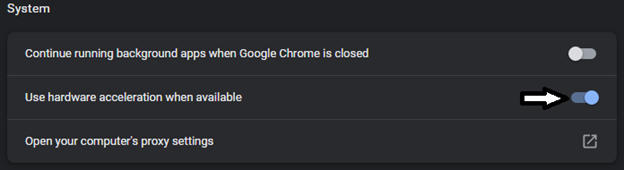
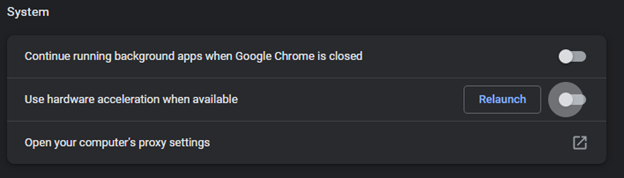
Check for the “Use hardware acceleration when available” selection after selecting the System.
Check for the “Use hardware acceleration when available” selection after selecting the System. There is an On/Off switch located there. The switch is generally on the “ON” side. Flip the switch to the “OFF” side and subsequently hit Relaunch to employ the modifications.
METHOD 2: Enable the Hardware Acceleration Mode for Google Chrome Using the Windows Registry Editor
In this method, we will use the Windows Registry Editor to enable the hardware acceleration mode for Google Chrome by adding a D-WORD 32-bit value file in Chrome’s folder and enabling it. This method is only limited to the Windows devices as it involves Registry.
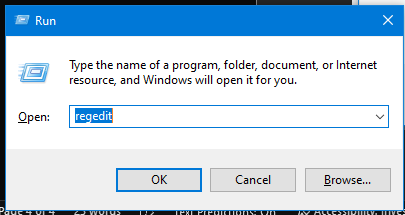
By concurrently hitting the Windows Key and R keys, you can launch the “Run” window.
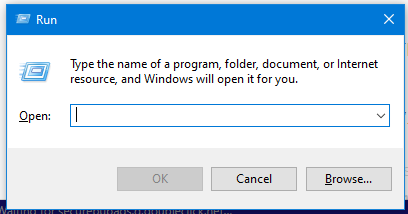
The Registry Editor will then launch once you input “Regedit” and press OK or Enter.
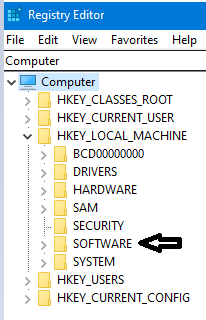
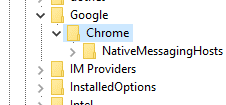
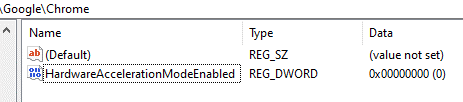
Direct towards the HKEY_LOCAL_MACHINE \ SOFTWARE \ Policies \ Google \ Chrome \.
Then, right-click on the Chrome button to make a recent 32-bit DWORD value.
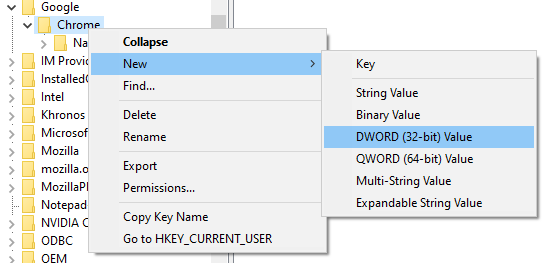
Now, you have to rename this value to “HardwareAccelerationModeEnabled”. Toggle the hardware acceleration on or off in Chrome by setting the value to either 0 or 1.
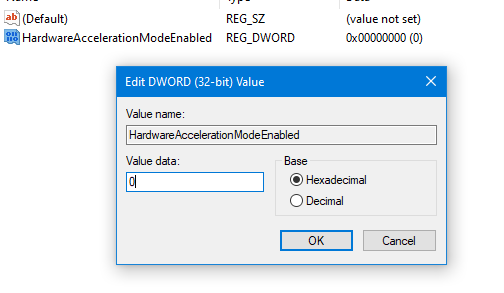
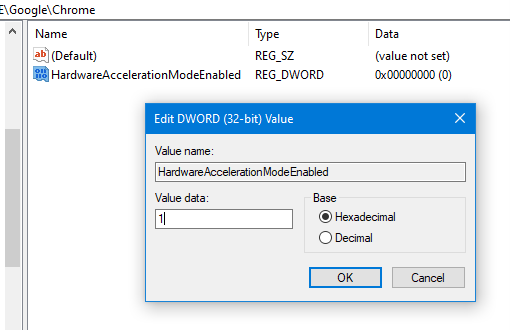
Finally, just restart your PC or device to apply the settings.
METHOD 3: Alternative Way to Enable or Disable the GPU Acceleration for Google Chrome
This alternative method is to override one of the several system flags and activate acceleration when Chrome doesn’t appear to want to do it. This approach is used when the settings of the application are hiding the option to enable or disable the hardware acceleration.
The first step is to input the chrome:/flags into the Chrome’s URL bar.
![]()
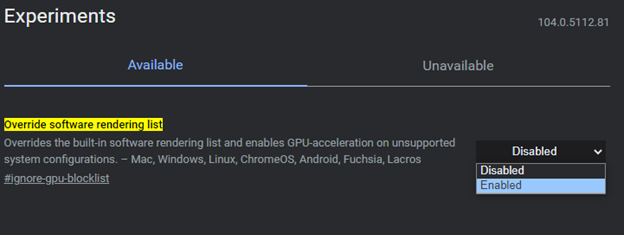
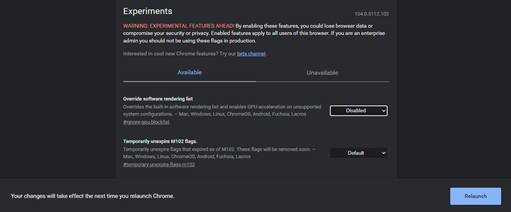
As seen in the following image, the flag page opens. Seek the Override software rendering list that employs the search bar.
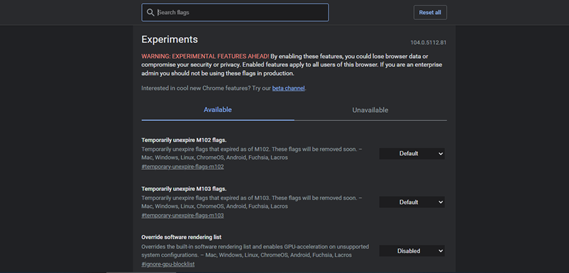


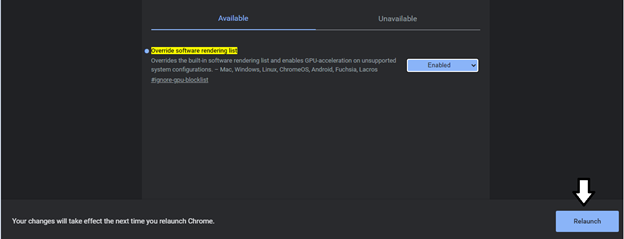
After this, expand the Disabled option and change it to Enabled. After enabling it, click on the Relaunch Now button at the bottom corner of the right side. ,
Now, we can check if the acceleration is enabled successfully by visiting the chrome://gpu page. Aside from most of the choices, we should have the Hardware accelerated next to them.
It is very simple to deactivate the hardware acceleration in Chrome. You can do this by just following the previous instructions to enable it, but selecting Disabled in the Override software rendering list.

Conclusion
In this article, the GPU acceleration mode for Google Chrome was discussed in a detailed manner where all the aspects were covered. The advantages and disadvantages to enable the hardware acceleration or GPU acceleration were also discussed in this article. We also implemented the three different methods to enable and disable this acceleration mode through Google Chrome settings, Windows registry editor, and even explicitly enabling the option by accessing the Chrome flags tab.
Source: linuxhint.com