How to Enable and Disable Automatic Updates on CentOS 7
In today’s tutorial, we will discuss how to disable and enable automatic updates on CentOS 7 using the PackageKit. The tutorial is divided into two parts. In the first part, we will demonstrate how to disable auto updates on CentOS 7. In the second part, we will show you how to enable auto updates. We will use the CentOS command line to perform the tasks. The commands are very easy to follow.
What is PackageKit?
PackageKit is a system developed to make the installation and updating of the software on your computer easier. The primary design goal is to unify all the software graphical tools used in different distributions and to use some of the latest technology like PolicyKit. It is the graphical software updater in the RedHat-based Linux distributions.
To learn more about PackageKit, visit the following page:
https://www.freedesktop.org/software/PackageKit/
Let’s get started with the tutorial!
How to Disable PackageKit on CentOS 7?
Following are the steps involved in disabling PackageKit on CentOS 7:
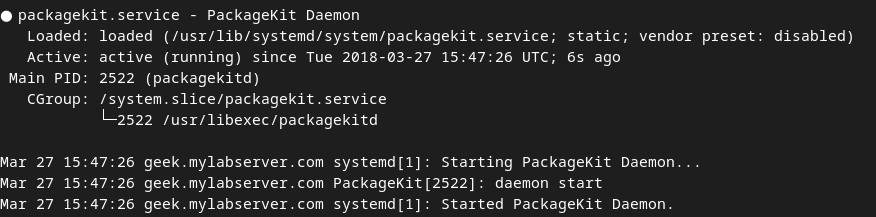
Step 1: Check the PackageKit Status
Before you begin to disable the automatic updates on CentOS 7, check the status of the PackageKit. It will be active as displayed below. To check the status, execute the following command:
|
1
|
systemctl status packagekit
|
![]()
You will see the output like this on your terminal:

Step 2: Stop PackageKit
Before disabling the PackageKit, we first need to stop it as we saw in the previous step that the service is in an active state. This means that it is running. To stop it, run the following command:
|
1
|
systemctl stop packagekit
|
![]()
Step 3: Mask PackageKit
In this step, we will mask the Packagekit service. Masking a service prevents the service from being started manually or automatically. To mask the service, run the following command:
|
1
|
systemctl mask packagekit
|
![]()
This command will create a symlink from /etc/systemd/system/packagekit.service to /dev/null.
Step 4: Remove PackageKit Software Updater
Now that the PackageKit is completely stopped and disabled, we will now remove it from our system. To do that, issue the following command:
|
1
|
yum remove PackageKit*
|
![]()
PackageKit will be instantly removed from our system.
How to Enable PackageKit on CentOS 7
Let’s also have a look at how to enable the PackageKit back. The following are the steps involved in enabling the PackageKit on CentOS 7:
Step 1: Reinstall PackageKit
To disable automatic updates, we had to remove the PackageKit. To enable automatic updates, we need to have it in our system again. With the help of the following command, we will install PackageKit back in our system:
|
1
|
yum install gnome-packagekit PackageKit-yum
|
![]()
Step 2: Unmask PackageKit
In this step, we will unmask the service. In part 1, we masked it to disable automatic updates. To unmask PackageKit, issue the following command:
|
1
|
systemctl unmask packagekit
|
![]()
Step 3: Start PackageKit
Now that the service is unmasked, let’s start it. To start PackageKit, we will run the following command:
|
1
|
systemctl start packagekit
|
![]()
Step 4: Verify PackageKit Status
Once the service is started, it is in an active state. Let’s verify it. To do that, run the following command to check the status of PackageKit:
|
1
|
systemctl status packagekit
|
![]()
The output will tell you that the service is running (active).
Step 5: Enable PackageKIt
Let’s now enable PackageKit. To do that, execute this command:
|
1
|
systemctl enable packagekit
|
![]()
Now, your system is back to the old settings. Automatic updates are now enabled on your CentOS 7 machine.
Conclusion
In this guide, we explored how to disable automatic updates on CentOS 7 with the help of PackageKit. We also explored how to enable automatic updates again. CentOS command line was used to disable and enable updates.
Source: linuxhint.com