How to Display Text When Checkbox Is Checked in JavaScript?
This article will contemplate on the approaches that can be utilized to display text when a checkbox is checked in JavaScript.
How to Display Text When a Checkbox is Checked in JavaScript?
To display text when checkbox is checked in JavaScript, the following approaches can be considered:
- “checked” property with the “display” and “innerText” properties.
- “jQuery” approach with the “is()” method or “ready()” and “click()” methods.
The stated approaches will be explained one by one!
Method 1: Display Text When Checkbox is Checked in JavaScript Using the checked Property
The “checked” property returns the checked state of the specific checkbox. This property can be utilized to check the checkbox and display the corresponding text against it.
Let’s discuss some examples which will explain the stated concept.
Example 1: Display Text When Checkbox is Checked in JavaScript Using the checked Property with the display Property
The “display” property displays the specified message with the associated element. This property can be applied to display the corresponding message against the accessed element upon the checked checkbox.
The following example explains the discussed concept.
First, include the specified heading in the “<h3>” tag:
Next, allocate the input type as “checkbox” for the following three options. Here, assign the specified “id” and attach an “onclick” event as well. This event will invoke the specified function upon checking the checkbox:
<br>
<input type= "checkbox" id= "check2" onclick= "checkFunction()">Graph
<br>
<input type= "checkbox" id= "check3" onclick= "checkFunction()">Line
After that, include the following paragraphs in the “<p>” tag with the specified id in order to display the corresponding message upon checking the particular checkbox:
<p id= "message2" style= "display:none">Graph Option is Checked Now!</p>
<p id= "message3" style= "display:none">Line Option is Checked Now!</p>
Here, declare a function named “checkFunction()”. In its definition, apply the condition upon each of the checkboxes with the help of the “checked” property by accessing their id directly and similarly display the corresponding message as well against the fetched id of the assigned paragraphs using the “display” property:
if (check1.checked == true){
message1.style.display = "block";
}
else if (check2.checked == true){
message2.style.display = "block";
}
else if (check3.checked == true){
message3.style.display = "block";
}
else{
message.style.display = "none";
}
}
The corresponding output will be:
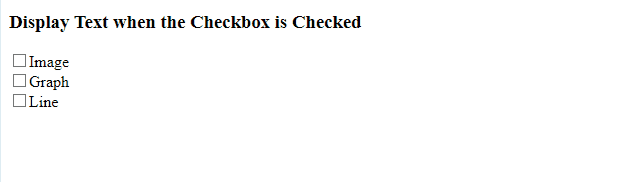
From the output, it can be clearly observed that specific text is displayed when a specific checkbox is selected.
Example 2: Display Text When Checkbox is Checked in JavaScript Using the checked Property with the innerText Property
This property can be applied to access the specified checkboxes and notify the user of the checked option on the Document Object Model(DOM).
Example
Firstly, similarly include the following heading and checkboxes with the specified “id” and an “onclick” event redirecting to the function checkBox():
<input type= "checkbox" id= "check1" value= "Python" onclick= "checkBox()">Python
<br>
<input type= "checkbox" id= "check2" value= "Java" onclick= "checkBox()">Java
<br>
<input type= "checkbox" id= "check3" value= "JavaScript" onclick= "checkBox()">JavaScript
<br><br>
After that, define a function named “checkBox()”. The following function in the below step will fetch the id of the specified checkboxes using the “document.getElementById()” method.
Also, apply a check on each of the checkboxes. For instance, if a particular checkbox is checked, the corresponding message against each of the checkbox will be displayed on the DOM via the “innerText” property:
get1= document.getElementById("check1")
get2= document.getElementById("check2")
get3= document.getElementById("check3")
get4= document.getElementById("msg")
if(get1.checked == true){
get4.innerText= "Python Language Selected"
}
else if(get2.checked == true){
get4.innerText= "Java Language Selected"
}
else if(get3.checked == true){
get4.innerText= "JavaScript Language Selected"
}}
Output

Method 2: Display Text When Checkbox is Checked in JavaScript Using jQuery
This particular approach can be applicable by including a “jQuery” library and applying its methods.
Example 1: Display Text When Checkbox is Checked in JavaScript Using jQuery is() Method
This method can be applied to apply a condition on either of the checkboxes and notify the user accordingly.
The first step will be to include the “jQuery” library:
Now, specify the checkboxes referring to three different options. An “onclick” event is attached to each of the checkbox in order to invoke the function checkFunction() upon checking a particular checkbox:
<br>
<input type="checkbox" id="check2" onclick="checkFunction()">Linuxhint
<br>
<input type="checkbox" id="check3" onclick="checkFunction()">Youtube
Finally, define a function named “checkFunction()”. Here, apply an “OR(||)” condition. This function will execute in such a manner that as soon as the specified checkbox is checked, an alert dialogue box will notify the user about it. In the other case, the “else” condition will execute:
if ($('#check1')||('#check2')||('#check3').is(':checked')){
alert("A Checkbox is Checked");
}
else {
alert("CheckBox Not Checked");
}
}
Output

Example 2: Display Text When Checkbox is Checked in JavaScript Using jQuery ready() and click() Methods
The “ready()” method specifies what happens when a ready event occurs and the Document Object Model is loaded. The “click()” method, on the other hand, triggers the function to run when a click event occurs. These methods can be implemented to click on the accessed checkbox and display the checkbox text and the corresponding value against it.
Syntax
In the given syntax, “function” refers to the function which is to execute after the DOM is loaded.
Here, likewise, the “function” points to the specific function to execute when the click event occurs.
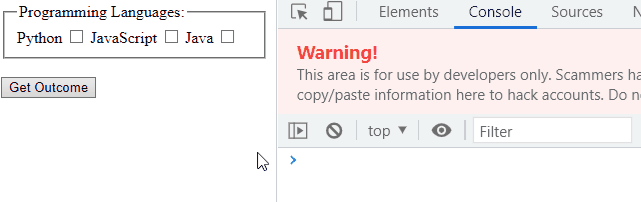
Implementation
First, include the following jQuery library:
Next, within the “<fieldset>” tag, specify the following labels and input types for each of the checkboxes:
<legend>Programming Languages: </legend>
<label for= "Python">Python</label>
<input type= "checkbox" name= "outcome" value= "Python" />
<label for= "JavaScript">JavaScript</label>
<input type= "checkbox" name= "outcome" value= "JavaScript" />
<label for= "Java">Java</label>
<input type= "checkbox" name= "outcome" value= "Java" />
</fieldset>
After that, create a button with the specified “class” and “id”:
Now, in the jQuery implementation, apply the “ready()” method such that when the DOM loads, the further steps become functional. In the next step, apply the “click()” method and fetch the checkboxes by their specific names. The “checked” property here will ensure that the checkbox is checked and return the corresponding value and text of the particular checkbox using the “val()” and “text()” methods respectively:
$('#outcome').click(function () {
$('input[name="outcome"]:checked').each(function () {
let value = $(this).val();
let Text = $(`label[for="${value}"]`).text();
console.log(`The value of checkbox is ${value}`);
console.log(`The text of checkbox is ${Text}`);
})
});
});
Output
This write-up demonstrated the methods that can be utilized to display text when a checkbox is checked in JavaScript.
Conclusion
To display text when a checkbox is checked in JavaScript, apply the “checked” property along with the “display” property to display the specified message against the corresponding checkbox which will be checked or with the “innerText“ property to display the corresponding text on the DOM as soon as the checkbox is checked. Also, you can utilize the jQuery approach with the “is()” method to apply an “OR” condition handling each of the checkbox or the “ready()” and “click()” methods to click on the fetched checkbox as soon as the DOM loads. This blog demonstrated the methods to display text when a checkbox is checked in JavaScript.
Source: linuxhint.com