How to Disable Secure Boot in Windows?
After reading this article, users will be able to do the following things:
Disable Secure Boot From BIOS
The Secure Boot setting can be disabled from the BIOS menu of the PC. These BIOS settings are made for users with some technical knowledge. That is why, it is important to not change any other settings from the BIOS because they may intercept from starting the PC correctly. Follow the steps exhibited below to Disable the Secure Boot setting.
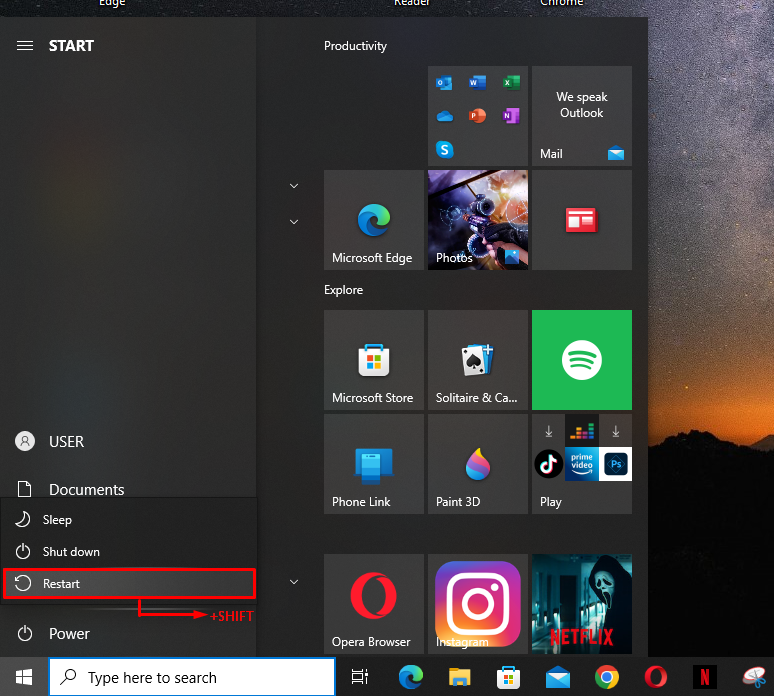
Step 1: Open BIOS Settings
To open BIOS settings, go to the start menu, and hit the “Restart” option while holding the “Shift” key on:
Step 2: Navigate to Advanced Options
A blue window with various options will appear on the screen. Select the “Troubleshoot” option:

Next, click on the “Advanced options” from the list:

Step 3: Disable the Secure Boot
In the Advanced options, hit the “UEFI Firmware Settings” from the options:

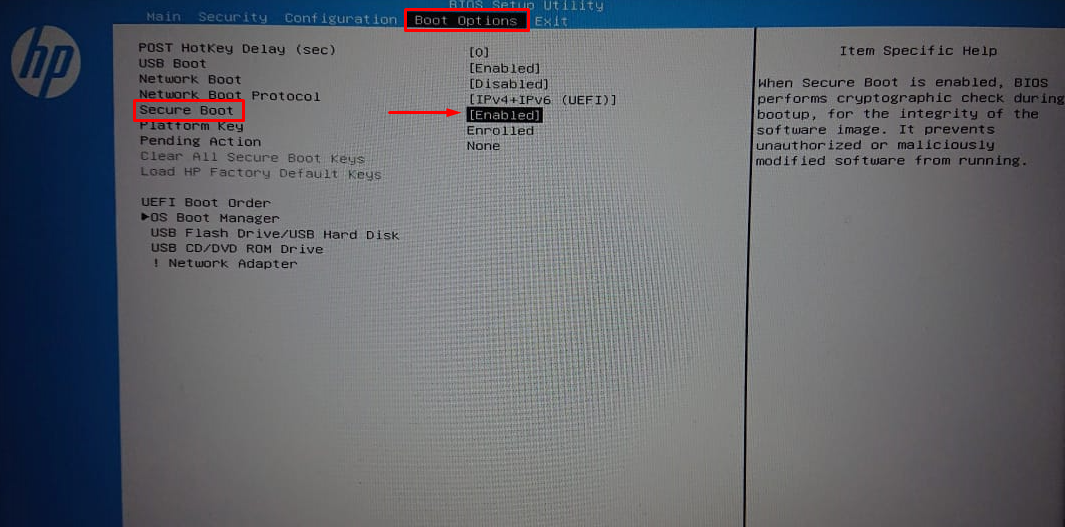
Now, the user has to navigate to the “Secure Boot” option in the BIOS menu. Its location typically varies from PC to PC. Usually, it is present in the “Security”, “Boot”, or the “Authentication” tab. To turn off Secure Boot, click on the “Disable” button:

After that, save the changes and restart the PC.
Re-Enable Secure Boot From BIOS
In certain cases, a PC has to be returned to its original state in order to turn on the Secure boot. To do that, any hardware/operating system that is incompatible with a secure boot must be removed.
To re-enable the Secure Boot, follow the steps exhibited in the above section to find the “Secure Boot” option in the BIOS settings, and hit the “Enable” button as shown below:
That is all about disabling and re-enabling the Secure boot option from the BIOS settings.
Conclusion
To disable Secure Boot, restart the PC while holding the “Shift” key, go to the “Troubleshoot” option, and select “Advanced options” from the list. Afterward, select the “UEFI Firmware Settings” and “Disable” the secure boot option. To re-enable secure boot, first, remove any hardware from the PC that is incompatible with secure boot, then find the Secure boot option in the BIOS settings and click on the “Enable” button. This article has presented a detailed procedure for disabling or re-enabling secure boot in Windows.
Source: linuxhint.com