How to Develop MongoDB with JavaScript
One of the most significant advantages of using MongoDB for web developers is its excellent integration with JavaScript. MongoDB provides a native JavaScript driver that enables the developers to interact with the database directly using the JavaScript code. Now, installing the MongoDB Node.js driver on the machine is necessary before we can begin creating the MongoDB applications in JavaScript. We need to use the following command for this:
The driver allows us to interact with MongoDB from your JavaScript code and perform various operations like connecting to the database, inserting the data, querying the data, and updating the data.
Example 1: Develop a MongoDB Connection with JavaScript
Begin by establishing the connection with the MongoDB server with the JavaScript that can be accomplished using the “npm” module as discussed previously.
const url = 'mongodb://<a href="http://127.0.0.1:27017/">127.0.0.1:27017</a>';
const client = new MongoClient(url);
const dbName = 'MyDB';
async function main() {
await client.connect();
console.log('Connected to server successfully');
const db = client.db(dbName);
const collection = db.collection('Persons');
return 'done.';
}
main()
.then(console.log)
.catch(console.error)
.finally(() => client.close());
We first import the required MongoClient from the “mongodb” module in our “File.js” file. We then define the connection URL for the MongoDB server (url) and create a new MongoClient instance using the specified URL.
After that, we specify the name of the MongoDB database (dbName) to be used in the connection. Next, the asynchronous main() function handles the main operations on the MongoDB server. Here, we connect to the MongoDB server using the await client.connect(). This is an asynchronous operation, so the function pauses until the connection is established successfully. We get to view the message that appears on the prompt once the connection has been made successfully. We get a reference to the database with the specified name in “dbName” using the client.db(dbName).
Then, we get a reference to the collection named “Persons” using the db.collection(‘Persons’). After defining the main() function, we call the main() to execute the operations. If the main() function resolves successfully, it prints the result (in this case, it is the “done” string) using the .then(console.log). If there is an error during execution, it catches the error and prints it using the .catch(console.error). Finally, it ensures that the MongoDB client connection is closed using the .finally(() => client.close()).
Hence, the prompt shows the message where the MongoDB connection has been established in the JavaScript file:

Example 2: Insert a MongoDB Document with JavaScript
Now that the connection has been established with the MongoDB server, we can use the MongoDB queries with JavaScript. Here, we apply the insert query to insert the single document.
const url = 'mongodb://<a href="http://127.0.0.1:27017/">127.0.0.1:27017</a>';
const client = new MongoClient(url);
const dbName = 'MyDB';
async function main() {
const db = client.db(dbName);
const collection = db.collection('users');
const insertDoc =
await collection.insertOne({ name: 'Andrew', age: 23 });
console.log('Document Inserted =', insertDoc);
return 'done.';
}
main()
.then(console.log)
.catch(console.error)
.finally(() => client.close());
We define the main() function as an asynchronous function that performs the database insertion operation. Inside it, we connect to the MongoDB server using the MongoClient instance and the URL. Then, we access the specified database (MyDB) using the client.db(dbName) and get the “users” collection from the database using the db.collection(‘users’).
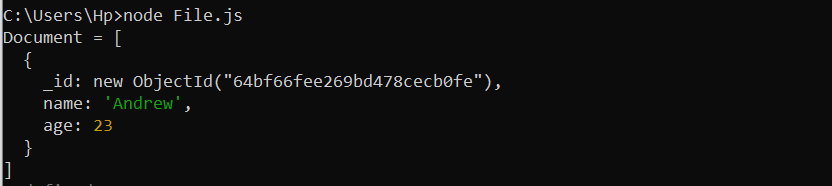
After that, we insert a document with the fields name as “Andrew” and the age as 23 into the “users” collection using the collection.insertOne(). The insertOne() method returns a promise that resolves with the result of the insertion. The added document is shown using the console.log. Lastly, we close the MongoDB client connection.
The document that is inserted into the MongoDB database collection has been successfully inserted as shown in the following output:

Example 3: Find a MongoDB Document with JavaScript
Similarly, we can apply the “find” query of MongoDB with JavaScript to find the document from the collection that was created in the prior example.
const url = 'mongodb://<a href="http://127.0.0.1:27017/">127.0.0.1:27017</a>';
const client = new MongoClient(url);
const dbName = 'MyDB';
async function main() {
const db = client.db(dbName);
const collection = db.collection('users');
const findQuery = { name: 'Andrew' };
const findDoc = await collection.find(findQuery).toArray();
console.log('Document =', findDoc);
}
main()
.then(console.log)
.catch(console.error)
.finally(() => client.close());
We begin with the demonstration from the main function where we connect to the MongoDB server first using the created MongoClient instance and the specified URL. Then, we access the MyDB database using the client.db(dbName) where the dbName is the previously defined database name.
Next, we get a reference to the “users” collection from the database using the db.collection(‘users’). A query object named “findQuery” is created which specifies that the documents to be retrieved should have the name field equal to “Andrew”. After that, we perform a “find” query on the “users” collection using the collection.find(findQuery) which returns a cursor to the matched documents.
The “await” keyword is used before collection.find() to ensure that the result is resolved before proceeding. The result of the find operation is converted to an array of documents using the toArray(), and the found documents are stored in the “findDoc” variable. The documents are then logged to the console using the console.log.
As a result, the found document of the MongoDB collection is displayed upon execution:
Example 4: Update a MongoDB Document with JavaScript
Next, we performthe “update” operation in JavaScript to update the specified document of the MongoDB collection.
const url = 'mongodb://<a href="http://127.0.0.1:27017/">127.0.0.1:27017</a>';
const client = new MongoClient(url);
const dbName = 'MyDB';
async function main() {
const db = client.db(dbName);
const collection = db.collection('users');
const updateQuery = { name: 'Andrew' };
const updateName = { $set: { name: 'Sam' } };
const updateResult = await collection.updateOne(updateQuery, updateName);
console.log('Updated Document =', updateResult);
return 'done';
}
main()
.then(console.log)
.catch(console.error)
.finally(() => client.close());
In order to update a document in the “users” collection, we invoke the main() function. We then prepare an “update” query using { name: ‘Andrew’ } to find the document with the name field equal to “Andrew”. After that, we set the name field of the matched document to “Sam” using { $set: { name: ‘Sam’ } }.
We define the “update” query and the “update” operation to perform the update using the collection.updateOne(updateQuery, updateName). The updateOne() method updates the first document that matches the “update” query and returns an object that represents the result of the update. The “updateResult” variable contains the outcome of the update action.
The ensuing output screen displays the updated query’s results:

Example 5: Delete a MongoDB Document with JavaScript
Finally, we employ the delete method of MongoDB to delete the previous document from MongoDB within JavaScript.
const url = 'mongodb://<a href="http://127.0.0.1:27017/">127.0.0.1:27017</a>';
const client = new MongoClient(url);
const dbName = 'MyDB';
async function main() {
const db = client.db(dbName);
const collection = db.collection('users');
const deleteQuery = { name: 'Sam' };
const deleteResult = await collection.deleteOne(deleteQuery);
console.log('Deleted Document =', deleteResult);
return 'done';
}
main()
.then(console.log)
.catch(console.error)
.finally(() => client.close());
We create a “delete” query object named “deleteQuery” which specifies the criteria for the documents to be deleted. In this case, it searches for documents where the name field is equal to “Sam”. After preparing the delete query, we applythe actual deletion operation using the deleteOne() method of the collection object.
We pass the “deleteQuery” as an argument to “deleteOne” which deletes the first matching document that meets the specified criteria in the query. The “deleteResult” variable holds the outcome of the delete action.
The specified document is deleted from the MongoDB collection using the “javascript” file:

Conclusion
We now have a fundamental understanding on how to use MongoDB with JavaScript via the MongoDB Node.js driver. We demonstrated it all with the different Mongo DB operations, from connection to the deletion of the document with JavaScript. From here, we can build more complex applications and integrate MongoDB into the Node.js projects as needed.
Source: linuxhint.com