How to Design Recommender System Using R
Set the Environment in RStudio
Make sure to install the R language at your end before designing the recommender system. After that, install Rstudio in your Windows system to perform R coding in it. After installing both the prerequisites, create a new file in the RStudio using its “New” menu, name it, and save it as an “R” file within any location of your choice so that you can’t miss the file anytime.
After setting up the environment, it’s time to install some R libraries in RStudio as a prerequisite to avoid any inconvenience at the time of execution. The choice of libraries to be installed depends on the choice of the recommender system type that you implement.
In our case, it is a content-based system, and we will design an interactive web application. R provides a “shiny” package to be set up in RStudio to build an interactive web-based application. To install it, use the ”install.packages” instruction followed by the name of the “shiny” package in an argument. Since it is installed already, it displays that the “Shiny” library is in use.

Book Recommender System
We design an interactive book recommender system for a user who may look for a book of their choice. The “shiny” package, used to build the interactive web apps, is loaded into R in the first line of code using the library() function. A data frame termed a “book” is created using the data.frame() method. Ten rows and twelve columns make up this DataFrame.
The first column, named “Title,” is used to store the book names. While the second column, “Genre”, stores the type of each book. The ratings for the books are calculated using the other rows from b1 to b10. The ratings range from 1 to 5, with 5 representing the best score and 1 representing the lowest possible rating.
book <- data.frame(
Title = c("Prime", "The Holy Night", "The Dark Knight", "Oppenheimer", "Forrest",
"The Matrix", "The Lord of the Rings", "Forty Rules of Love", "In the line of fire", "Mean"),
Genre = c("Romance", "Thrill", "Action, Crime, Thrill", "Crime, Thrill", "Thrill, Romance",
"Romance, Action", "Adventure, Fantasy", "Action, Romance", "Animation, Adventure, Thrill", "Action, Adventure, Romance"),
b1 = c(1, 1, 1, 4, 3, 4, 4, 3, 5, 4),
b2 = c(2, 1, 1, 3, 4, 3, 2, 3, 1, 5),
b3 = c(3, 2, 1, 3, 5, 3, 2, 1, 5, 5),
b4 = c(4, 2, 1, 1, 4, 1, 2, 5, 3, 4),
b5 = c(5, 3, 1, 2, 1, 4, 4, 4, 5, 1),
b6 = c(1, 3, 2, 4, 2, 3, 2, 4, 4, 3),
b7 = c(2, 4, 2, 4, 4, 2, 1, 2, 1, 2),
b8 = c(3, 4, 2, 3, 4, 3, 3, 3, 2, 4),
b9 = c(4, 5, 2, 3, 5, 3, 4, 2, 2, 5),
b10 = c(5, 5, 2, 3, 4, 4, 5, 3, 4, 4)
)
A fluid page design is created in the initial line of code using the fluidPage() function. This implies that the UI’s components are flexible and adjusted according to the browser’s screen. The “titlePanel” method builds the app’s title panel. The “Book Suggestion App” is the name of this application.
A sidebar layout is created by utilizing the sidebarLayout()method which is found on the third line. A sidebarPanel() and a mainPanel() are combined to create a sidebar layout. When it comes to the sidebarPanel() method that is used for our user-interactive interface, three input controls are located in it. The first input control method which is selectInput() allows us to choose a book genre in the drop-down list. The unique() function is used to save the genre in the “choices” variable.
Another sliderInput() function is used to create a slider named “rating” to set an appropriate rating for each book, i.e. between 1 and 5. The rating on the slider is 4 by default. You can change it as well. An actionButton() control generates a button named “suggest_btn” that causes the user’s book recommendations to be made. A “Recommended Books:” header via the “h3” function and a VerbatimTextOutput() control with the name “suggested_books” are both included in the main panel.
titlePanel("Book Suggestion App"),
sidebarLayout(
sidebarPanel(
selectInput("genre", "Select a Genre:", choices = unique(book$Genre)),
sliderInput("rating", "Minimum Rating:", min = 1, max = 5, value = 4, step = 1),
actionButton("suggest_btn", "Get Book Suggestions")
),
mainPanel(
h3("Recommended Books:"),
verbatimTextOutput("suggested_books")
)
)
)
The server function, which is in charge of the app’s functioning, requires two parameters: “input” for gathering the user inputs and “output” for producing the output. There are two primary sections: (1) When the suggest_btn button is hit, the observeEvent() method watches for the event, collects the user-selected genre, and requires a rating from the user interface at execution. (2) The book data set undergoes filtering according to the chosen genre and lowest rating to generate the filtered_books DataFrame.
The amount of ratings that are more than or equivalent to the lowest rating is counted using the rowSums() method. To discover the books that fit the chosen genre, employ the grep() tool.
The “if” statement determines whether fewer than three books are in the filtered DataFrame. If so, the script that is enclosed in curly brackets will adjust the value of the result for suggested_books to the “No suitable books found” message. The “else” section is carried out if there are more than three books in the obtained DataFrame.
The logic in the “else” statement arbitrarily selects three books from the filtrated information frame and adjusts the suggested_books output’s result to the books’ titles. The renderText() method is used by the output$suggested_books to produce the final outcome of the suggested_books. The book names are connected with a newline character using the paste() method. Lastly, the shinyApp() function runs the “ui” and “server” sections.
observeEvent(input$suggest_btn, {
selected_genre <- input$genre
m_rating <- input$rating
filtered_books <- book[grep(selected_genre, book$Genre) &
rowSums(book[, 3:12] >= m_rating) >= 3, ]
if (nrow(filtered_books) < 3) {
output$suggested_books <- renderText("No suitable books found.")
} else {
suggested_books <- sample(filtered_books$Title, 3)
output$suggested_books <- renderText(paste(suggested_books, collapse = "\n"))
}
})
}
shinyApp(ui, server)
Testing the Book Recommender System
After running your code, the interactive web application named “Book Suggestion App” will display a drop-down list, a rating slider, and a “Get Book Suggestions” button.
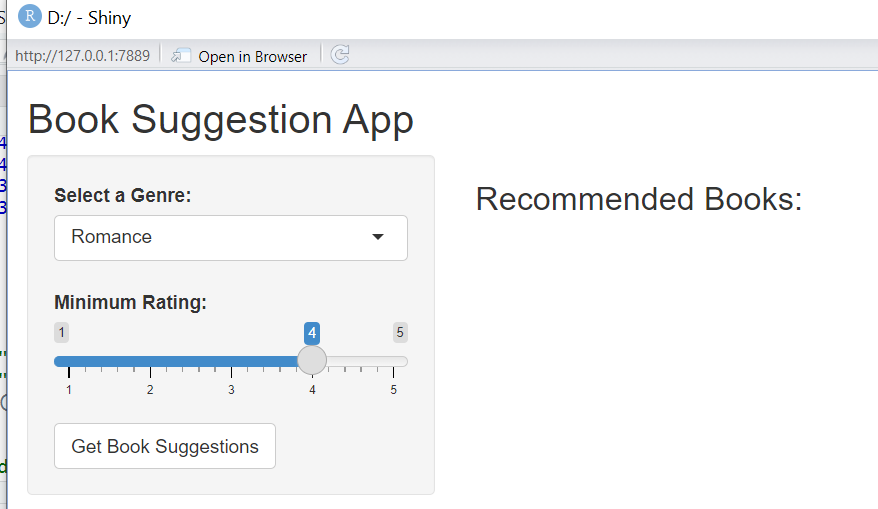
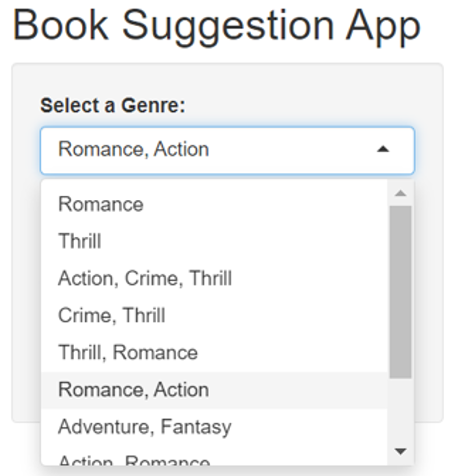
The drop-down list contains different genres for the book.
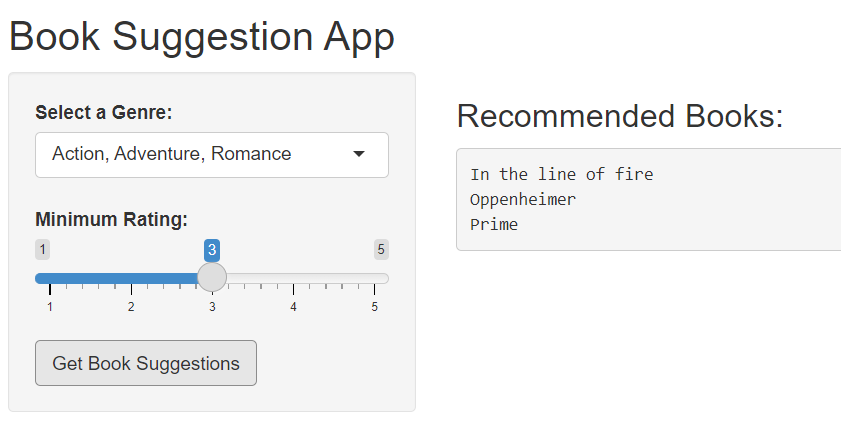
Upon selecting the specific genre, selecting the minimum rating, i.e. “3”, followed by tapping the button, we got three book suggestions in the “Recommendation” section.
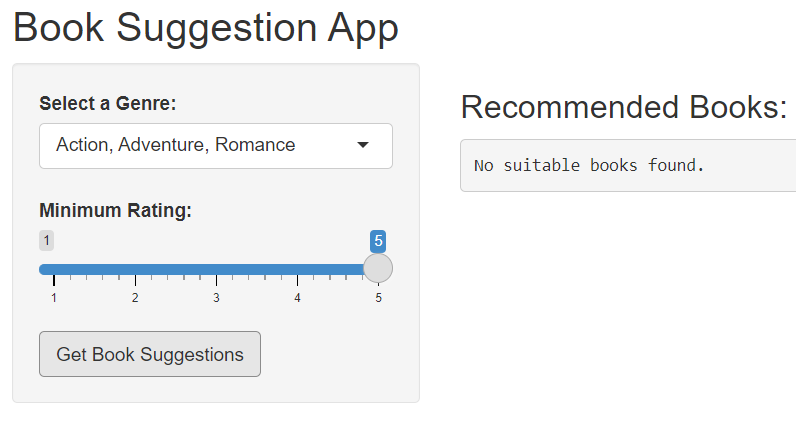
We got no book suggestions in return after selecting the rating of “3” for the same book genres.
Conclusion
The article starts with an explanation on how a recommender system works and how we use it in our daily life. After that, we designed a recommender system for the users who might ask for a good book suggestion. For this, we utilized the shiny library of R and provided an interactive system in return.
Source: linuxhint.com