How to Create Local Persistent Volume in Kubernetes
In this guide, we will learn about local persistent volumes in Kubernetes and how we create local persistent volume files in Kubernetes. Persistent volumes are similar to host Path volumes but they allow only a few specifications, like point-to-point pining to specific nodes.
What is the Local Persistent Volume in Kubernetes?
A local persistent volume, abbreviated as “Local PV”, is a persistent volume type in Kubernetes that is kept on the local filesystem of the node rather than a networked storage system like NFS or a cloud provider’s block storage service. A Local PV can be used to store data that is particular to a node, including logs or configuration files, as well as data that is often requested and has low latency requirements. Compared to networked storage systems, local PVs are constrained in various ways. Local PVs can, however, be a useful option for some applications that require low-latency access to data and can live with the possibility of data loss.
Pre-Requites:
The user must be an Ubuntu or Linux operating system used for running local persistent volume in the Kubernetes applications. The users must know the Kubernetes cluster and how to run commands on terminals and along with these must-have know-how about pods, containers, and minikube in Kubernetes. The windows user must install a virtual box setup in their system to run Linux and ubuntu on their windows operating system virtually. Let us start the process of creating a local persistent volume in Kubernetes by explaining everything step by step. So, we start with the first step:
Step 1: Start the Kubernetes Cluster Locally
In this step, we will first create or start a Kubernetes cluster on our local machine. We will run the command for running the Kubernetes cluster. The command is:

When this command is executed, the minikube is started on our system, which provides us with a Kubernetes cluster locally.
Step 2: Create a YAML File in Kubernetes
In this step, we will create a YAML file in Kubernetes in which we configure a persistent volume. This YAML file contains all the details of the persistent volume. So, we run the command:
When this command is executed, then in return, it opened a storage .yaml file on which we have specific information of persistent volume to configure the local PV in our system.
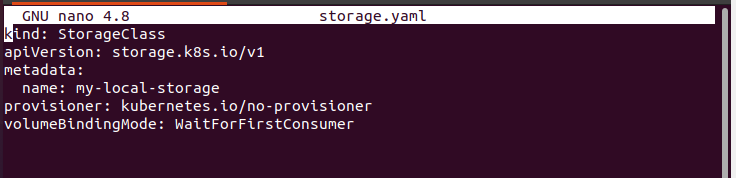
This file contains the name of the file and API version. After that, metadata of the pod is also specified in this file. The name of this pod is ‘my-local-storage’ and the provisioner and volumebindingmode are also specified in this file perfectly. The screenshot of the command and file is attached above.
Step 3: Create Storage Class Resource in Kubernetes
In this step, we will discuss how we can add or create resources in Kubernetes. We also mention the path where we want to create a storage class in Kubernetes. Run the command:
![]()
Press enter: the command is executed and the output is displayed below the command as shown in the screenshot attached above. The flag ‘-f’ is used in the command for path specification. We created a storage class ‘my-local-storage’ successfully in Kubernetes while waiting for the first consumer binding mode.
Step 4: Create a Local Persistent Volume Configuration File
In this step, we will make a configuration file for local persistent volume in our Kubernetes system. So, we run the command:
When this command is executed, the configuration file is opened, as shown in the attached screenshot.
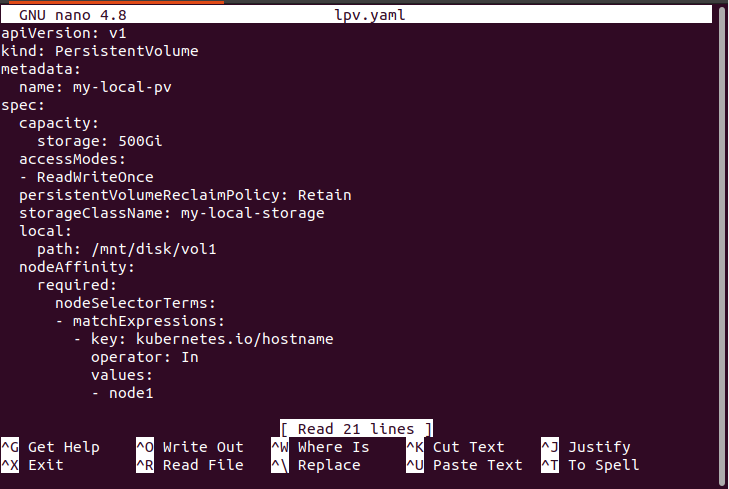
This file contains the name of a local persistent volume pod, the kind of pod, and the specification of pods in which storage, persistence volume claim, storage class name, local file path, and match expression all important features are added correctly. Close the file after the configuration of the pod.
Step 6: Deployment of Local Persistent Volume File in Kubernetes
In this step, we will now deploy the local persistent volume file into our system by just running the command. The command is:

When the command is executed, a file named ‘my-local-pv’ is created inside the persistent volume directory in our Kubernetes application.
Step 7: Create a Persistent Volume Claim Configuration File in Kubernetes.
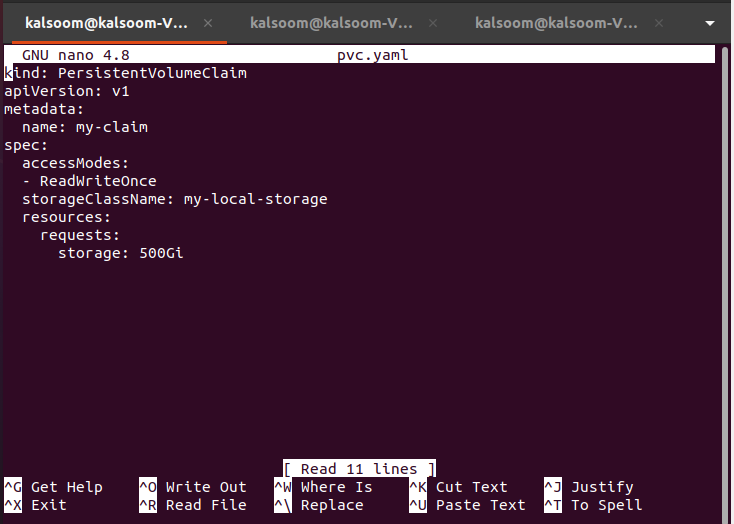
In this step, we will create a new file for PVC in our Kubernetes application. The PVC is run with the help of commands. Run the command:
When a command is executed, a file is opened. This file contains the type of pod, the name of the pod, and the PVC specifications that are justified in this file. The screenshot of this file is attached below.
Step 8: Deployment of the PVC File in Kubernetes
In this step, we will now deploy the configuration file of PVC in our Kubernetes application for running the pods with specifications. We will run the command on the kubectl command line tool:
![]()
When the command is executed, then PVC is created successfully in our Kubernetes application ‘persistentvolumeclaim’ directory.
Step 9: Get the Persistent Volume Pod in Kubernetes
In this step, we will discuss how we get the PV pods running in our system. We run the command:

On command execution, the list of the running pods is executed in our Kubernetes application. PV pod is also shown in the list and the name of the pod is ‘my-local-pv’. The result of the command is attached above as a screenshot.
Step 10: Create a POD with Local Persistent Volume
In this step, we will make a POD file by running the command.
On command execution, the file is opened.
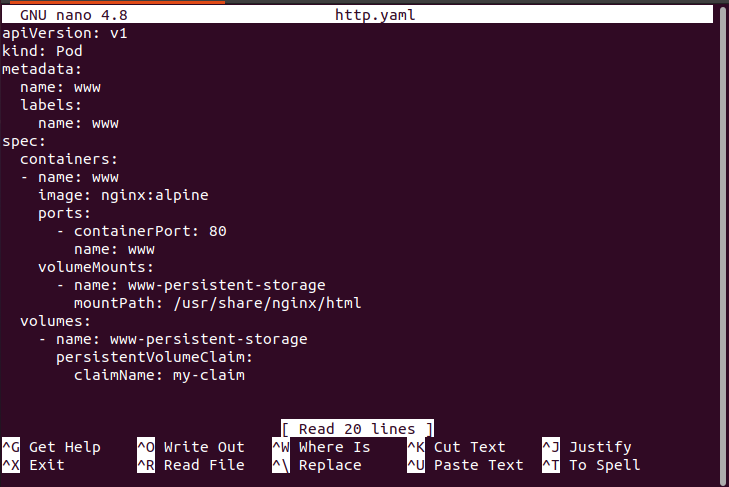
This file contains the name and kind of pod and specifications of pod in detail. Look briefly at the screenshot attached above.
Step 11: Deploy the Pod File in Kubernetes
In this step, we will deploy the POD configuration file for running in the system. Run the command:
![]()
When the command is executed, www is created successfully.
Step 12: Show the Running PV Pods in Kubernetes
In this step, we will verify the running of PV pods in our Kubernetes application. We run the command:

The list of pods is displayed in return for command execution. The output screenshot is attached above for you.
Conclusion
We discussed how to create and set up the PV in our Kubernetes application. We have provided all the details and commands with screenshots. You can also change this command according to your Kubernetes application for better practice.
Source: linuxhint.com