How to Create Kubernetes Network Policies
In this article, we will discuss network policies in Kubernetes. Network policies are very important in Kubernetes. With the help of network policies, we specify how pods communicate with each other and how we make connections between pods. If you are new to this concept, this article is for you. Let us start the article with a detailed definition of network policies in Kubernetes.
What are Network Policies in Kubernetes?
A network policy in Kubernetes describes how pod groups are permitted to communicate with one another and other network endpoints. The Network Policy resource, which specifies how pods are permitted to communicate, is used to implement network policies. You may secure your cluster and manage traffic flow within and between your pods by specifying fine-grained network access control for your cluster using network policies.
Pre-Requisites:
The system the user uses must be a 64-bit operating system. The RAM of the User must be 8GB or above 8GB. The latest version of Ubuntu is installed in the user system. The windows user also uses Linux operating system virtually on their system. The user must have an idea about Kubernetes, the kubectl command line tool, pods, and cluster that was run in our system in the previous session.
Step 1: Start a Kubernetes Control Panel
In this step, we run the Kubernetes in our system to start our network policies operation perfectly. We start minikube in our system by just running the command. Minikube is a Kubernetes cluster that runs on the local machine. The command for starting minikube is:
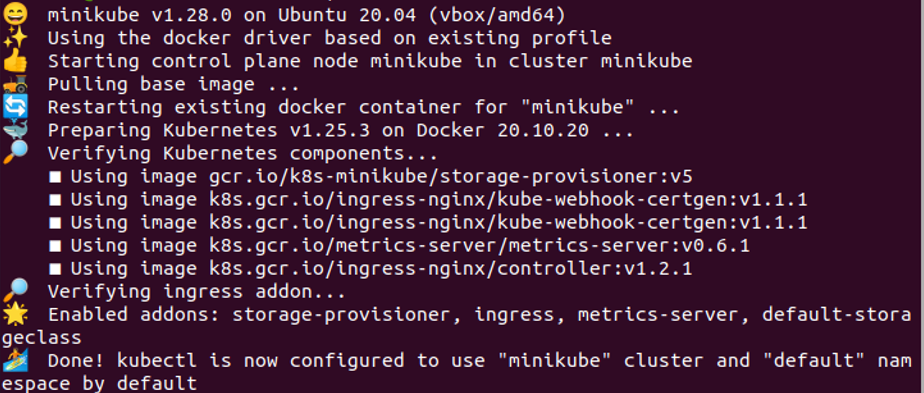
When the command is executed then minikube starts correctly in our system. Now, we can easily perform our actions related to network policies efficiently in our system.
Step 2: Create a Nginx Deployment in Kubernetes
In this step, we learn how to create a deployment of Nginx in our Kubernetes system. We execute the given command in the kubectl command-line tool. The command is:
![]()
On command execution, deployment is created successfully in the app folder in our Kubernetes application. The Nginx image is deployed in our system correctly. The deployment will ensure that the specified number of replicas of the pod is running at all times, by creating or deleting replicas as needed. It will also allow us to update container images in a rolling update in our Kubernetes system perfectly.
Step 3: Sample Deployment on a Specific Port in Kubernetes
In this step, we will now expose the sample that is recently trying to deploy on the system on a specific port. We will run the command:
![]()
When the command is executed the deployment sample is exposed on port 80 successfully in our Kubernetes application. The Kubernetes API server will receive a request from this command to create the service. The API server will then create the service in the cluster. It has a stable IP address and DNS name. The Service acts as a load balancer for pods in the deployment, distributing incoming traffic evenly among them. This command provides us with a stable network endpoint for the pods, allowing them to be accessed even if their IP addresses are replaced.
Step 4: Enlist Services Pod in Kubernetes
After the deployment of the sample in the system, we will get the list of running services in Kubernetes. To retrieve information about all pods in the cluster, we run the command:
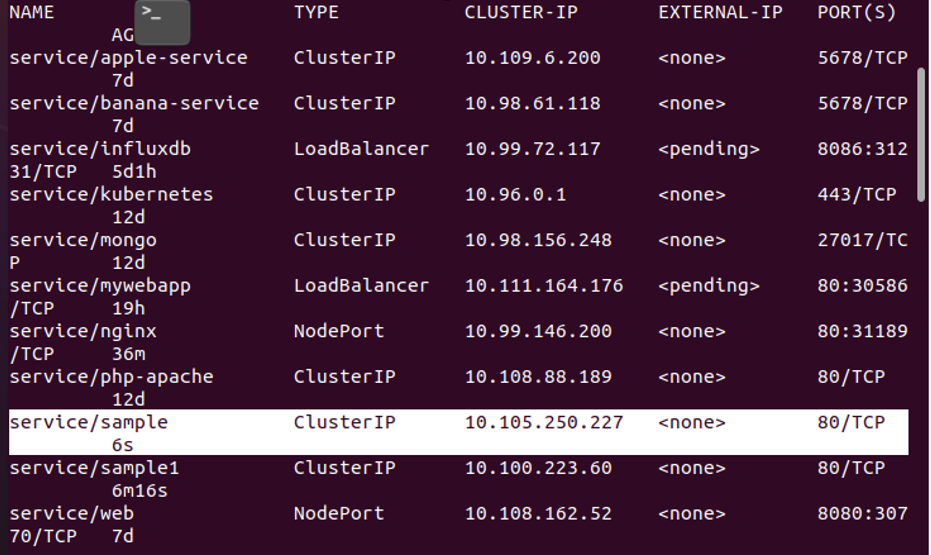
When we executed the command, the services list is displayed on the output. The sample in services is shown in the list. The name, type, Custer-Ip, external-IP, PORTS, and Age of pods and services are displayed perfectly through this command,. The ‘service/sample’ has port number ‘80’, IP of the cluster is ’10.105.250.227’.
Step 5: Create Network Policy Ngnix in Kubernetes
In this step, we will create a Nginx file through which we create a network policy in our Kubernetes application. We will create a network policy and then deploy a network policy in Kubernetes easily with the help of the kubectl command. The command is:
![]()
In the command, we add a link to the policy networking file and give the name of the file ‘Nginx-policy’. The extension of the network policy file is “YAML”. When this command is executed, the network policy folder already exists in our system in which the access-ngnix YAML file is created successfully. The configuration file that is being applied with this command is for the Kubernetes service object, which exposes a set of pods as network services.
Step 6: Create and Run a New pod in Kubernetes
In this step, we will build a new pod in a Kubernetes cluster. This pod will run a container based on the busybox:1.28 and have a docker image. We will execute the ‘/bin/sh’ command on the kubectl command line tool.
The ‘kubectl run’ command creates a deployment in the cluster, which is responsible for managing a set of replicas of the pod. A Replica Set and pod will automatically be created by the deployment for the container.
Conclusion
With the help of network policy, we can easily make connections between different pods and containers. You can also edit these commands according to your Kubernetes application requirements which will help you for a better understanding of this topic. The networking of all pods is very important and beneficial for pods metadata.
Source: linuxhint.com