How to Create init Containers in Kubernetes
What is a Container in Kubernetes?
A container is a complete package that contains everything required to execute an application. It is an image of a ready-to-run software package that allows an application to perform its desired function. It contains code, system libraries, essential default setting values, and any other runtime requirements. You only need to code the container once and after that, it can be executed anywhere. It is platform-independent so you will not have any problems while running your applications on any platform using containers. Containers can virtualize the operating system which allows you to run your applications from anywhere from your platform or private data center or even to the public cloud.
What is A init Container in Kubernetes?
The init container in Kubernetes is a method to execute the first run initialization routine in a Kubernetes pod. It is a lightweight specialized container that always runs before the application or any other main container that runs in a pod. It contains the setup script and other utilities which are generally not present in the image of the application. It is usually defined in the pod specification along with the containers array. The basic usage of an init container is to bootstrap Appian with JDBC or RDBMS drivers that are not included in the Webapp Docker image. It can be used to delay or block the application or other containers to start when you need to wait for the bootstrap script to be completed or for resources and dependencies to be available.
How to Create an init Container in the Kubernetes environment?
As multiple app containers run in the pod, more than one init container can also run in a single pod. and they all will complete their execution before any app container starts its execution. The init containers run in a sequence, when one init container completes its execution then the next one starts its execution and when all init containers complete their execution then any app container starts its execution.
Moreover, if the execution of any init container fails, then Kubernetes repeatedly restarts the container until it completes its execution successfully. Now, let us create an init container in Kubernetes. But before that, make sure your system meets all the basic needs to create an init container. To create an init container you must have:
- Ubuntu 20.04 or any other latest version
- Kubectl command line tool
- Minikube cluster
Now, let us move on to the implementation.
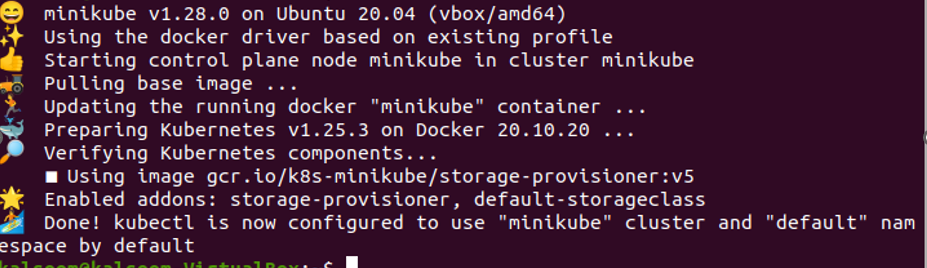
Step # 1: Start the Minikube Cluster
You need to start the minikube cluster to use the Kubernetes environment to run kubectl commands. To start the minikube cluster, we will be using the following command:
This will wake up the minikube cluster and allow you to run the kubectl commands in the terminal.
Step # 2: Create the YAML Configuration File
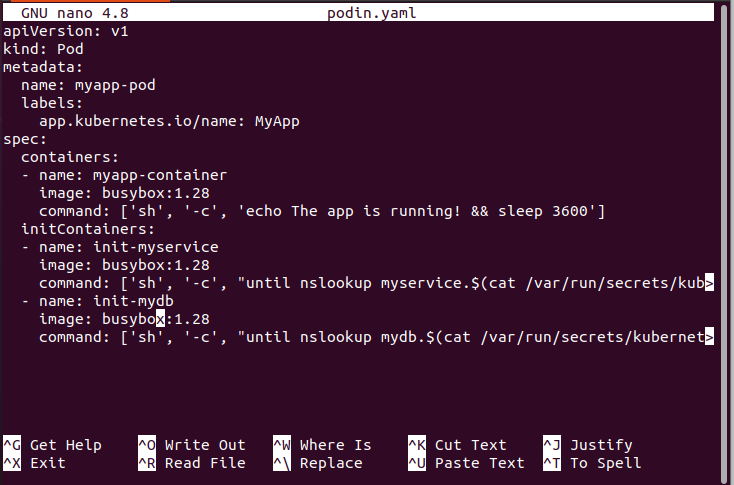
Now, the process of creating an init container has started. The first and foremost thing that you need to create the init container is to create a YAML configuration file. You can use the ‘nano’ command to create a new YAML file or open an already existing YAML file containing the configuration details. The command given below will allow you to create a YAML file of your chosen name:
Once the YAML file has been created, you can save the configuration details in it like the one given in the snapshot below:
Step # 3: Deploy the YAML File
Now that our configuration file is ready, let us deploy it using the kubectl apply command. The following command will allow you to run the pod on the configuration file which we just created:
![]()
The output clearly shows that the pod named myapp-pod has been created.
Step # 4: Check the Status of Pod
Now, let us check the status of the Pod with the help of the command given below:

This is simply showing the name, ready, status, restart, and age parameters of the pod. If you need to look at the detailed status of the pod, you can use the following given below:
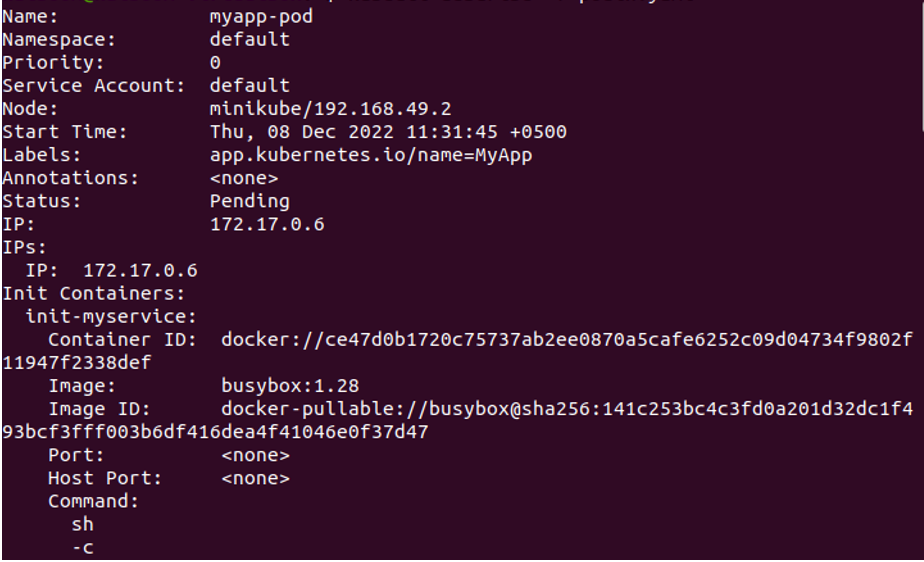
Here, you can see the in-detail status, which is telling you when the pod has started, which IP address it is running on, which node it is running on, etc. giving you a detailed picture of the Pod’s status.
Step # 5: Check the Logs of the Init Container
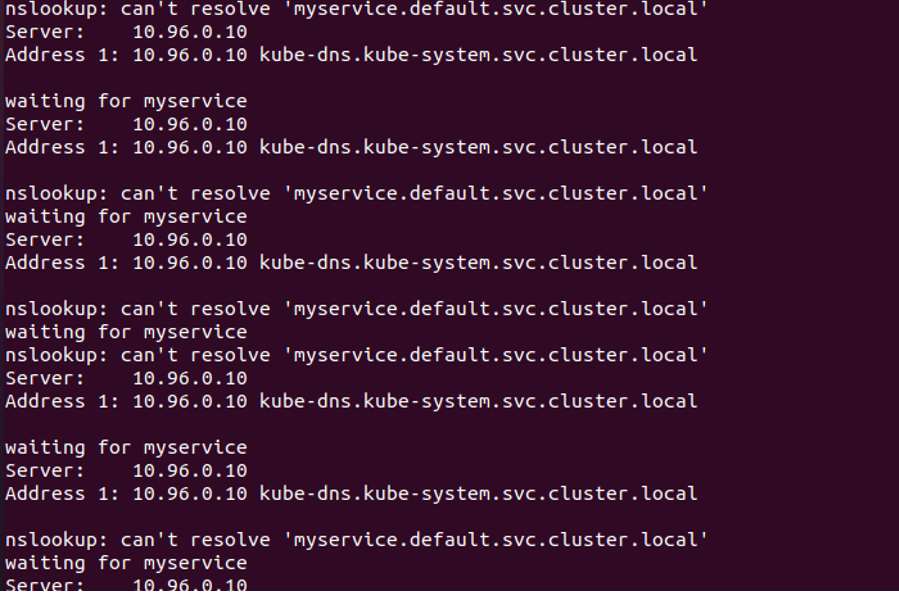
From the output given in the previous step, you can see that the pod which we have created is up and running. Now, if you want to see the logs of the init container which is running on that pod, you can use the command given below:
The init container name is ‘init-myservice’ which we specifically mention to check its log. Now, when you execute this command, you will get a similar output to the one given below:
Conclusion
In this article, we learned about the basic concept of what containers are while specifically focusing on the init container in Kubernetes. The init container is a lightweight specialized container that executes before any other container starts up in the pod. Its functionalities sometimes overlap startup and readiness probes. These probes can be used to perform an activity like blocking or delaying the application startup until a certain condition has been met. By demonstrating a simple example, we learned how to create an init container in Kubernetes.
Source: linuxhint.com