How to Create Git Aliases?
In Git, creating Git aliases can help you work more efficiently, increase your productivity, personalize your workflow, and improve the readability of your scripts and workflows. Git aliases can be customized to their personal preferences and workflow. They can create aliases that are specific to the development style, and that permit users to work more effectively and efficiently.
This tutorial will talk about:
What are Git Aliases?
Git aliases are custom shortcuts for frequently utilized Git commands. They permit the Git users for creating a shorter or more memorable command for a longer or more complex Git command. Git aliases can save time and reduce the amount of typing required for common Git tasks.
How to Create and Use Git Aliases?
To create and use the Git aliases, utilize the following syntax:
In the above-stated syntax:
-
- Replace the “alias-name” with the shortcut name that you want to set for the command.
- “git-command” indicates the command for which you want to make the alias.
Example 1: Create an Alias For “checkout” Command
To create/make an alias for the Git “checkout” command, try out the below-stated procedure:
-
- Navigate to the stated Git repository.
- Create a Git alias for a Git “checkout” command.
- List all branches.
- Utilize the Git alias “co” and switch to the other branch.
Step 1: Navigate to the Local Git Directory
First, run the “cd’ command and navigate to the stated repository:
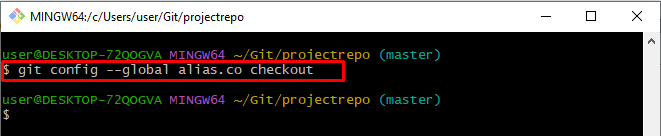
Step 2: Create an Alias
Execute the “git command –global alias” command and specify a name for the alias. Furthermore, add the Git command for which you want to create the alias:
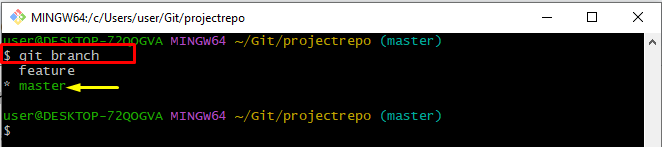
Step 3: List All Branches
Next, list all branches of the stated repository using the “git branch” command:
The below-stated output indicates all branches of the Git local repository and asterisk “*” beside the “master” branch specifies that it is a current working branch:
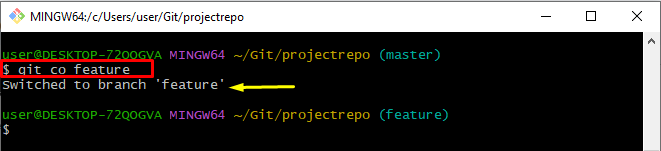
Step 4: Use the “checkout” Alias
Now, use the created alias as the Git command to check out the result. To do so, execute the “git co” along with the branch name and switch to it:
It can be seen that; we have successfully switched to the “feature” branch:
Let’s discuss another example for a better understanding.
Example 2: Create an Alias For “git log” Command
To create an alias for the “git log” command, follow the below procedure:
-
- Run the “git config –global alias” command to make an alias.
- Use the create “l” alias as a Git command.
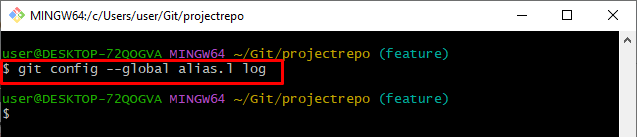
Step 1: Create a “git log” Alias
Use the “git config –global alias” command and add a name for the command for which you want to create an alias:
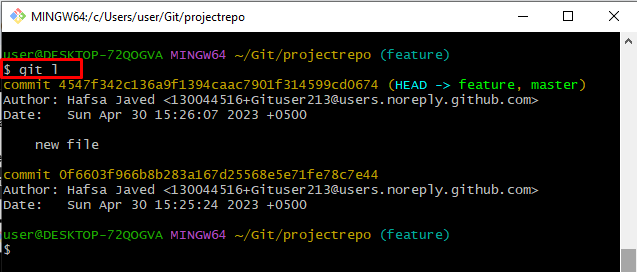
Step 2: Use the “git log” Alias
To view the complete Git log history, execute the “git l” alias command:
It can be noticed that the Git log history has been displayed successfully:
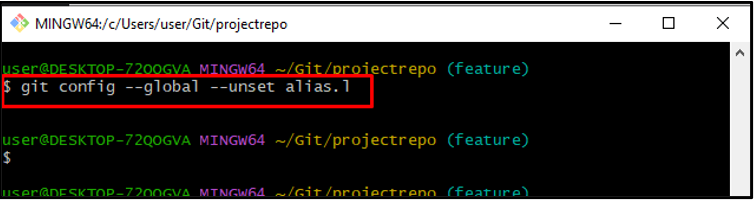
How to Unset Git Aliases?
To unset the Git alias, utilize the below-stated syntax:
Example
To unset the Git log alias “l” from the stated repository, run the below-given command:
That’s all about creating, using, and unsetting the Git alias.
Conclusion
To create an alias for the Git command, first, navigate to the stated Git repository and create a Git alias for a Git command by using the “git config –global alias” command. Then, use the Git alias as a Git command. This tutorial has stated the method for creating and using the Git alias.
Source: linuxhint.com