How to Create Custom Python Modules for Code Reusability
New Python File Creation
Begin by making a new Python file with the “.py” extension.
We can develop a module that comprises the common utility functions such as data type conversion, string formatting, and input validation.
Example:
def convert_string_to_int(inputString):
try:
return int(inputString)
except ValueError:
return None
def convert_string_to_float(inputString):
try:
return float(inputString)
except ValueError:
return None
def format_name(first_name, last_name):
return f"{first_name.capitalize()} {last_name.capitalize()}"
def is_valid_email(inputemail):
# A basic email validation check, you can use a more robust solution for production.
if "@" in inputemail and "." in inputemail:
return True
else:
return False
Within the “myUtils” module, we define the following functions in our example:
convert_string_to_int(inputString): It converts an “s” string to an integer and delivers “None” if the conversion fails due to a ValueError.
convert_string_to_float(inputString): It transforms an “s” string to a floating-point number, returning “None” if the conversion fails because of a ValueError.
format_name(first_name, last_name): This function takes the first and last names as parameters and returns a formatted full name with both the first and last names capitalized.
is_valid_email(inputemail): It performs a basic check to see if the input string email contains the “@” and “.” characters.
By importing the “myUtils” module, we can now utilize these functions in other Python scripts.
When we execute the “main.py”, the “myUtils” module is imported, and the functions that are described within it are used. This shows how to write a custom Python module for code reuse, particularly for common operations like data type conversion, string formatting, and input validation.
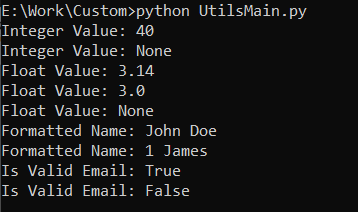
print("Integer Value:", myUtils.convert_string_to_int("40"))
print("Integer Value:", myUtils.convert_string_to_int("a"))
print("Float Value:", myUtils.convert_string_to_float("3.14"))
print("Float Value:", myUtils.convert_string_to_float("3"))
print("Float Value:", myUtils.convert_string_to_float("y"))
print("Formatted Name:", myUtils.format_name("john", "doe"))
print("Formatted Name:", myUtils.format_name("1", "james"))
print("Is Valid Email:", myUtils.is_valid_email("john.doe@example.com"))
print("Is Valid Email:", myUtils.is_valid_email("john.doeexample.com"))
Output:
Here is a real-world example of a custom Python module: Imagine that we are developing a web application. This application needs to perform several common tasks such as sending and receiving emails, logging the errors, and interacting with a database. We could write all this code ourselves, but it would be a lot of work and difficult to maintain the code over time. Designing specific Python modules for each activity is a more efficient approach.
For example, we could create a module for sending emails, a module for logging the errors, and a module for interacting with the database. Once we create these modules, we can import them into our web application and use them to perform the common tasks that we need. This makes it easier to maintain our code and it requires less time and work overall.
Email Module
The send_email() function sends an email using the SMTP protocol. It takes three arguments: the email subject, the email body, and the email recipient address. The function initially establishes a connection with the SMTP server and signs in using the provided credentials. Then, it composes the email message and sends it to the recipient. Finally, the function closes the connection to the SMTP server.
def send_email(email_subject, email_message, email_to_email):
# Simplified email sending using SMTP
try:
mail_smtp_server = "smtp.gmail.com"
mail_smtp_port = 587
mail_smtp_username = "your_username"
mail_smtp_password = "your_password"
# Connect to the SMTP server
mail_server_obj = smtp.SMTP(mail_smtp_server, mail_smtp_port)
mail_server_obj.starttls()
mail_server_obj.login(mail_smtp_username, mail_smtp_password)
# Compose and send the email
from_email_sender = "your_email@example.com"
email_message = f"Subject: {email_subject}\n\n{email_message}"
mail_server_obj.sendmail(from_email_sender, email_to_email, email_message)
# Close the connection
mail_server_obj.quit()
return True
except Exception as e:
print(f"Failed to send email: {e}")
return False
This function takes three arguments:
- email_subject: The subject line of the email
- email_message: The body of the email
- email_to_email: The email address of the recipient
Database Utility Module
The code is a Python module with two functions: create_sql_database() and execute_query().
- The create_sql_database() function creates or connects to an SQLite database. The database’s name is the only argument required. The function returns a connection object to the database or returns “None” if it fails to connect.
- The execute_query() function executes an SQL query on an SQLite database. It takes two arguments: a connection object to the database and the SQL query string. The function produces “True” if the query executes properly or “False” if it is unsuccessful.
import sqlite3
def create_sql_database(db_name):
# Create or connect to a SQLite database
try:
conn_obj = sqlite3.connect(db_name)
return conn_obj
except Exception as ex:
print(f"Failed to connect to the database: {ex}")
return None
def execute_query(conn_obj, sql_query):
# Execute a SQL query
try:
cursor_obj = conn_obj.cursor()
cursor_obj.execute(sql_query)
conn_obj.commit()
return True
except Exception as ex:
print(f"Failed to execute the query: {ex}")
return False
Logger Utility Module
Developers can use logging to log the messages to a file, to the console, or both. Logging can be a very useful tool to debug and troubleshoot the Python applications. The code is a logging Python module with two functions: setup_logger() and log_error().
The setup_logger() function configures and returns a logger instance. The name of the log file is the only argument required. The function returns a logger object that can be used to log the messages to the file.
The log_error() function logs an error message to the logger. It takes two arguments: a logger object and the error message string.
import logging as log_obj
def setup_logger(log_file_name):
# Configure and return a logger instance
log_obj.basicConfig(filename=log_file_name, level=log_obj.INFO, format="%(asctime)s - %(levelname)s: %(message)s")
return log_obj.getLogger()
def log_error(logger, log_error_message):
logger.error(log_error_message)
Test the Created Modules
Before using the custom Python modules, it is better to thoroughly test them locally or using the console.
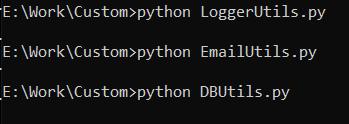
The first few lines of code import the necessary modules:
import LoggerUtils as obj_Log_Module
import DBUtils as obj_db_utility_module
The “EmailUtils” module provides functions for sending emails, the “LoggerUtils” module provides functions for creating and using the loggers, and the “DBUtils” module provides functions for creating and interacting with SQL databases.
Next, the code sends an email using the send_email function from the “EmailUtils” module.
email_subject = "Hello from our web app"
email_message = "This is a test email."
recipient_email = "recipient@example.com"
email_sent = obj_email_Module.send_email(email_subject, email_message, recipient_email)
The send_email function takes three arguments: the email’s subject, the message body, and the recipient’s email address. A Boolean result is returned by the function that indicates whether or not the email was delivered successfully.
Next, the code sets up a logger using the setup_logger function from the “LoggerUtils” module.
log_file_name = "app.log"
obj_app_logger = obj_Log_Module.setup_logger(log_file_name)
obj_Log_Module.log_error(obj_app_logger, "An error occurred in the web app.")
The log_error function takes the logger object and the error message as input and logs the message to the log file.
Next, the code creates a database and executes a query using the create_sql_database and execute_query functions from the “DBUtils” module.
db_name = "mypyapp.db"
conn_obj = obj_db_utility_module.create_sql_database(db_name)
if conn_obj:
create_sql_table_query = "CREATE TABLE IF NOT EXISTS users (id INTEGER PRIMARY KEY, name TEXT, email TEXT)"
result_query_executed = obj_db_utility_module.execute_query(conn_obj, create_sql_table_query)
if result_query_executed:
print("Database and table created successfully.")
# Close the database connection
if conn_obj:
conn_obj.close()
The create_sql_database function takes the name of the database as input and returns a connection object. The execute_query function takes the connection object and the SQL query as input and executes the query.
Finally, the code closes the database connection. It is important to close the database connection after we are finished using it to avoid resource leaks.
Complete Code:
import EmailUtils as obj_email_Module
import LoggerUtils as obj_Log_Module
import DBUtils as obj_db_utility_module
# Send an email
email_subject = "Hello from our web app"
email_message = "This is a test email."
recipient_email = "recipient@example.com"
email_sent = obj_email_Module.send_email(email_subject, email_message, recipient_email)
# Setup a logger
log_file_name = "app.log"
obj_app_logger = obj_Log_Module.setup_logger(log_file_name)
obj_Log_Module.log_error(obj_app_logger, "An error occurred in the web app.")
# Create a database and execute a query
db_name = "mypyapp.db"
conn_obj = obj_db_utility_module.create_sql_database(db_name)
if conn_obj:
create_sql_table_query = "CREATE TABLE IF NOT EXISTS users (id INTEGER PRIMARY KEY, name TEXT, email TEXT)"
result_query_executed = obj_db_utility_module.execute_query(conn_obj, create_sql_table_query)
if result_query_executed:
print("Database and table created successfully.")
# Close the database connection
if conn_obj:
conn_obj.close()
Code Execution:
Here is the successful execution of the Python custom modules:

Conclusion
This blog post shows how to write custom Python modules for a web application to automate the typical operations like sending emails, recording failures, and database interaction. Developers can save time, enhance the code maintainability, and simplify the code reuse by wrapping these functionalities in modular code, thus improving the reliability and efficiency of the application development process.
Source: linuxhint.com