How to Create a Webhook in Kubernetes
What Are Webhooks?
You might have come across the term webhook in your app’s settings. You might wonder whether a webhook is of some use to you or not. Well, the answer is an absolute yes. Webhook is a way to deliver the data to an application. Webhooks, in simple words, let you deliver the messages right from one app to the other. Whenever an event is completed, automated messages are sent to the application. Webhooks are what these automated responses are. The concept is very similar to SMS notifications.
For example, you own a paypal account, and someone wants to transfer your money. To know if the event is successful, you need some notification. This is where webhooks come into play. The webhook allows Paypal to tell your accounting app when the system completes your money order. Similarly, woocommerce notifies you about your orders in Slack via webhooks.
Now, let’s discuss the prerequisites and the step-by-step process for creating a webhook in Kubernetes.
Prerequisites:
Before the creation of webhooks, let us look into the prerequisites. You must make sure that your system complies with all the standards before you can build your webhook:
- Ubuntu 20.04 or any other latest version to have a Linux/Unix environment to work
- Kubernetes cluster
- Kubectl CLI to use the Kubectl commands, cluster communication, and manage the development environment
- Minikube or any other Kubernetes playground for creating the clusters
If you have not installed these tools, your first step is to install them immediately. Once you have gotten these tools, we can move on to the next part. Let us dive right into the creation of webhooks, step by step.
Step 1: Configuration File Format
For HTTP configuration mode, webhook requires a file. This configuration file uses the Kubeconfig file format and specifies it by the –authorization-webhook-config-file=SOME_FILENAME flag. The file comprises two elements – users and clusters. Users make references to the API server webhook within the file, whereas clusters make references to remote service.
Here is what a simple configuration file looks like:
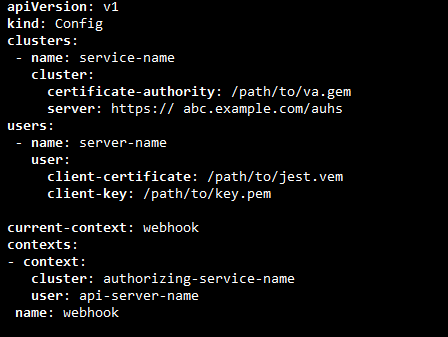
In the attached screenshot, you can see the API version and the kind of API in the first two lines. After that, the clusters, users, and current context information are presented. Keep in mind that kubeconfig files need context. Therefore, you must give one to the API Server. This is what we accomplished in the previous step, as you can see from the previous image.
Once HTTP configuration is done successfully, we can move forward to the next step which is requesting the payloads.
Step 2: Request Payloads
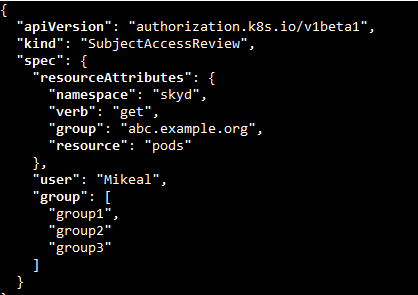
The API server POSTs a JSON-serialized authorization.k8s.io/v1beta1 SubjectAccessReviewobject when it is about to get authorized. This is done to notify about the authorization decision. This object contains information about the field and resource. The resource information defines the properties that were accessed or requested, whereas the field details identify the person that attempts to make the request.
Here, it is an important thing to keep in mind that the versioning compatibility rules are no different for webhook API objects and are just as similar to Kubernetes API objects. Correct deserialization is crucial to webhook creation. To achieve a precise deserialization, the implementers should always take two factors into account: the potential for beta objects’ looser compatibility promises and the need to check the request’s APIVersion field. Moreover, the API server must enable the authorization.k8s.io/v1beta1API extensions group (–runtime-config=authorization.k8s.io/v1beta1=true).
Here is an example request body that we attached for your help:
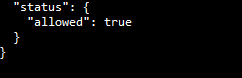
Remote service is held responsible for allowing and disallowing access, which is done by filling in the status field. We will discuss both types of responses step by step. Talking about the permissive response body’s spec, you may leave it empty or completely omit it. Most of the time, it is ignored. An example of allowing access is as follows:
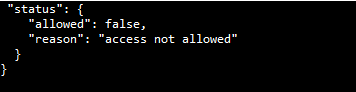
Next up is the disallowing access. There are now two methods for executing a disallowing response. The implementers usually prefer the first method in most cases. This method is dependent upon the configuration of authorizers. Authorizers are allowed to approve the request if they have been configured. In the opposite scenario, where there are no authorizers or just do not allow the request, the request does not get approved to generate a permissive response. The following image shows a denied response:
Why Use Kubernetes for Webhooks?
Kubernetes is an open-source system to manage the communication between software applications, scaling, and automation. In terms of backend cluster speed and manageability, Kubernetes has significantly advanced in recent years. Owing to its wonderful flexibility, scalability, and ease of operation, it is one of the best software for backend clusters today. One of the key features of Kubernetes is that it provides features to ensure the secure production workloads.
Difference Between API and Webhook
Both API and webhooks are frequently used in the software world daily. You may use the terms interchangeably. Since they both have a similar operation, confusion is quite valid. However, they are not the same things. The prime difference between API and webhook is that APIs are manual but webhooks are automated. In the case of APIs, they need to be asked to access or deny the requests. However, webhook does that on its own. We can say that webhook is a subset of API. Therefore, they have a much-limited scope. The bottom line is that APIs require a user’s command to perform a response, whereas webhooks are not dependent on any such user commands.
Conclusion
This article presented a bird’s eye view of what webhooks are and how to create them on Kubernetes. In this article, we learned why Kubernetes is the most popular software for building webhooks. Following the guide which is stated in this article, we will assist you to make your webhooks in no time, and with ease.
Source: linuxhint.com