How to Create a Simple to-do List With HTML, CSS, and JS
This post is all about creating a simple to-do list with the help HTML, CSS, and JavaScript.
How to Create a Simple to-do List With HTML, CSS, and JavaScript?
To make a simple to-do list with HTML, CSS, and JavaScript, first, make a simple list in the HTML with the help of the “<ul>” tag. Then, access the list in CSS and apply various CSS properties for styling the list including color, margins, and other. After that, utilize the “<script>” tag and add the JavaScript code.
To do so, try out the code stated below.
HTML Part
In the HTML part, follow the step-by-step instructions given below.
Step 1: Create Main div Container
First, make a div container and specify an “id” with the help of the id attribute. You can also utilize the class attribute by specifying a particular name.
Step 2: Insert Heading
Utilize the heading tag to insert a heading inside the HTML page and embed the text for the heading.
Step 3: Make Input Field
Specify the input “type” as “text”, assign an id, and utilize the placeholder attribute to place the text at the input field.
Step 4: Add a Button
Use the “<span>” element and add the “onclick” event to trigger the function when the user clicks on the “Insert” button.
Step 5: Make a List
Now, with the help of the “<ul>” tag, we will make an unordered list and add the element of the list using the “<li>” tag:
<div id="main-Container" class="head">
<h2 style="margin:5px">To-Do List</h2>
<input type="text" id="input_data" placeholder="Enter Title">
<span onclick="newElement()" class="Btn"> Insert</span>
</div>
<ul id="list">
<li>JavaScript</li>
<li class="checked">Java</li>
<li>HTML/CSS</li>
<li>Docker</li>
<li>Discord</li>
<li>Windows</li>
<li>PowerShell</li>
</ul>
</div>
As a result, the list has been created successfully:

CSS Part
In the CSS part, you can apply styling by accessing the element with the help of the id or class. To do so, follow the instructions stated below.
Step 1: Style “main” div
Access the “main” div container with the help of the assigned “id” along with the selector as “#main”:
margin: 20px 60px;
padding: 30px 40px;
}
After accessing the div container, apply the below listed CSS properties:
- “margin” specifies the space outside of the defined element.
- “padding” determines the space inside the defined boundary.
Step 2: Apply Styling on List
Access the list and apply the below-mentioned properties for styling the list:
cursor: pointer;
position: relative;
padding: 12px 8px 12px 40px;
background: #f1cbcb;
font-size: 16px;
transition: 0.3s;
}
Here:
- “cursor” determines the mouse cursor be displayed when pointing over an element.
- “position” is utilized for setting the position of an element. To do so, the value of the position is set as “relative”.
- “background” specifies the color at the backside of the element.
- “font-size” CSS property determines the size of the font.
- “transition” permits to change of property values smoothly, over a given duration.
Step 3: Set Color For List Elements
Access the odd elements of the list and set the “background” color:
background: #cfeeeb;
}
Access the list along with the “hover” that is used when the user mouse over the element. Then, set the background color. To do so, the value is set as “#ddd”:
background: #ddd;
}
Step 4: Style List Items with “checked” class
Utilize the class name with the list element to access the item where the particular class attribute is specified:
color: #fff;
background: #888;
text-decoration: line-through;
}
Then, apply the below-listed properties:
- “color” property is used to set the color for the font.
- “text-decoration” determines the styling for the text to decorate it. In this case, the value is set as “line-through” to make a line of the entire text.
Step 5: Style head Class
To style the head class, access the class and apply “background-color”, “color”, “padding”, and “text-align” CSS properties:
background-color: #685ef7;
color: rgb(252, 186, 186);
padding: 30px 40px;
text-align: center;
}
As a result, list, and elements of the list have been styled successfully:
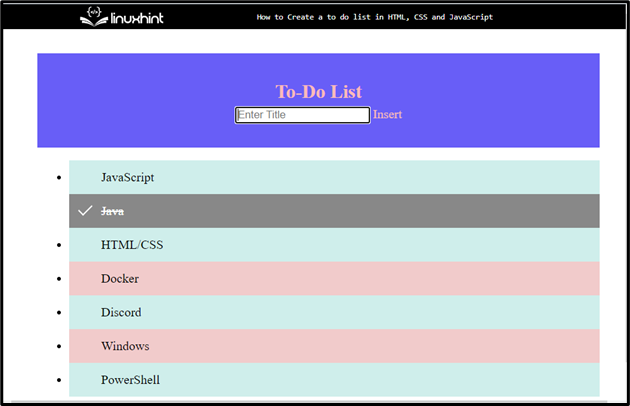
JavaScript Part
In this part, utilize the “<script>” tag and add the JavaScript code in between the tags. To do so, follow the mentioned steps stated below:
Step 1: Get List
Utilize the “getElementsByTagName()” method to access the list and store it in an object:
Declare a variable:
Step 2: Append Element
Use the for loop and define the length to iterate the element. Then, add the following code:
- Create new elements using the “createElement()” method and store them in a variable.
- Add text for each element using the “createTextNode()” method.
- Append each element and store the created element in the list:
var span = document.createElement("SPAN");
var txt = document.createTextNode("\u00D7");
span.className = "close";
span.appendChild(txt);
nodeList[i].appendChild(span);
}
Step 3: Hide Current List Item
To hide the current list item, access the class with the help of “getElementsByClassName()” method and store it in a variable:
var i;
Use the “for” loop to iterate the element and call the function when the user performs an event.
close[i].onclick = function() {
var div = this.parentElement;
div.style.display = "none";
}
}
Step 4: Add Checked Symbol
Select the list using the “querySelector()” and insert it in a variable:
Invoke the “addEventListener()” method and use the “if” statement to check the condition. Add a “checked” symbol when clicking on a list item, otherwise return false:
if (ev.target.tagName === 'LI') {
ev.target.classList.toggle('checked');
}
}, false);
Step 5: Create New Item
To create a new list item when the user clicks on the “Insert” button, utilize the following code:
- First, invoke the function “newElement().
- Create an element with the help of the “createElement()” method and store it in a variable.
- Access the input data by using the id and append child.
- Use the “if” statement and check condition. If the text field is empty then it will trigger the notification to add something in the text area. Otherwise, it will add the data to the list.
- Utilize the “for” iterator loop and call the function to trigger the event:
var li = document.createElement("li");
var enterValue = document.getElementById("input_data").value;
var t = document.createTextNode(enterValue);
li.appendChild(t);
if (enterValue === '') {
alert("Must add something");
}
else {
document.getElementById("list").appendChild(li);
}
document.getElementById("input_data").value = "";
var span = document.createElement("SPAN");
var txt = document.createTextNode("\u00D7");
span.className = "close";
span.appendChild(txt);
li.appendChild(span);
for (i = 0; i < close.length; i++) {
close[i].onclick = function() {
var div = this.parentElement;
div.style.display = "none";
}
}
}
Output
As you can see, we can successfully add and remove elements in the created to-do list.
Conclusion
To create a simple to-do list, first, create a list in HTML using the “<ul>” tag and add elements with the help of “<li>”. After that, access the list in CSS and apply properties including “background”, “color” and others. After that, add the JavaScript code, that will trigger an event when the user adds the data in the text field and clicks on the created button. This tutorial has stated the method for making a to-do list by utilizing HTML, CSS, and JavaScript.
Source: linuxhint.com