How to Create a New User in Ubuntu 22.04
This guide will explain to you how can you manage the users in Ubuntu 22.04 through the terminal and the UI. Also, we will take a look at how can you assign and revoke the sudo privileges for any user. We will provide the step-by-step instructions along with screenshots to make the process easier for you.
Please remember that for this process, you need to have an account with administrative privileges.
Through the Terminal
Like everything else, you can manage your users through the terminal in Ubuntu 22.04. All you need is an account with sudo privileges and you’re ready to start.
Adding a User
Adding a user is pretty straightforward. You can use the following:
Here, you need to replace the [username] with your desired name for the user account. For instance, let’s say we create a user account for eminem. You execute the following:
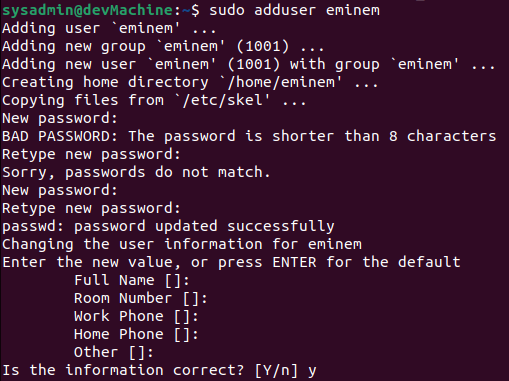
Executing this command prompts you for the sudo password. Then, it asks you to create a password and re-type it for the new user account.
Right after it, you will be asked for information such as the user’s full name, room number, and work phone number, along with some other stuff. If you want, you can provide all of these details or you could press return to set the default values for each section.
In the end, you are prompted to confirm that the information that you entered is correct. You can do so by pressing “y” and proceeding to the next step.
Verifying the User Add
At the successful completion of the last step, if you still want the confirmation that the user has been successfully added, you can use the cat command combined with the grep command as such. Let’s see if the user account for John has been created:
![]()
This shows that a user by the name of “eminem” now exists.
Assigning Sudo Privileges to the User Account
Now that the user account is successfully created, you can give them the sudo privileges (if that’s what you want to do). Type out the following command:

Executing this adds the specified user account to the sudo group and elevates the rights assigned to it.
Removing Sudo Privileges from the User Account
If you elevate the privileges for any user by mistake, or if there is no need for them anymore, you can execute this to take away the sudo privileges from them:

This removes the sudo privileges from the specified user account.
Deleting a User
Deleting a user account is similar to removing the sudo privileges. You can remove the account using the following command:

Just be careful not to remove the admin account, or the command will error out.
Through the GUI
If you don’t want to fiddle around the terminal with commands to create and manage your user accounts, you can go into the system settings through the GUI to achieve this.
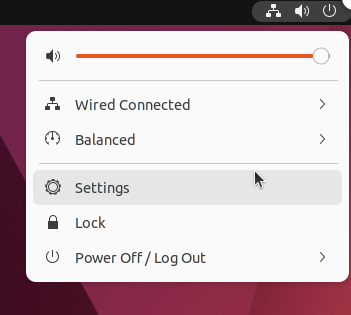
From the power button in the upper right on your desktop, open up the system settings.
In the menu on the left, scroll down until you see the section titled “Users”. Click on it to get the user account management options in the section on the right.
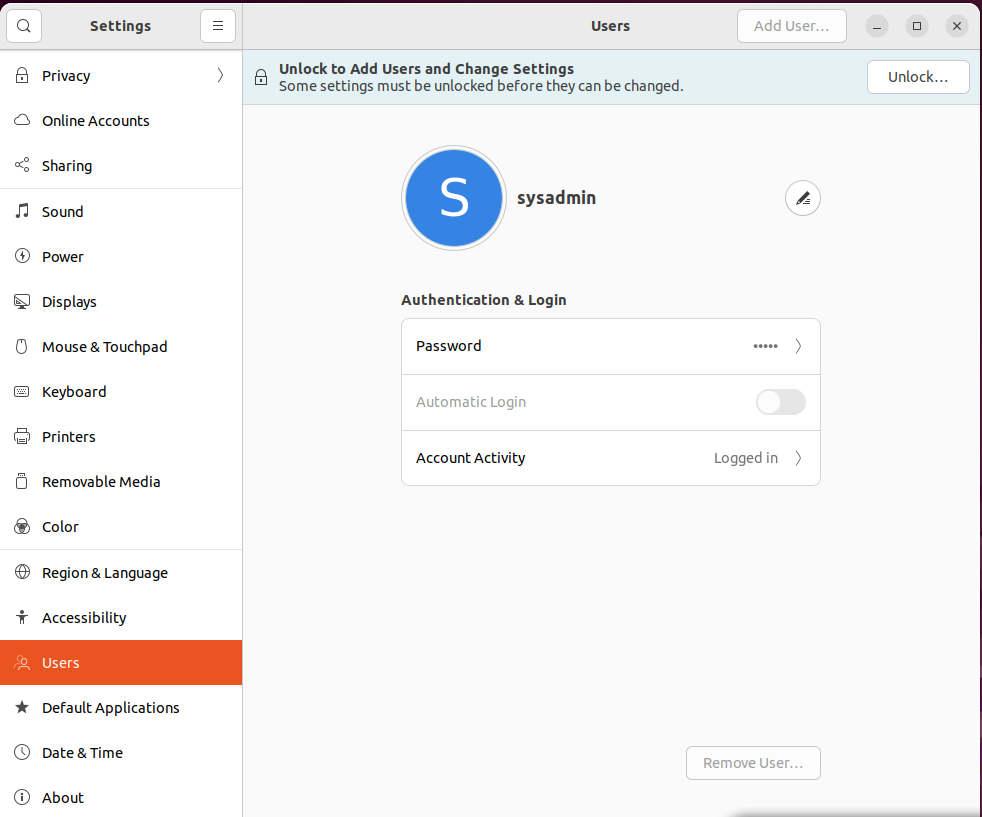
By default, you will see that all of the options are disabled. You have to provide your sudo password to unlock all the options and proceed.

Adding a User
After you are authenticated, click on the “Add User” button from the top right of the window.
In the dialog box that pops up, you’ll see all the text boxes and options to provide the information for the new user account that you are creating.
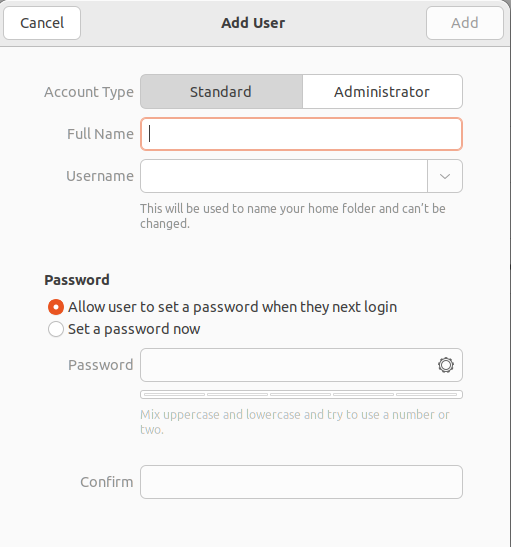
Fill out all of the boxes and click on the green “Add” button in the upper right corner to complete the process.
Verifying the User Add
After you click the “Add User” button, the current dialog box closes out and you will be in the previous window. In there, you will see the user that you created in the section at the top.

Assigning Sudo Privileges to the User Account
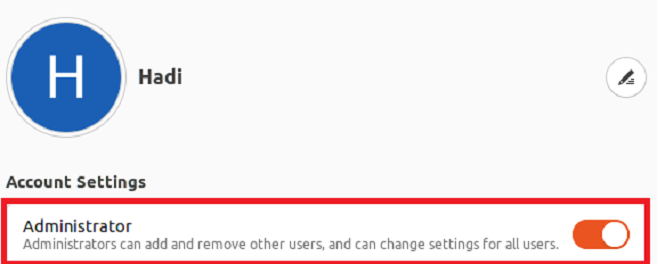
It’s pretty simple. You can set it up at the time of creating the user account, or you can edit an existing account. In the account creation dialog box, you will see a toggle at the type which, when set, defines the type of the user account. You can visually select the “Administrator” to assign the sudo privileges to the account.
![]()
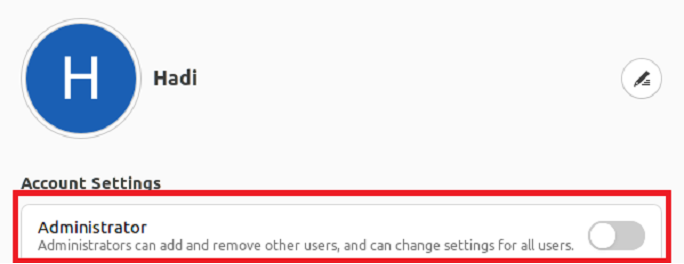
If you are editing an existing account, you can edit through the option as shown in the following:
Removing Sudo Privileges from the User Account
Similar to the previous step, you need to visually select the “Standard” to remove the sudo privileges from an account while creating an account. Otherwise, if you want to edit an existing account, you just need to turn off the highlighted option.
Deleting a User
If you don’t need the created user account, you can easily remove it from your Ubuntu 22.04. After you unlock the edit mode by authenticating with your sudo credentials, you can select the account that you want to remove and click on the red “Remove User” button.
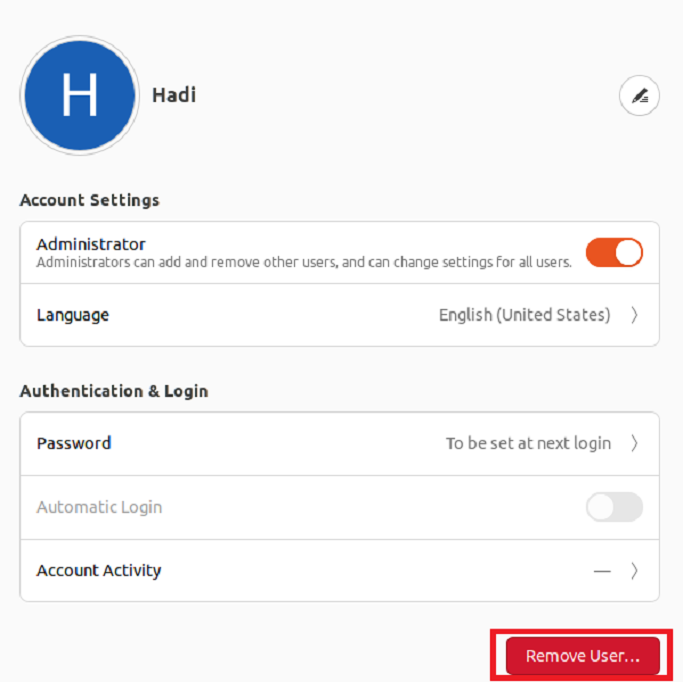
You are prompted to confirm if you want to retain the files for this user account and be given the appropriate choices using the multiple buttons. After that, the user account is accordingly removed from your computer.
Conclusion
Thank you for sticking with us throughout the guide. If you followed the procedure and haven’t gotten any errors yet, you now know the whole process of managing the users within Ubuntu 22.04.
If at any step you run into any issues, feel free to engage us through the comments below and we’ll gladly walk you through the process.
Source: linuxhint.com