How to Create a Docker Image?
“Are you beginning your career in programming or DevOps and opted to start with Docker?
If you have no clue what docker is and how it makes the life of a DevOps engineer easy, we have got your back with this incredible tutorial about docker images. This article includes all the required steps on how you can successfully create a docker image. We will guide you with the help of examples to learn how to build a docker image quickly and easily.
Developing applications need a lot more than just writing a few lines of code. Different architectures, multiple languages, discontinuous interfaces between tools, and various framework models for each stage of a lifecycle create enormous complexity. Here, dockers come to the rescue of the developers and especially the DevOps engineers by simplifying and accelerating the workflows and providing developers the freedom to innovate with their selected tools, development environment, and application stacks.
In this tutorial, we will take you through the complete lifecycle of Dockers step by step. We will describe the basic concept of dockers and docker images and how a docker image is created in ubuntu environments. We will also provide you with the different methods of installing the dockers in ubuntu environments. You can also install and use dockers in the windows operating system as well. However, this article is specifically designed for the installation and creation of docker images in an Ubuntu platform.
By following this guide, you will be able to create your first docker image quickly and easily. So, let us begin!”
What is Docker?
Before we give a technical definition of what docker is and why it should be of value to you as a DevOps engineer, let’s discuss a thorough scenario first. Suppose you have written a code, and it is working well on your system, and now you shared it with a tester, but the code is not working on the tester’s system. That is mainly because of the different computer environments.
As a developer, you must understand that each computer environment is different, with different configuration files. A program code that is successfully executing in your system might give you a list of errors if you run it on another computer. This happens due to the different servers, configurations, and other basic differences in the computer environment.
So, the question here is that if you get into such a situation, how will you cope with that scenario?
Well, as a novice developer, you might think of building the same virtual machine for both systems, but is that a feasible or the right solution to the problem?
It might resolve all the errors but might give you a slow response, and you may have to compromise on the feasibility. So, what other option do we have?
The docker containers can help in such kind of scenario by providing an easy-to-use, fast, and lightweight working environment that can be used to run the application on any system without encountering any problems.
Let us see What Docker can do for us in Such a Situation
Dockers is an open-source software platform or containerization platform that simplifies the process of development, execution, management, and distribution of applications. It enables the usage of a container by developers to bundle applications. The dockers do this by virtualization of the computer’s operating system. It simply standardizes the executable components by combining the source code of the application with OS libraries and the dependencies needed to execute the code in any environment. The docker container enables the developers to run their code in any computer environment, be it a personal laptop, or official system, or a system in the cloud. As long as you are working on docker, you can run your program code in any computer environment.
The basic difference between dependencies and configuration will have no impact on the execution of the application code. Containerization is an old concept; however, it is modified with dockers. Before docker, the containers were not this much popular among the developers as they are now.
Docker is a tool that is used to automate the process of application deployment in a lightweight, fast, and efficient container so that the application or the code can be executed in different computer environments.
The main point to note here is that a container is a software package that is made up of all the dependencies needed to run an application code in different computer environments. On the same system, several containers can be running and kept separate from one another. The containers are quick and easy to configure, and they are highly productive as well. They allow you to run your application code in any type of computer environment without making any changes in it and encountering any errors.
You might be thinking that what is the difference between a virtual machine and docker; they both are the same as they are using the containers.
The virtual machine environment and the docker environment look similar, but in actuality, they are quite different. They both provide the same output but with different functionalities. Now, let us see a few differences between dockers and virtual environments to get a better understanding of both environments. The biggest difference between dockers and the virtual machine is that the virtual machine has a separate guest OS for each container. For example, if your virtual machine has 10 containers, it will have 10 separate guest OS for each container.
However, the dockers do not have any guest OS for any container making it lightweight and faster than any other system. Despite eliminating the guest OS and being lightweight, it still provides the same functionality as a virtual machine.
Dockers take a very small memory space, while the virtual machine takes a lot of memory space on the host computer. The reason is the same; the dockers do not have the guest OS saving the memory space, while virtual machines have separate guest OS for each container which takes a lot of space in the memory. Therefore, because of being lightweight, dockers boot up faster, demonstrating a high efficiency, while a virtual machine takes a lot more time to boot up, which results in low efficiency.
Hence, the performance of the docker environment is quite consistent and much better than VM. Setting up a docker’s environment is very easy, and it is also easy to scale up. Containers depict a very efficient performance as they run and execute in a single docker environment. On the other hand, running multiple virtual machines shows an unstable performance. Similarly, to port the docker across various platforms is much easier and faster than a virtual machine.
So as a developer, you can build your code and share it with the tester, and it will run perfectly as long as both of you are using the docker’s environment. If you don’t utilize dockers, you are not required to make changes like you normally would. You will not encounter any errors as you may do if you do not use the docker environment. The docker’s environment is composed of a few components. It is built on a proper structure so let’s move on to the list of the main components of a docker.
Components of a Docker
The dockers work in the client-server model and are composed of 3 main components: host, client, and registry. It is built on a client-server architecture; the client requests the server, and the server fulfills the client’s request. In the docker environment, the client builds the application and sends it to the server for execution. Let us explore each component of a docker one by one.
Docker Host: This is a host environment where the code is executed and is used to run the applications. It consists of docker images, daemons, containers, storage, and a network. The docker daemon manages all the commands received from the REST APIs and CLI. It also oversees all the actions performed within the container and manages its services while communicating with other daemons. The image of the Docker container that includes all the modifications made to the container is called a Docker image. The storage is used to store the images and files on the docker repository. The containers are used to run the application in different environments.
Docker client: The docker client component is used to communicate with the docker daemon or the server through REST APIs and different commands. When you run a command on the client side, the docker client sends those commands to the docker server. The docker server receives these commands as a REST API request by the client for communication. It also provides the Command Line Interface (CLI) to run the commands like docker run, docker commit, docker exit, docker stop, docker push, docker pull, and docker build. In short, the main purpose of the docker client is to get the images from the directory and get them to run on the docker host.
Docker registry: The docker registry is the repository that stores the images. It provides the location where you can store your images for later use. There are two types of docker registry; one is known as a public registry, and the other one is known as a private registry. Public registries are also known as docker hubs. The private registry is private to the enterprise or the docker author. Docker run, docker push, and docker pull are a few of the commands which are used with the docker registry. We’ll present the list of the docker command in the coming sections.
Docker Commands
Docker is a portable environment that enables you to create, move, and execute your application in any place. It allows you to package all the libraries, dependencies, services related to the application, and operating system together to quickly build your application. For that reason, it became very famous as an easy-to-use containerized technology. These days, among new DevOps engineers, it is one of the utmost foremost technologies. It is similar to the virtual machine but provides opposite services, such as a lightweight and fast working environment.
The docker image is a set of commands that are used to build in a docker container. You can refer to a docker image as a snapshot of a virtual machine that gives instructions to the system to build a docker environment. The commands are necessary to build a complete running container consisting of all the dependencies, environment files, tools, libraries, and required configuration to execute the application in a container. There are many docker commands, and each has a different function. Each command follows a different syntax, takes different parameters, and provides different results. Let us have a quick look at the list of commands used by the dockers:
| Commands | Description |
|---|---|
| attach | Attach or link the input stream, output stream, and error stream to an already running container |
| Build | Create an image from Dockerfile |
| Pull | Get the repository or the image from the docker repository |
| version | Get the information on the docker version |
| update | Configure the update of all containers |
| top | Get the container’s running process |
| stop | Stop the container(s) |
| stack | Manage the stacks of docker |
| run | Execute the command in a new container |
| rename | Change the name of the container |
| pause | Make the running process pause |
| load | Get, load, and download an image from STDIN or tar archive |
| images | List down all the images |
| export | Export tar archive of a container’s file system |
| events | Get the events from the server in real-time |
| commit | Build a new image of the changes made to the container |
| search | Search the images in the docker hub |
| push | Push the repository or the image to the docker registry |
These are the few base commands used by the docker. As you can see from the description, each docker command serves a unique purpose and returns a different result.
Now, let us step through what this guide will cover further. We are going to discuss what a docker image is and how it works. Along with that, we will also provide you with all the necessary information about the prerequisites and how to install the docker in the ubuntu environments. So let us start!
Docker Images: What are They?
A docker image is a template or a system file that consists of the application and all the dependencies necessary to run the application in a docker container. It is a set of instructions constructed on multiple layers that are used to build a docker container. It also acts as a startup point for using the docker. A container, as discussed above, is a virtualized environment used by docker to build and run an application. It is used to develop, execute, and deploy applications in various types of computing environments.
A docker container usually uses one machine while sharing its kernel and virtualizing the operating system to run more isolated processes. However, the docker image acts as a snapshot of the docker in other types of virtual machine environments. It keeps the record of the docker container and is immutable. Immutable docker images mean that you cannot change them, but you can share, copy, duplicate, or delete them.
The immutable docker images help a lot in testing and configuration of software as they won’t be changed no matter what happens. You need to create a new docker image if you need to save the changes made to the existing docker image.
The docker containers entirely depend on the docker image to be able to run as images are used to create a runtime environment and are necessary to run an application. Hence a runnable docker image is important for a container to be in a useful position. Now, let’s move further and see what a docker image contains in it.
Parts of a Docker Image
A docker image is composed of various layers containing everything required to configure an environment for the container. It is built layer by layer by packaging everything together. It includes tools, files, dependencies, and all relevant system libraries. Here is the list of the main items of the docker image:
Base image: The first layer is known as the base image. The preexisting base images are also available, and they can be created from scratch as well by using the “build” command.
Parent image: It is the base image’s alternative, serving the same purpose as the base image. It is an image that is reused and that acts as a base for every other layer.
Layers: Multiple layers can be added to the base image with the help of code that allows the image to be able to run in a container. The CLI (Command Line Interface) is used to see the docker image through docker history, or it can also be viewable under the path /var/lib/docker/aufs/diff. By default, the docker shows all the top layer images, which include the size of a file, tags used, and repository. The middle layers are cached so that the top layers can be easily viewable. The storage drives in dockers are used to manage the content of layers in the image.
Container layer: This layer is used to create the new container, maintain the changes in the running container, and customization of containers as well. The container layer efficiently manages all the changes made to the already running container by saving new data and deleting old files, and making changes to the existing files.
Docker manifest: The docker manifest employs the JSON format to demonstrate the docker image by using the digital signature and image tags.
A simple docker image contains all these parts to enable the container to work. Now let us demonstrate the working of the docker image in the next section.
How Does the Docker Image Work?
Before we get to know how to create a docker image, let us learn how a docker image works. Understanding how a Docker image functions are extremely important. As we know that a docker image consists of multiple layers, so it works with a layered file system. In simple words, the docker image packages up the preconfigured server environment with the applications, which can be used privately or shared publicly with other docker users. It acts as a starting point for the beginner DevOps engineer or anyone who is interacting with the docker’s environment for the first time.
Now let us take an example. Suppose you are working on an operating system, say Linux, and execute an application on it. The docker image will bundle up all the files together, i.e., dependencies, code of the application, installation, etc., to provide a completely operational container environment.
The point to note here is that to create a docker image; you have started with a base image. But a docker image can also be built from scratch by using a “build” command. Here we will tell you where you can find an off-the-shelf or a readymade image to give you a head start in creating your own containerized applications, services, and tools.
We will also discuss how you can build a customized docker image. As a new docker user, the process of building a custom docker image is very important to understand. In most cases, a base image is already available to use that fulfills all your requirements. But in some cases, you might need to create a completely customized docker image to spin up a bare-bone foundation for your new container.
The following section will demonstrate the two methods to create a docker image. We will guide you step by step on both processes so that by the end of this article, you will be able to work with both methods suitable to your requirement. Let us have a quick overview of both methods to know the basics and then get into the depth.
Method # 1: Create a Docker Image From an Existing Container
In this method, you will utilize a preexisting base image, make your required changes to it, customize it according to your needs, and finally create a new docker image from it. A container is run on a pre-existing docker image while you make live changes to the container and save the final product as a new image.
Method # 2: Create a Docker Image Using a Docker File
This method allows you to follow the instructions from a file – Dockerfile. The Dockerfile guides you on how to build a base image and make your desired changes to it. It allows you to create a plain text file in which you specify your instructions for creating a docker image.
We will cover both methods in detail later in this tutorial. But first, we need to fulfill the requirements of prerequisites. We need to make sure that our systems have all the prerequisites for creating a docker image.
Prerequisites
In this section, you will get to know the prerequisites for installing the docker, building a docker image, and using the docker container for application development in Ubuntu OS. Here are the necessary prerequisites of the Ubuntu operating system for the dockers.
Prerequisites for Ubuntu Operating System
For creating a docker image in an Ubuntu environment, you need to have Ubuntu 20.04 with a minimum of 1 GB RAM. 2 CPUs, and free 25 GB disk space.
Once you fulfill all the prerequisite requirements, you are ready to start the installation process.
How to Install Dockers on Ubuntu?
As we know all the basic requirements and prerequisites to install the dockers on the Ubuntu system, let us get started with installing the dockers in Ubuntu. By default, Ubuntu 20.04 is available in the FocalFossa repository, but if you don’t have it, get it installed first. Let’s follow the steps given below and install the Dockers on Ubuntu.
Step # 1: Update Packages
The first step to installing the docker images is to update the complete list of packages on the Ubuntu directory. For that, use the “sudo apt update” instruction. On a system running Ubuntu 20.04, this script will provide the output seen below:

Step # 2: Install Docker
Once you have updated all the packages, install the dockers by using the “sudo apt install docker.io” command. After executing this command in your system, you will be able to see the following result:
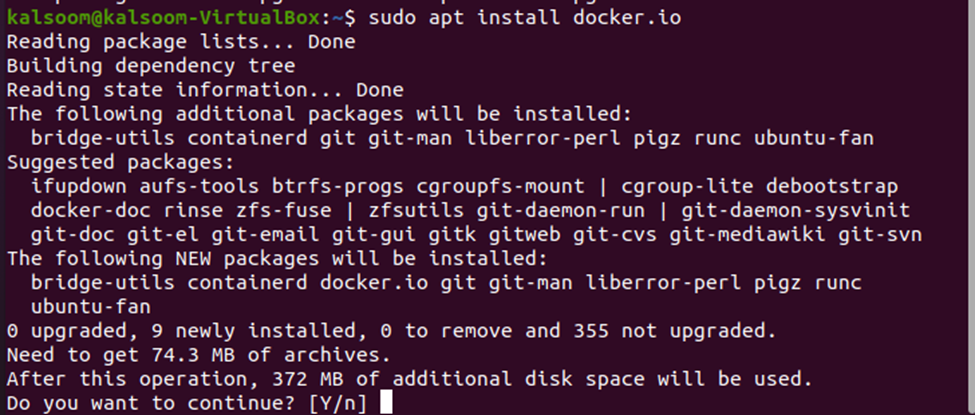
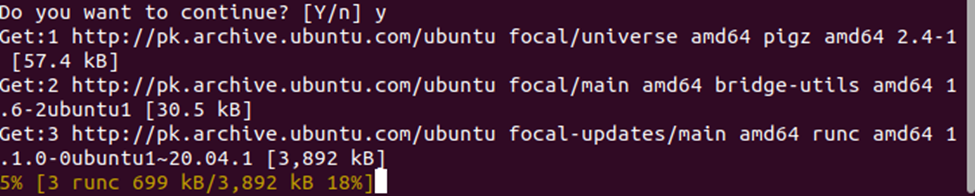
The system will read the complete list of packages, build the dependency tree, and install all the additional packages required to have a docker environment on your system. It will also ask for your permission, if necessary and get all the files and packages for creating the docker’s environment. See the output below:
Step # 3: Start Docker
Note that the process of installation is completed successfully. So, the docker services are ready to start. To do that, first, start the docker with the “systemctl start docker” command. See the command below:

Step # 4: Enable Docker Environment
Once the docker is started, enable the docker environment with the “systemctl enables docker” command. See the command below:

Step # 5: Check the Status of Docker Services
Now the docker services are ready to be used. Let us check the status of the services with the “systemctl status docker” command. See the output below:

As you can see, the docker services are ready to be used. They are active and operating in your system right now.
Step # 6: Test the Installation
Now that our docker is successfully installed in Ubuntu 20.04, we should test that it is installed correctly. The “sudo docker run” statement is used to ensure that the docker was correctly installed. Once you enter the “sudo docker run hello-world” command on your system, it will promptly ask for your password. After you provide the password and are successfully authorized into the system, the system will pull the “hello-world” file. Here is the output of the “run” command:
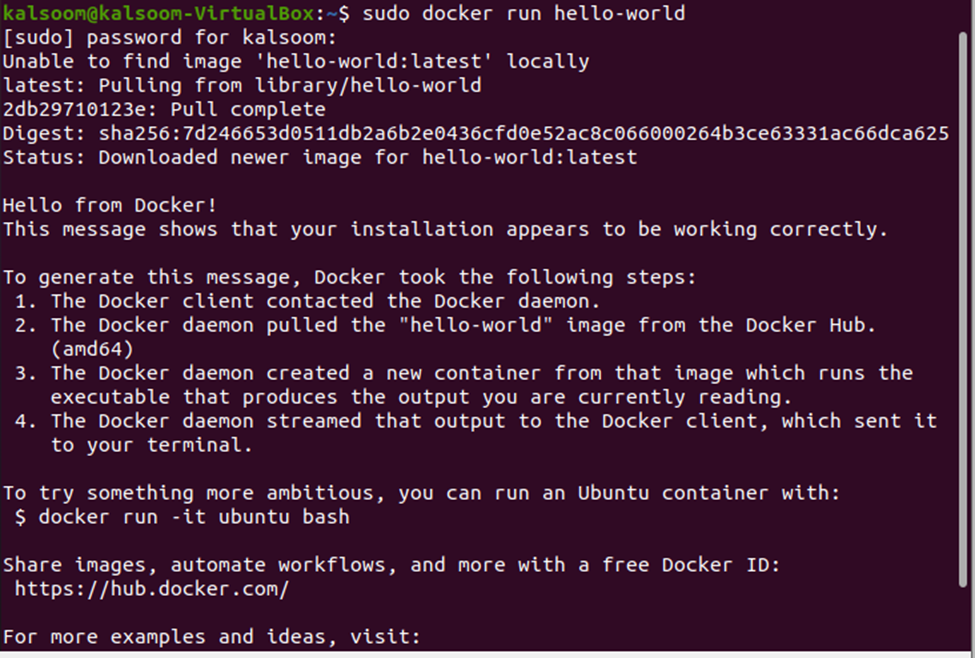
As you can see that the docker is saying hello and giving you a message indicating that the docker was correctly installed in your system. The installation process has been completed successfully. Now let us move forward to creating the docker image in Ubuntu 20.04 system.
Creating a Docker Image
Now that we have installed the dockers successfully, the system environment is ready to create a docker image. As we discussed above, there are two different methods to create a docker image: creating an image from an existing container and creating an image from a docker file. We’ll be discussing both methods in detail here. But before that, let’s see the docker image of Ubuntu 20.04.
To Pull an Ubuntu 20.04 Docker Image, we Must go Through the Following Three Steps
Step # 1: Pull the Image From the Docker Hub
To use Ubuntu 20.04, it is essential to look for the docker image in the docker hub and pull it from there. The docker hub is the docker’s hosted repository service used to store and share docker images publicly with the docker users. Utilize the “pull” command to download the image from the Docker Hub.
Have a look at how you can run the “docker pull” command:

When you execute this command in your system and provide all the credentials, you will get to see the docker image in the listing screen with a GUI interface.
Step # 2: Verify the Pull Command
Now, if you want to verify the pull command, you can do that by using the “image” command. Here is the output of the “sudo docker image ls -a” command:

Step # 3: Run Ubuntu 20.04 Image
This is the final step to running the Ubuntu 20.04 image. To do that, execute the “run” command. Execute the “sudo docker run -it –entrypoint “/bin/bash” ubuntu:20.04” command on your system:

Once the run command is successfully executed, a container for Ubuntu 20.04 image is built and up for running. Now let us explore the two methods of creating the docker image.
Method # 1: Create a Docker Image From an Existing Container
In this method, we are going to create new docker images based on the latest Ubuntu 20.04 base image. To generate a new image from an existing container, we will use a LAMP server. There are a lot of base images available already, but this is an easy example to understand and simple for the new docker users. Let us follow the steps below to create a docker image from an existing container:
Step # 1: Pull the Ubuntu Image
The first and foremost step is to pull the Ubuntu image from the docker hub. So, execute the “sudo docker pull ubuntu” command to get the image from the docker repository hub. See the execution of the “pull” command below. Additionally, the terminal screen shows the command’s output.

As you can see, the “pull” command has successfully pulled down the latest Ubuntu image from the hub. Now build a container that can work in this environment.
Step # 2: Create a Container
The next step is to build a container that is suitable for the existing environment and can work within the latest Ubuntu. The below-affixed instruction is used to create a container. See the output below:

You can notice that the container has been built, and now you are working within the container.
Step # 3: Update the apt
Now that you are working in the container make sure you update the apt. It is very important as if you skip this step, you will not be able to install anything on your container. Use the apt-get update command in order to update the apt. You will get the following output after executing the “apt-get update” command:

The terminal indicates that the command is successfully complete and all the reading of all the packages has been done. Now you are ready to install any required command on the server.
Step # 4: Install the LAMP Module
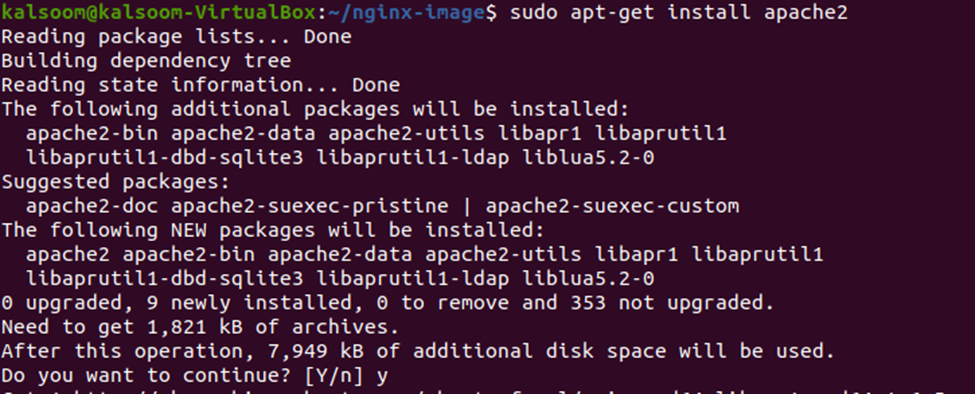
Your container is ready to install all the commands and packages required to build a docker image. Use the “install” command to install all the required LAMP packages or commands. We need to install the “apache2”, “mysql-server”, and “PHP libapache2” to install the basic module of the LAMP server. Let us install the “apache2” first, with the “sudo apt-get install apache2” instruction. The result of the command has also been visible on the terminal screen.
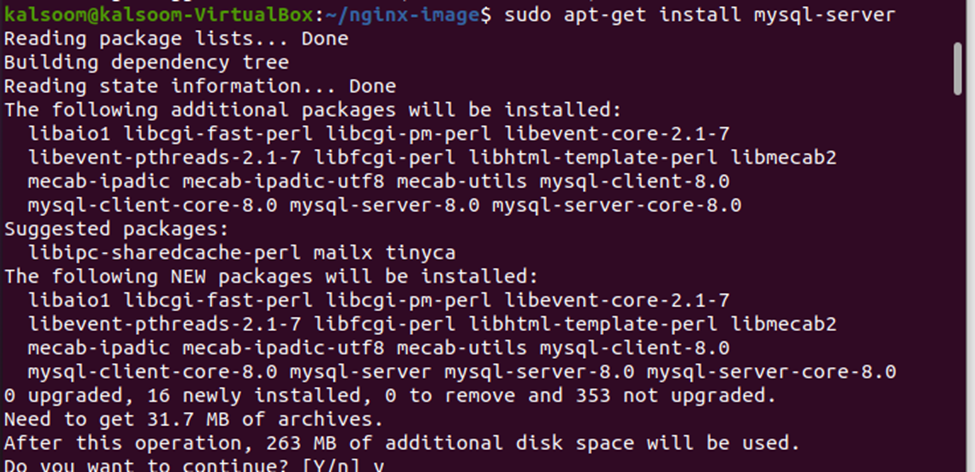
The installation of apache2 has been efficaciously accomplished. Now, begin the installation process of “mysql-server” with the “install” command. Install the MySQL server by using the “sudo apt-get install mysql-server” instruction. On the terminal screen, the command’s output appears as well.
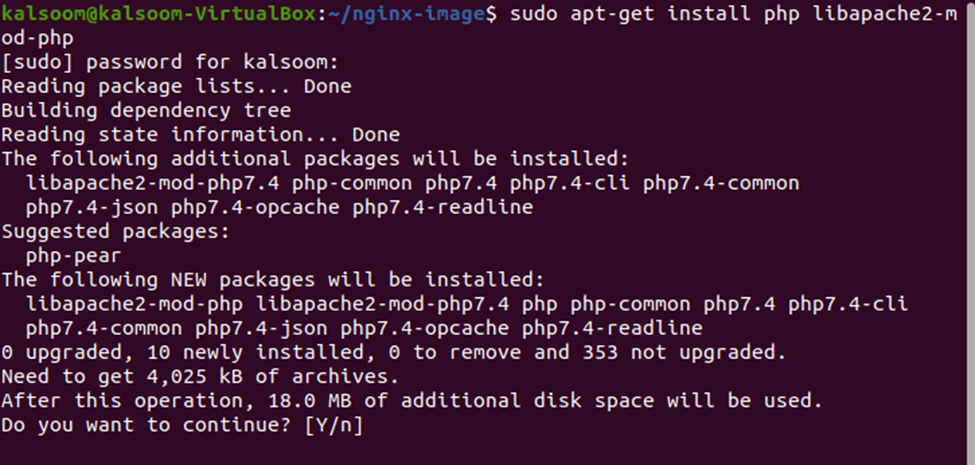
The mysql server is installed in your operating system successfully. Begin the installation of the “php server” by executing the “sudo apt-get install php libapache2-mod-php” command. When this instruction is executed in Ubuntu 20.04, the following output is produced:
The terminal is indicating that the installation of “php libapache2-mod-ph” has been successfully completed. Now restart the “apache2” with “/etc/init.d/apache2 restart” command. See the output below:

The “apache2” has been restarted, so let us check the status of the apache2 with the “services apache2 status” command. See the status of apache2 in the output below:
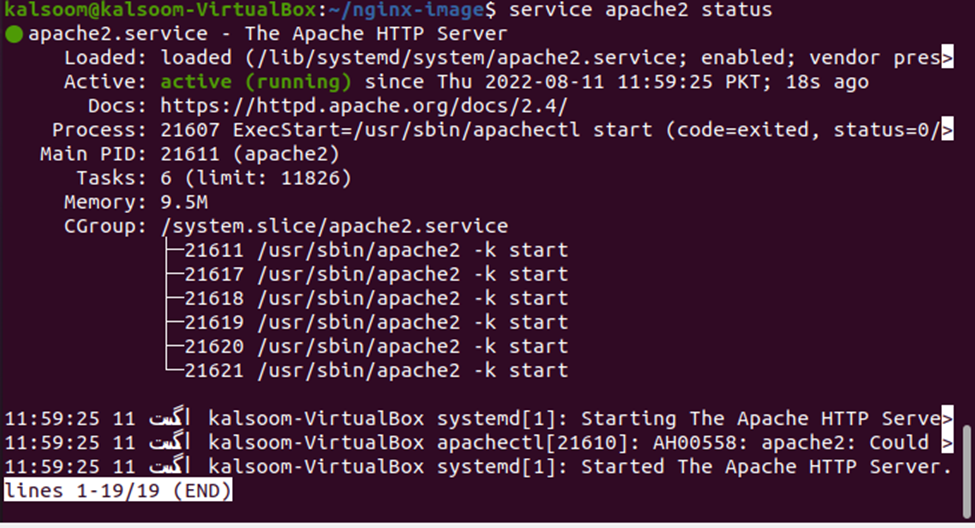
As you can notice that the apache2 is up and running successfully. Now that all the installation process for the basic LAMP server has been completed exit the container by using the exit command.
Step # 5: List Down All the Containers
To list down all the containers that have been created so far, use the “sudo docker ps -a” command. See the execution of the command below:
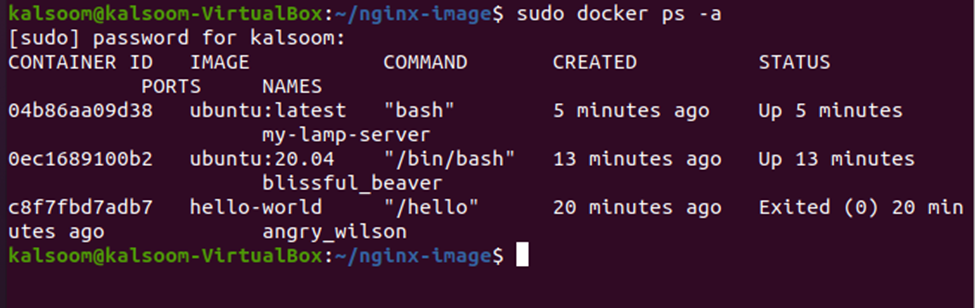
The terminal has listed down all the containers with the details, such as the ID of the container, the name of the image that has been created, the name of the command that has been used, the time of creation, the status of the container, the port that has been used and the name of the container. A basic image has been created. Once you learn how to create simple and basic images, you can easily build varied images according to your needs by employing all your developer’s skills.
An important point to note here is that a hostname is automatically generated and assigned to the docker container when you create it. You can easily rename it by using the “rename” command as defined above. And the second most important thing that needs to be remembered is that you must exit the docker once everything is installed successfully so that you do not lose anything. Now let us move to the next step and save every change that we have made so far to the container.
Step # 6: Save the Changes
All the changes that you have made to the image will not be saved automatically. The “commit” instruction must be cast off to save the modifications. The “commit” command is used to build a new image of all the changes that have been made so far to the existing docker image. Use the “sudo docker image” command to make sure that no changes will be lost. See the command below:

The syntax of the “commit” command is as follows:

The “sudo docker commit” is the basic command used to commit the changes to a new docker image instance. The “-m “Message”’ parameter is used to provide the commit message that guides you and others to understand the changes made by you. The “-a “creator name”’ switch is used to provide the name of the author or developer. The <container-id> is used to provide the id of the container, “04b86aa09d38” is the container id that was acquired by the “sudo docker ps -a” command in the previous step. The <repository> represents the username of the docker hub unless you create a new repository in the hub. Finally, the <new-image-name> represents the name of the new image.
Remember that when a new image is created, it will be saved locally on the system. Now, let us list down all the images existing on the system. Use the “sudo docker images” command to list down all the recent as well as old images present in the system. Here is the list of all the images:

This is how you create a new image from an existing base image. You can now build any customized image according to your requirements on your own by following the same step-by-step process.
Method # 2: Create a Docker Image by Using a Dockerfile
In this method, we are going to use the YAML file to create a docker image from scratch. Docker provides a “compose” tool to define and run multiple containers-based docker applications. The YAML file is used with the “compose” tool to configure the services of the application. Now, let us follow the steps below to create a docker image with a YAML file:
Step # 1: Create YAML File
The first step is to create a YAML file so that you can add the necessary instruction and configuration required to pull and build the container. A single “touch docker.yaml” command is used to achieve that, have a look at the command below:

This command will create a new file, “docker.yaml”, in your system that you can use for listing all instructions and configurations.
Step # 2: Open the File
After creating the file, open it for editing. Use the “nano” command with the name of the file to open it. Have a look at the command below:

This will open up the “docker.yaml” file in your desired editor, and you can see the version of the compose file and the services it contains. The outcome of the “nano docker.yaml” script is as follows:
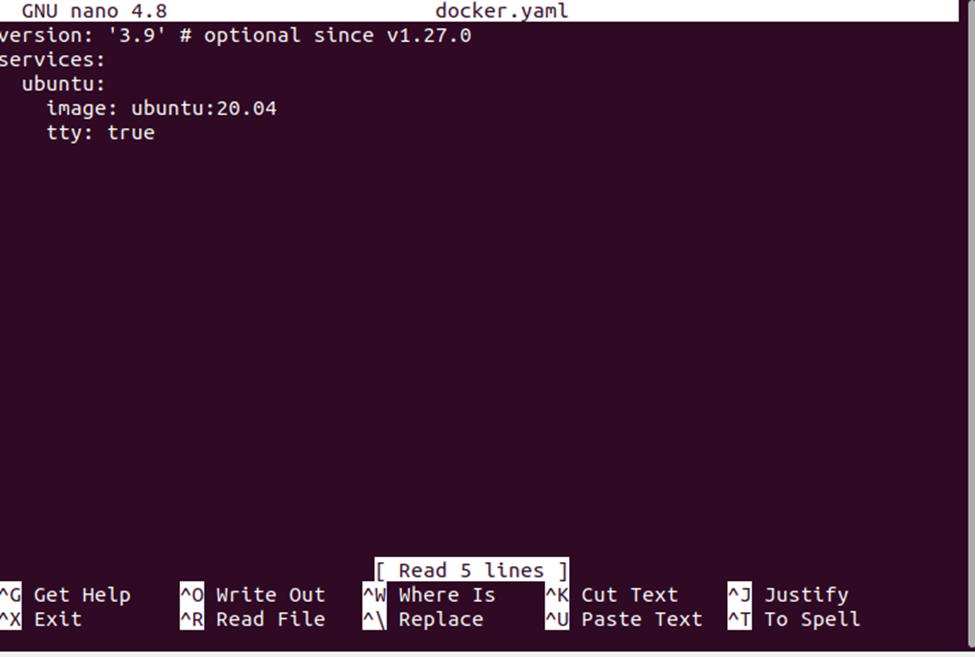
As you can see, the version of the compose file is version: 3.9, and the services are also listed under the “services” section.
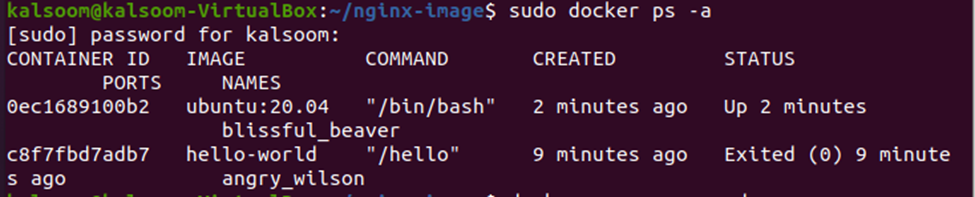
Step # 3: List the Docker Containers
The next step is to list down all the containers by using the command “sudo docker ps -a”. When you execute this command, this will list down all the containers of the docker container with the details, i.e., the id of the container, the name of the image, the command executed, creation time, the status of the container, port used, and the container name. See the output of the “sudo docker ps -a” command below:
Step # 4: Access the Container
The final step is to access the container. You can simply access the container by using the “sudo docker exec -i -t testproject_ubuntu_1 /bin/bash” command.

Once you successfully executed this command, you have successfully created a docker image container of Ubuntu 20.04.
These are the two basic methods of creating a docker image in the Ubuntu operating system. By following the step-by-step process, you can easily create your docker image.
Conclusion
Now that we have seen different methods of creating a docker image, we can create a docker image on our own easily and quickly. Now we also understand the importance of the docker environment for DevOps engineers and the role of the docker image, and its popularity for creating the docker containers. We can see how Docker makes application infrastructure management easy and simple by providing a light, fast, and resilient work environment. Moreover, the docker separates the infrastructure and application layer to provide much-needed collaboration, portability, and control over the software chain delivery. The concept of containerization has been here for a long time, but it got a new life with the evolution of dockers. Now docker containers simplify the life of modern DevOps teams by providing them with a fast and light computer working environment. Understanding the architecture of Dockers and docker images helps a lot in working with containerized applications.
Source: linuxhint.com