How to Convert Markdown to HTML
In HTML, we have to add lots of tags and style is also added in HTML for formatting. We can do the same tasks in HTML which we can also do using the Markdown. We can convert the Markdown file into the HTML file easily by simply using some commands. We will explain how to convert the Markdown to HTML here. We will also convert the Markdown into HTML and provide a detailed description of this concept in this guide. Now, we convert the Markdown file into the HTML file. Also, we will show and explain each step that we have to follow to convert the Markdown file into the HTML file in Visual Studio Code.
Example 1:
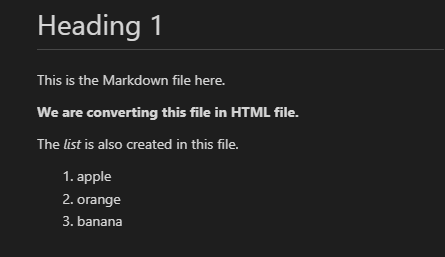
We use the Visual Studio Code here. We show how we convert the Markdown file into the HTML file in Visual Studio Code. For this, we must have the Markdown file created in this Visual Studio Code. The file that we create here is named “myabcfile.md”. In this file, we add the heading by using the “#” tag. Then, we add a text below this heading which is a simple text or paragraph. Now, we also insert another line that is bold because we insert two asterisks at the start and two asterisks at the end of this line. So, this line appears bold here. After this, we make the word “list” italic. We make this word italic using two underscores. One underscore is added at the start and one underscore is added at the end of the word. In the following illustration, we generate the ordered list by placing the number and putting the dot after the number. Now, we save this file. We will also show how this file appears in the preview window.

We just show the output of the Markdown code in the preview window. Now, we convert this Markdown to HTML. Move ahead and see in the following illustration on how to convert this Markdown file into an HTML file:
Open the terminal by clicking on the terminal on the taskbar which is present at the top of this Visual Studio Code. When this terminal is opened, type the “code –install-extension yzhang.markdown-all-in-one” command which is also shown in the following. After typing this command in the terminal of the Visual Studio Code, we hit the “Enter” key. After successfully compiling this command, we move forward. This command helps in installing this extension which is mentioned here.
![]()
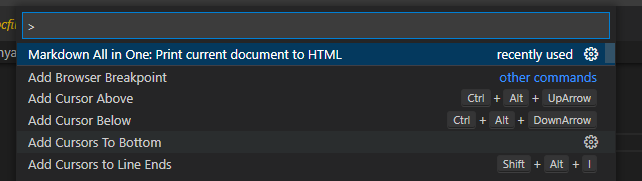
When the previous extension is installed successfully, we open the “Command Palette” in this Visual Studio Code. This command palette is opened by simply hitting the “CTRL+SHIFT+P” keys. After this, the dropdown is opened on the top of this Visual Studio Code app. Here, we just type “Markdown” and then many commands appear there. We select the “Markdown All in One: Print current document to HTML” here as shown in the following image. Here, we select this command after pressing the “CTRL+SHIFT+P”. Now, this Markdown file is converted into the HTML file with the aid of this command that we selected here.
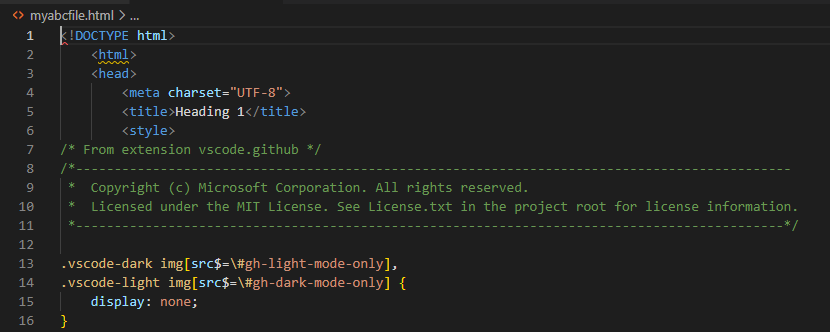
Both files are shown here. We convert this “myabcfile.md” into the “myabcfile.html” file. The Markdown as well as the HTML file is shown in the following image. This HTML file contains all the data which we added in the Markdown file. But the only difference is that the HTML file contains the different tags and styling in it but the Markdown file doesn’t contain a lot of tags.

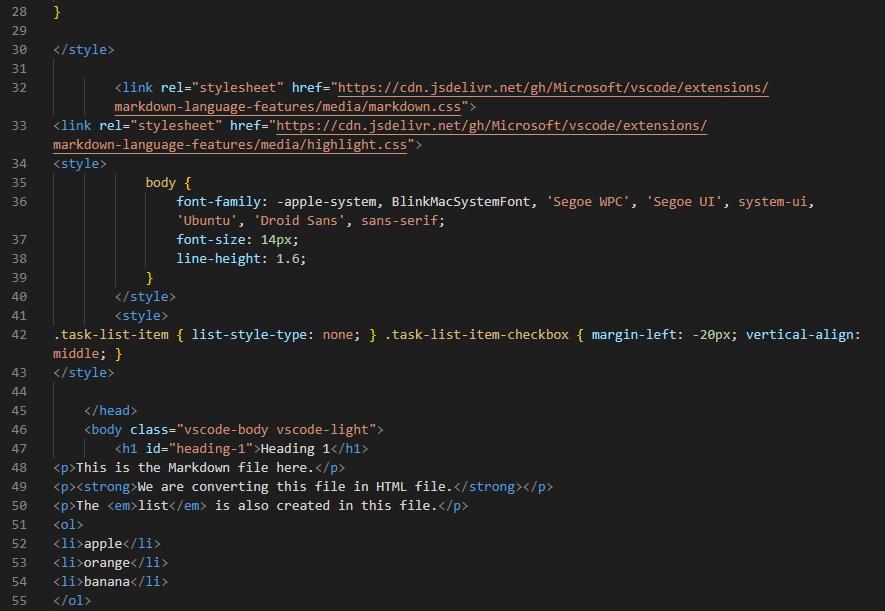
The HTML file is also shown in the following image. You can note the “<html>, <head>, <title>, <style>, and a lot of tags in this file”. So, this is the simplest way to convert the Markdown to HTML.
Example 2:
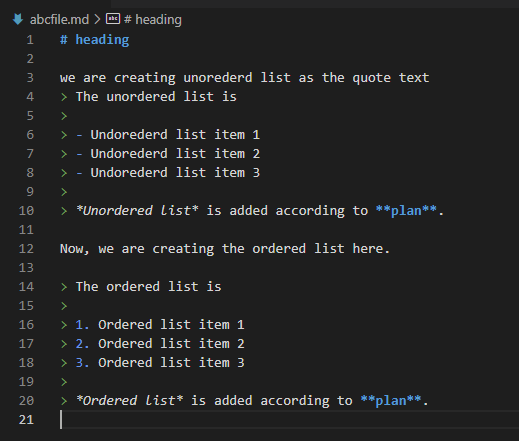
In this Markdown file, we add the heading, unordered list, ordered list, text, and the formatted text. We insert the heading here. Then, we also write some text and add the unordered list. After this, we add another line in which we also insert some words where we apply the bold and italic styles. Then, we place the ordered list and the new line after this ordered list. Now, we save this file and the name of this Markdown file is “abcfile.md”. Now, we convert this “abcfile.md” into the HTML file.
We again open the terminal in the same way as we previously discussed and write the given command in the terminal of the Visual Studio Code. After running the given command, we close this terminal.
![]()
Then, we press the “CTRL+SHIFT+P” and open the palette command. Here, we select the command which is displayed in the image at the top. This converts the previous Markdown code file into the HTML file.

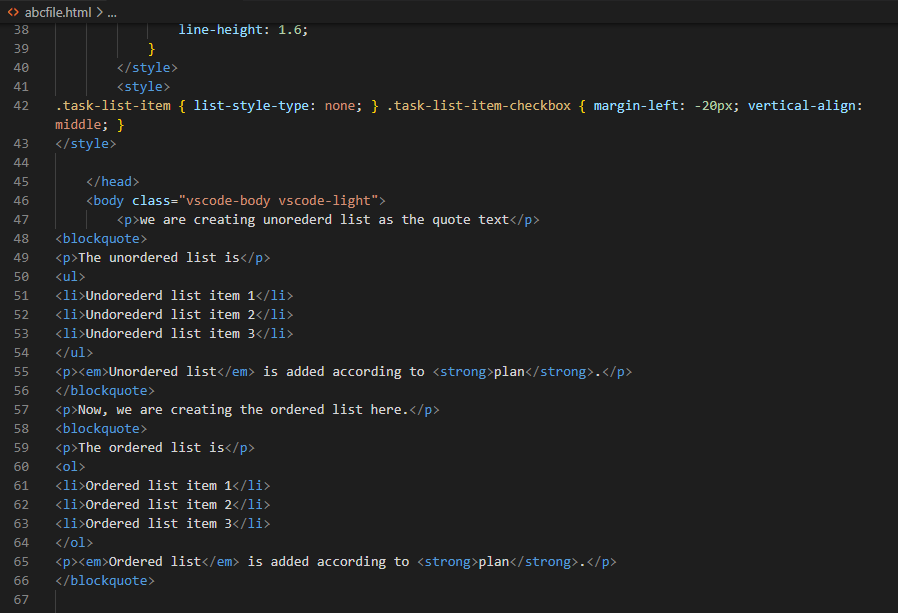
Both files are displayed here. This “abcfile.md” file is converted into an “abcfile.html” file. The following image displays both the Markdown and HTML files. The sole difference between this HTML file and the Markdown file is that the HTML file uses different tags and styling while the Markdown file uses fewer symbols. This HTML file contains all the information that was contributed to the Markdown file.
![]()
When we open this HTML file, we see a lot of tags there that we didn’t add in the Markdown because the Markdown language doesn’t need a lot of tags. Markdown is a very simple and easy language. As shown in this image, it adds the “<blockquote>” tag for the creation of “blockquote”. But in the Markdown file, we simply add the greater than “>” symbol to generate this blockquote.
For an unordered list, the HTML file contains the “<ul>” opening and closing tags as well as the “<li>” tag to add the list item. But in the previous Markdown file, we simply add the “-” symbol to create the unordered list. Also, the “ol” tag is present here which is used to add the ordered list. In the Markdown, we generate this ordered list by inserting the number and a dot for this ordered list. We easily convert the previous Markdown file into the HTML file here.
Conclusion
We provided a detailed description on how to convert the Markdown into HTML in this guide. We explained how we do this in the Visual Studio Code and converted two Markdown files into the HTML files in this guide. We explained that we have to install one extension after creating the Markdown file and then we have to open the command palette to select the command which helps in converting the Markdown file into the HTML file. We have also shown both the Markdown and the HTML file in this guide, so you can easily check both files’ data. The conversion of Markdown into HTML is explained here in depth.
Source: linuxhint.com