How to Control Servo Motor with Arduino
Usually, servo motors have arms that can be controlled using Arduino. Servo motors consist of a control system which provides feedback about the current position of the motor shaft this feedback allows to move at great precision.
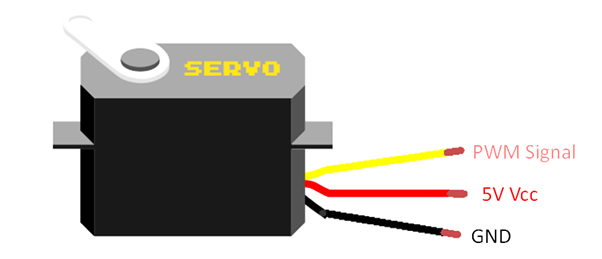
Servo Motor Pinout
Typically, most servo motors have three pins:
- Vcc Pin (Normally Red 5V)
- GND Pin (Normally Black 0V)
- Input Signal Pin (Receive PWM signal from Arduino)
Working of Servo Motor
We can control the servo motor by connecting the Vcc pin to 5V and GND pin to 0V. On the yellow color terminal, we provide a PWM signal which controls the rotating angle of the servo motor. Width of the PWM signal gives us the angle at which the motor will rotate its arm.
If we look into the Datasheet of servo motors, we get following parameters:
- PWM signal time period
- Minimum width for PWM
- Maximum width for PWM
All these parameters are predefined in the Arduino Servo library.
Servo Motors with Arduino
Servo motors are super easy to control with Arduino, thanks to the Servo Library which helps us to customize our code according to need and allows us to rotate the servo arm at our desired angle.
All the three Parameters mentioned above are fixed in the Servo library. By using these parameters, we can control the angle of servo motor in following way:
- If PWM signal width = WIDTH_MAX, servo will rotate to 180o
- If PWM signal width = WIDTH_MIIN, servo will rotate to 0o
- If PWM signal width lies in between WIDTH_MAX and WIDTH_MIN, the servo motor will rotate in between 0o and 180o
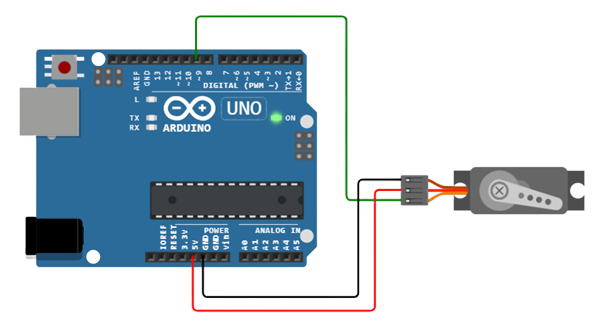
We can generate a desired PWM signal on some of the Arduino pins. PWM signal will be given at the input signal pin of the servo motor. Connecting remaining two pins of servo to 5v and GND of Arduino.
How to Control Servo Motor using Arduino
Here I will explain how we can connect and program our servo motor using Arduino. All you need is:
- Arduino UNO
- USB B cable
- Servo motor
- Jumper wires
How to Program Servo with Arduino
Following are some simple steps:
Step 1: Include predefined servo library:
Step 2: Create Servo Object:
Tip: In case if you are controlling more than one servo motors, you have to create more servo objects:
Servo myservo2;
Step 3: Set control pin (9) on Arduino Uno which sends PWM signal to Input signal port of servo:
Step 4: Rotate servo motor angle to desired value for example 90o:
Arduino Code
Open servo motor example program from File>Example>Servo>Sweep, a new window will open showing us our servo sketch:
Servo myservo; // servo object is created for controlling servo motor
int pos = 0; // to store servo position a new variable is created
void setup() {
myservo.attach(9); // this will set Arduino pin 9 for PWM output
}
void loop() {
for (pos = 0; pos = 0; pos -= 1) { // goes from 180 to 0 degrees
myservo.write(pos); // tell servo to go to ‘pos’ position
delay(5); // waits for 5 ms so servo can reach to position
}
}
Once the program is compiled and uploaded, the servo motor will start rotating slowly from starting position 0 degrees to 180 degrees, one degree at a time just like steps. When the motor has completed 180-degree rotation, it will start its rotation in the opposite direction toward its starting point i.e., 0 degree.
Schematics
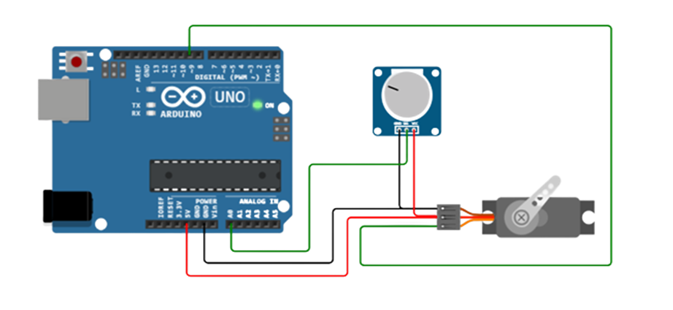
How to Control Servo Motor using Potentiometer
We can also control servo motor position by hand. To do this we need a Potentiometer. Potentiometer has three pins. Connect the two outside pins to 5V Vcc and GND of Arduino and middle one to A0 pin on Arduino board.
How to Program Servo with Potentiometer
Most of the sketch for potentiometer is the same as the previous example. The only difference is a new Variable val and potpin is defined before the setup and loop section of code.
int val;
In loop section analog pin A0 is used to read values for Potentiometer with function analogRead(). Arduino boards contain 10-bit ADC (Analog to Digital Converter) giving us values between 0 and 1023 depending at what position potentiometer is:
Lastly, we have used map() function to re-maps numbers from 0 to 1023 according to the angle of Servo as we know Servo motors can only rotate between 00 and 1800.
Arduino Code
Open knob sketch available in Arduino IDE, go to Files>Examples>Servo>Knob. A new window will open which shows us our knob sketch for servo:
Servo myservo; // Creating a servo object name myservo
int potpin = A0; // defining analog pin for potentiometer
int val; // variable which will read analog pin values for potentiometer
void setup() {
myservo.attach(9); // defined pin 9 for PWM input signal of servo on Arduino
}
void loop() {
val = analogRead(potpin); // reads value from potentiometer (value between 0 and 1023)
val = map(val, 0, 1023, 0, 180); // scale the value to use with the servo (value between 0 and 180)
myservo.write(val); // sets servo position with scaled value
delay(15); // waits for the servo to get to position
}
Above code will help us to control the servo motor shaft using potentiometer, the shaft will rotate between 0 and 180 degrees. We can also maintain speed along with the direction of servo using it.
Circuit Diagram
How many Servo Motors can I Connect with Arduino?
Maximum number of servo motors Arduino UNO can handle is up to 12 with Arduino library for servo, and maximum of 48 servos can be connected with boards like Mega.
Tip: We can directly run servo using Arduino current but remember if servos motors draw more than 500mA then your Arduino board can automatically reset and lose power. It’s recommended to always use a dedicated power supply for servo motors.
Conclusion
In this tutorial, we have covered the controlling mechanism of servo motors with Arduino. We covered the basics of controlling servo position and speed using potentiometer. Now you have got an idea about servo and possibilities for your robotics, RC projects and automation using servo are endless.
Source: linuxhint.com