How to Connect to MongoDB with Java
Download, Install, and Open the JDK
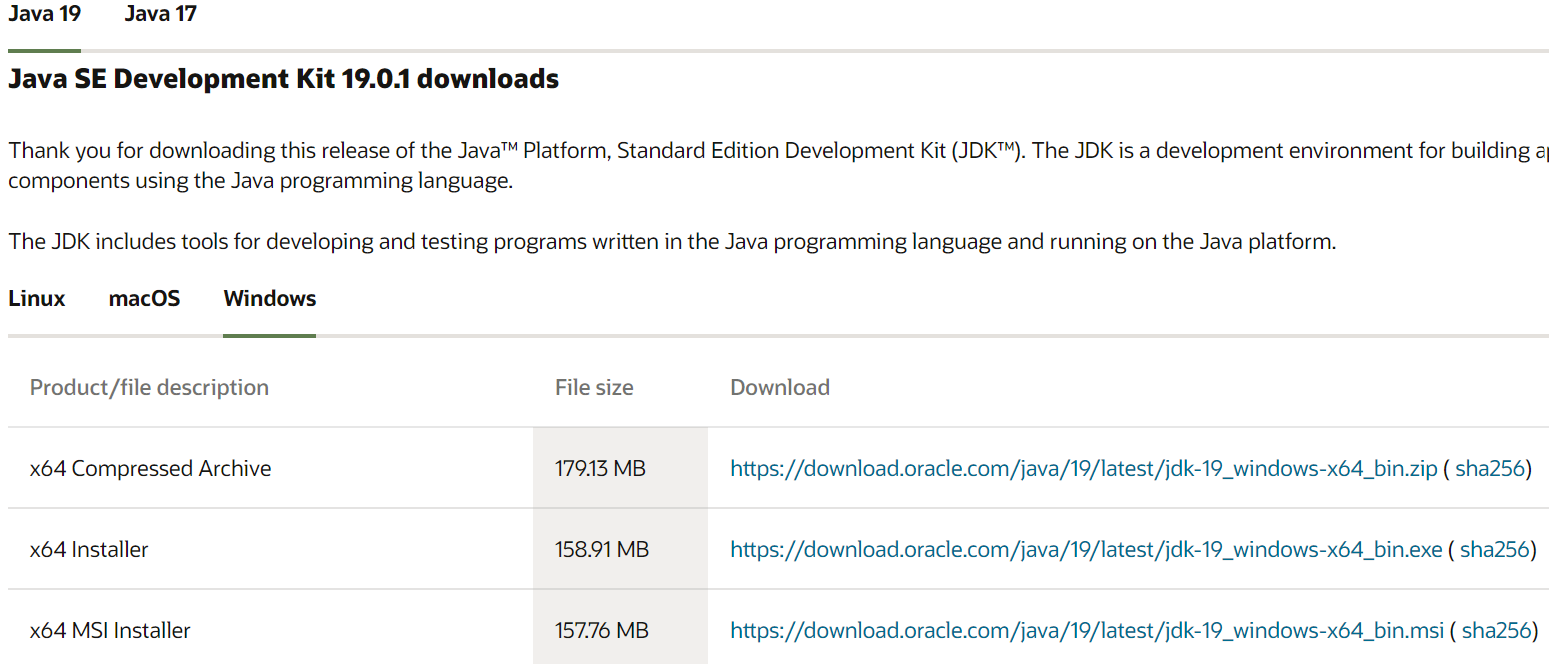
We start by downloading and then installing the Java Development Kit or “JDK”. Open the official website of “Oracle” and choose “Java 19” for “Windows”. Tap on the “Download” link at the front of an “MSI Installer” file and wait to get it downloaded fully.
After the download, open it with administrative rights and tap the “Next” button on every step.
![]()
Set the Environment Variable for Java
Open the settings for system environment variables and look at the “System variables” section. Select the “JAVA_HOME” variable and tap on the “Edit” button.

Within the edit window, browse and select the path to the JDK-19 using the “Browse Directory” button. Make sure to add the same path to the “Path” variable as well.

Install MongoDB
After the installation of JDK-19, you have to download the “msi” file for MongoDB. Run it with administrative rights and follow the steps in its installation wizard.
![]()
Wait until the system completes the installation of MongoDB then set up its local host.

When the MongoDB compass launches on your Windows screen, you will find the “Databases” section which contains the built-in databases. As you can see, we generated a “test” database as well.

Install the Eclipse IDE
It’s the turn for the Java development environment “Eclipse IDE” to get downloaded and installed. Search for it and “Download” its “exe” file. Run this “exe” file to install it.
![]()
The installer displays some options. Tap “Eclipse IDE for Java Developers”.

Tap the “Install” button on the next screen and wait until it is completely mounted.

Setup the Java Project in Eclipse
Create a new project named “Mongo” in the Eclipse IDE within your current workspace.

Make sure to download the Mongo-Java connector driver.
![]()
Right-click on the “Mongo” project and “properties”. Within the “Java Build Path” section, add an external “JAR” file that is used as a connection between MongoDB and Java.

You can find the look for this connector “jar” file within the Package Explorer section under the “Referenced Libraries”.

The Java code starts with the import of required packages that are specific to their purpose like insertions and selection, etc. After that, we create a “Mongo” Java class that starts with its main() execution method. The first step to connect the MongoDB with Java is to create a MongoDB client connection using the “MongoClient” class “mongo” object that is initiated here. Pass the local host address and the port number of MongoDB to it. The MongoCredential class “c” object is declared, taking the credentials from the users via the “createCredential” function.
The first argument it takes represents the “username”. The second represents the database title. And the third argument is the password that needs to be converted to a character array. After the connection to the “MongoDB” client, the println() statement dsiplays the successful connection message. It’s time to get the newly created “Mongo” database in the “db” object of the “MongoDatabase” class from the MongoDB client using the “mongo” database object by calling the getDatabase() function, passing it as a database name. Next, we create a new “Data” collection within the “Mongo” database using the getCollection() method of the “mongoCollection” class and save it to the “col” object. The next “println” statement shows the success message.
We create two document-type records for the “Data” collection using the “Document” class. Two objects, “doc1” and “doc2”, represent two document-type records to be inserted. A total of 4 fields are appended to each record via the “append” function. Now that the documents are ready, we create a document-type list “l” using the “List” class along with its “ArrayList” superclass. The add() function is called to add both the “doc1” and “doc2” documents to the list “l” as MongoDB takes the values in an array-list format.
The list “l” is inserted into the “col” collection by utilizing the “insertMany” function. The FindIterable “iter” class object gets the collection from the database via the “find” function as we do so in MongoDB. At last, to display the records that were just added in the database, we use the Iterator “iter” class object that iterates the records.The while loop checks for the subsequent next record to display on the console using the hasNext() and next() functions, consequently.
importcom.mongodb.client.FindIterable;
importcom.mongodb.client.MongoCollection;
importcom.mongodb.client.MongoDatabase;
importjava.util.ArrayList;
importjava.util.Iterator;
importjava.util.List;
importorg.bson.Document;
importcom.mongodb.MongoClient;
importcom.mongodb.MongoCredential;
publicclassMongo {
publicstaticvoidmain( Stringargs[] ) {
MongoClientmongo = newMongoClient( "localhost" , 27017 );
MongoCredentialc;
c = MongoCredential.createCredential("Saeed", "Mongo","".toCharArray());
System.out.println("Connected to MongoDB successfully!");
MongoDatabasedb = mongo.getDatabase("Mongo");
MongoCollectioncol = db.getCollection("Data");
System.out.println("Collection ‘Data’ got created!");
Document doc1 = newDocument("Makeup-Brand", "Huda Beauty").append("Price", 10000).append("Quantity", 100).append("Country", "America");
Document doc2 = newDocument("Makeup-Brand", "Nars")
.append("Price", 86000).append("Quantity", 560).append("Country", "UAE");
Listl = newArrayList();
l.add(doc1);
l.add(doc2);
col.insertMany(l);
FindIterableiter = col.find();
intn = 1;
Iteratori = iter.iterator();
while (i.hasNext()) {
System.out.println(i.next());
n++;
}}}
After running the previous Java code in Eclipse IDE, we get the following attached output. It shows that not only the connection is established between MongoDB and Java but also the collection is created and displayed.

Verification on MongoDB Compass
To verify that the connection is established and the collection is added successfully, open your MongoDB Compass, refresh the local host, and move within the “Databases” section. The “Mongo” database is displayed there as shown in the attached photo. By expanding the “Mongo” database followed by the “Data” collection within it, we get the two records that we added. You can likewise check this using the MongoDB CLI.

Conclusion
This article demonstrates everything you need for the connectivity of MongoDB with the Java environment like Eclipse IDE. Although every step that is implemented is important, the use of a “jar” file is a must, i.e. “mongo-java-driver”. Without using this file in the “Java Build Path” of the project, you will be unable to connect to MongoDB with Java even if you perform all the remaining steps in this guide.
Source: linuxhint.com