How to Connect Power BI to REST APIs
One of the reasons why Power BI stands out is because it is compatible with many data sources. So, apart from traditional data sources like Excel, Text, CSV, PDF, JSON and popular databases, you can also connect to REST APIs.
This capability allows you to create reports from an API data of your choice. And since nearly all online services have an API that you can use to retrieve, read, and update the data, you can use this feature to create interactive reports and visualizations from popular platforms like Jira, Google Sheets, Zendesk, and Google BigQuery, among others.
This article introduces you to REST APIs and proceeds to illustrate how you can import the data to Power BI using REST APIs.
Introduction to REST APIs
A REST API or Representational State Transfer Application Programming Interface is a type of web service that allows communication between different software systems over the internet. Notably, REST APIs are widely used to enable the exchange of data and functionality between web servers and clients.
The primary principles and characteristics of REST APSs include being stateless, cacheable, uniform interface, layered systems, and the ability to have multiple representations. You will also notice that the REST APIs have resources that are identifiable by URLs or with multiple representations.
REST APIs typically use the standard HTTP methods to perform the CRUD (Create, Read, Update, Delete) operations on resources:
- GET: Retrieve the data.
- POST: Create a new resource.
- PUT: Update an existing resource or create it if it doesn’t exist.
- DELETE: Remove a resource.
We can try a basic REST API example by sending an HTTP request using the GET method to read the data. You can use the following HTTP request on a browser of your choice:
https://api.publicapis.org/categories
The result of the HTTP request is as follows:
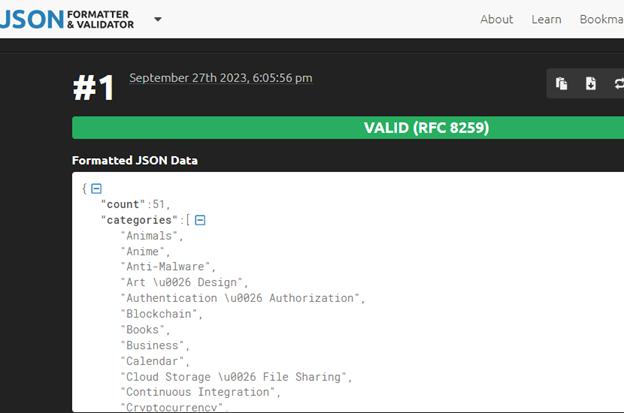
The next step is to copy the generated JSON code on a JSON formatter such as https://jsonformatter.curiousconcept.com/#. This is a free tool that you can find online.
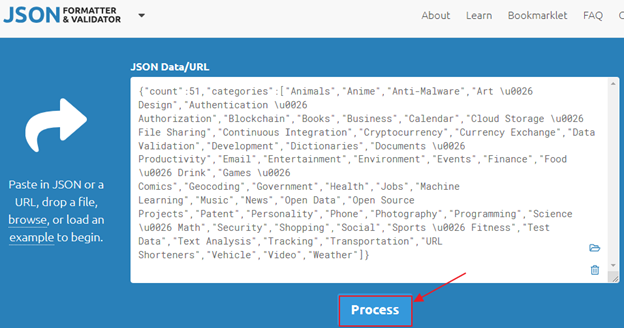
Click on the “Process” button to generate a new code. The code looks like this:
"count":51,
"categories":[
"Animals",
"Anime",
"Anti-Malware",
"Art \u0026 Design",
"Authentication \u0026 Authorization",
"Blockchain",
"Books",
"Business",
"Calendar",
"Cloud Storage \u0026 File Sharing",
"Continuous Integration",
"Cryptocurrency",
"Currency Exchange",
"Data Validation",
"Development",
"Dictionaries",
"Documents \u0026 Productivity",
"Email",
"Entertainment",
"Environment",
"Events",
"Finance",
"Food \u0026 Drink",
"Games \u0026 Comics",
"Geocoding",
"Government",
"Health",
"Jobs",
"Machine Learning",
"Music",
"News",
"Open Data",
"Open Source Projects",
"Patent",
"Personality",
"Phone",
"Photography",
"Programming",
"Science \u0026 Math",
"Security",
"Shopping",
"Social",
"Sports \u0026 Fitness",
"Test Data",
"Text Analysis",
"Tracking",
"Transportation",
"URL Shorteners",
"Vehicle",
"Video",
"Weather"
]
}
How to Connect Power BI to the Rest API Data
Now that you have a basic understanding of REST APIs, you can import the data from EST API to Power BI using the following process:
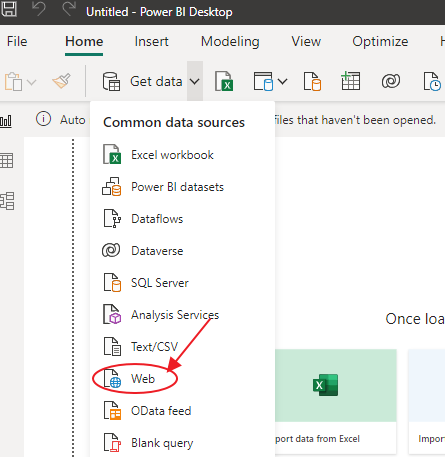
Step 1: Open the Power BI Desktop and Get the Data
First, open the Power BI Desktop and get the data by clicking on the “Get data” tab. This is available on the “Home” tab. Since REST API is not one of the available data resources, you can click on the “Web” option on the roll-down menu.
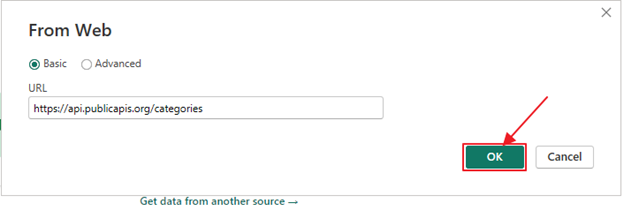
Step 2: Enter Your URL
Enter your API URL. Ensure that you select the “Basic” option and enter the same URL for the HTTP request for the REST API – https://api.publicapis.org/categories. Then, click on “OK”. You can also go for the “Advanced” option if you find it necessary.
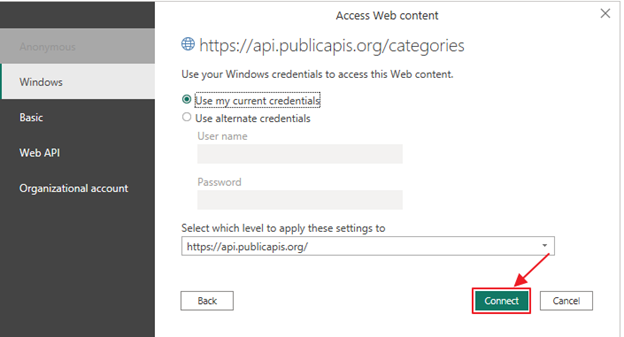
Step 3: Choose the Access Option
A new pane will appear with further options. This pane provides various options through which you can access the API. You can access it anonymously through an organizational account or through your Web API or Windows credentials.
The given process opens the Power Query Editor and consequently loads the API data on your Power BI Desktop as shown in the following:

Conclusion
That helps to connect the REST API data to Power BI. You can now use the data to create the Power BI reports. Note that you can only create reports for particular categories and the reports can range from simple cards, graphs, charts, to more complex maps.
Source: linuxhint.com