How to Configure the CoreDNS for Kubernetes
In general, CoreDNS is a Kubernetes function that can be used from different perspectives. One of the different approaches to implement the DNS services in a Kubernetes cluster is CoreDNS. Here, we will properly explain the use of CoreDNS and its configuration using commands and screenshots. This guide is just for users who have an eager interest in learning about the CoreDNS. For other users who do not know Kubernetes, please follow our previous Kubernetes articles for a better understanding. We will start our roadmap by dividing the material into different chunks. Let’s start the article.
What Is CoreDNS in Kubernetes?
Each instance has a single container for the CoreDNS. A DNS server which is designed with a focus on versatility is CoreDNS. It is made to be compact and simple to use. To add more functionality, adding plugins is a simple process. All the server blocks connected to the same port are collected by CoreDNS and combined into a single DNS server. In the default deployment, CoreDNS makes the reverse caching available. We must deploy the CoreDNS pod and services in our pod to use the CoreDNS in a Kubernetes cluster. This article describes how we install the CoreDNS in our cluster.
Why Do We Use CoreDNS in our Kubernetes Cluster?
In this session, we learn the usage of CoreDNS in Kubernetes. We use the CoreDNS for different purposes in Kubernetes. We use the CoreDNS for scalability in which it is designed as well as suited to be used in large and distributed Kubernetes clusters. Second, CoreDNS is used for flexibility. In coreDNS, we can easily be configured using plugins and customized according to customer needs. DNS is used for the security and performance of the Kubernetes cluster. We can design Kubernetes to increase the efficiency of CoreDNS resolution in the cluster.
Prerequisites:
Please verify some important requirements before installing CoreDNS on your system. The latest version of Ubuntu or Linux must be running on our system. Make sure your server’s name and IP address are correct. The Kubernetes package is already running on your system. Containers, minikube, pods, clusters, and the kubectl command-line tool must all be familiar to you because they will be used in the following sessions. Windows users must install a virtual box to run Linux correctly and effectively.
After that, we start our CoreDNS configuration process, step by step.
Step 1: Launch the Kubernetes Control Panel
In this step, we start the Kubernetes cluster in our system by running the command in the kubectl command-line tool. The command is as follows:
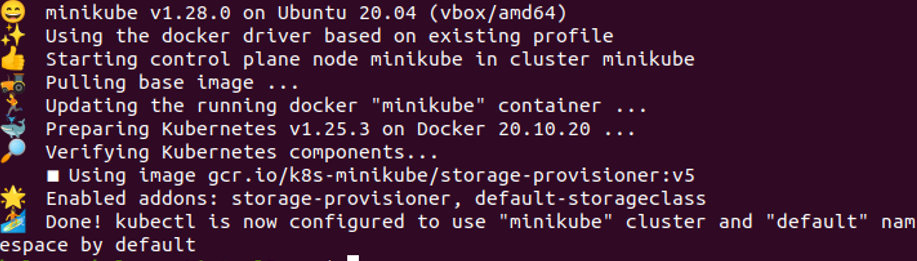
Minikube is a Kubernetes cluster that runs on local machines. The minikube container is started after the command execution is successful.
Step 2: Retrieve the CoreDNS Resources in Kubernetes
In this step, we get the CoreDNS configmap object in the YAML file by just running the command in the Kubectl command-line tool.
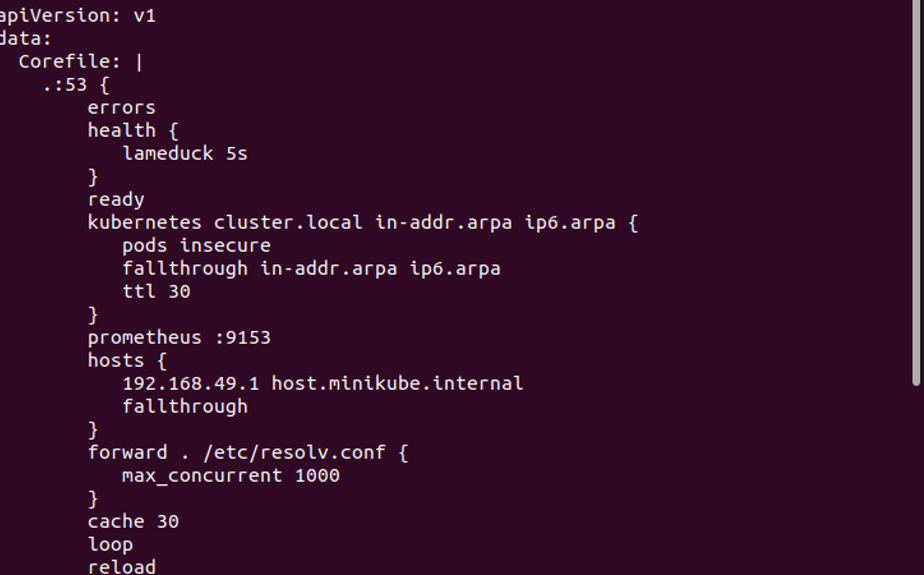
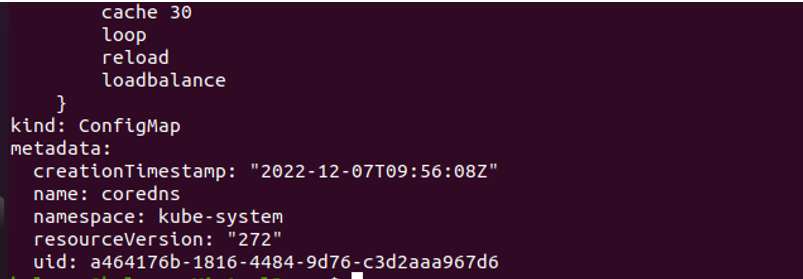
When the command is executed, it returns a YAML file in which all detailed content related to CoreDNS is stored. We can modify these details easily according to our needs. We can see this command’s output in the previously-attached screenshot. This config map shows us the default core file in the system. This file includes plugins like errors, health, ready, and reload in CoreDNS.
Step 3: Create CoreDNS Configuration File
In this step, we create a configuration file in Kubernetes that contains information about CoreDNS.
Entering the command initiates its execution. In our system, the “coredns. yaml” configuration file is successfully opened. We can see the configuration file in the following screenshot:
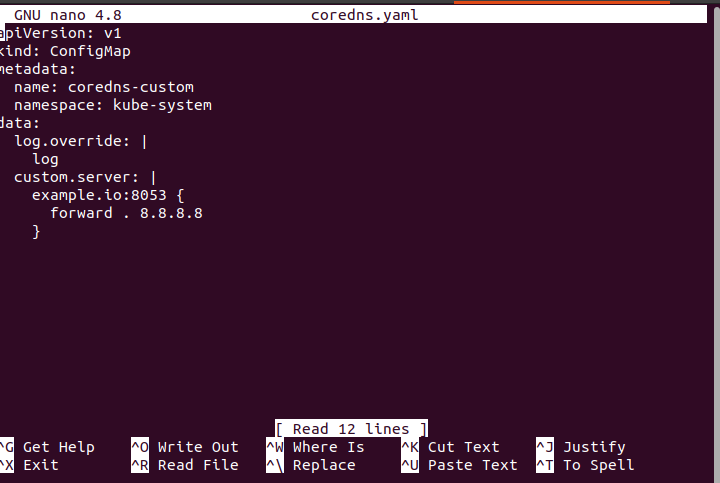
This configuration file shows us that the kind of this YAML file is “ConfigMap”, the name of this pod is “coredns-custom”, and the namespace of this pod is “Kube-system”. This file contains data like logs, custom server data, etc. In this file, we can handle the logs of CoreDNS in the cluster. The server detail of this container is explained in this file like in the “example.io” of this container which is 8053, among many other details.
Step 4: Deploy the CoreDNS in Kubernetes Cluster
We deploy or install the CoreDNS in our Kubernetes cluster in this step. We finally deploy the CoreDNS in our system through which we can easily use the CoreDNS function. We run the command on the kubectl command-line tool:
![]()
When we run the command, the coredns-custom pod is successfully created in our Kubernetes system. The output of this command is attached as a screenshot. Now, coreDNS is installed in the system, and all these specifications are installed efficiently in the cluster.
Step 5: Retrieve the Logs for the Kubernetes Container
In this step, we fetch the detailed logs of the container in a pod in a Kubernetes cluster. We run the command on the kubectl command-line tool to view the log that occurred during installation. The command is as follows:
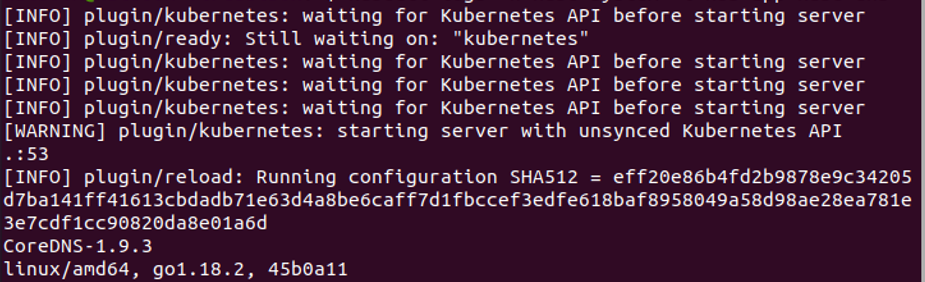
Upon the command execution, the logs of the container appear. The output of this command is shown in the previously-attached screenshot. This command retrieves the logs for all pods in the “kube-system” namespace that have the “k8s-app = kube-dns” label. In this command, “-n” is a flag that indicates the namespace, and “-l” is also a flag that indicates the label selector to filter the pods in the cluster. Using the kubectl logs command in the system, we can obtain an information about the issues that occurred during the CoreDNS setup. As seen in the previous screenshot, we see the error messages or logs that occurred in the Kubernetes cluster right now.
These are all the steps to configure the CoreDNS in the Kubernetes cluster in Ubuntu.
Conclusion
We conclude at the end of this article that CoreDNS provides DNS service for Kubernetes clusters. Hopefully, our efforts and your time are not wasted. We included screenshots for your convenience, as you can also create and modify the Kubernetes clusters to suit your needs.
Source: linuxhint.com