How to Configure Deny Service External IPs in Kubernetes
You may run into a problem while setting up a Kubernetes cluster when you only know how to use NodePort to make your Kubernetes service accessible over the Internet. When employing the NodePort service type, a high port number will be assigned and you must allow connections to those ports in your firewall rule. It is detrimental to your infrastructure particularly if the server is accessible via the open Internet. You can assign a block of IP addresses outside the cluster as a cluster administrator who can transmit traffic to services there. This is exactly what we are going to talk about in this article: to find all the critical information on how to configure deny service external IPs in Kubernetes.
What is External IP Service?
One of the Service endpoints will receive traffic that enters the cluster using the external IP (as the destination IP) and the Service port. Kubernetes is not responsible for managing external IP.
Making sure which IP is utilized to access the Kubernetes cluster is crucial in this situation. Using the external IP service type, we may bind the service to the IP address that is used to access the cluster.
The fact that the Kubernetes network interacts with the Overlay network is important to understand this situation. This implies that you may access practically every node in the cluster once you reach any of the nodes (master or worker node).
The network is shown in this way:

Both Nodes 1 and 2 in the diagram share a single IP address. The real Pod lives on Node 1 but the IP address 1.2.3.6 is bound to the Nginx service on Node 1. Node 1’s IP address, 1.2.3.4, is bound to the httpd service, and Node 2’s actual Pod is located there.
This is made possible by the Overlay network’s underpinnings. When we curl IP address 1.2.3.4, the httpd service should respond; when we curl 1.2.3.5, the Nginx service should respond.
Advantageous and Disadvantages of External IP
Here are the advantages and disadvantages of External IP:
It is Advantageous to Use External IP because:
-
- Your IP is completely within your control. Instead of using the cloud provider’s ASN, you might utilize IP that belongs to your own ASN.
The Drawbacks of External IP Include the Following:
-
- The straightforward setup we will go through right now is NOT very readily available. This implies that if the node fails, the service will no longer be accessible and you will have to fix the problem manually.
- To handle the IPs, considerable human labor is required. Since the IPs are not dynamically allocated for you, you have to do it manually.
What is Default Deny/Allow Behavior?
The “Default allow” denotes that all traffic is permitted by default. Unless specifically allowed, all traffic is refused by default when using the term “default deny.” except when a network policy is specified.
-
- All traffic to and from a pod is permitted if no network policies are in effect for that Pod.
- If one or more network policies are in force for a pod of type ingress, only that ingress traffic explicitly permitted by those policies is allowed.
- When one or more network policies apply to a pod of type egress, then only the egress traffic allowed by those policies is allowed.
The default setting for other endpoint types (VMs, host interfaces) is to block traffic. Only traffic that is specifically allowed by network policy is permitted, even if no network policies apply to the endpoint.
Best Practice: Implicit Default Deny Policy
You must configure an implicit default deny policy created for your Kubernetes pods. This makes sure that unwanted traffic is automatically blocked. Remember that implicit default denies policies always come into effect last; if any other policies allow the traffic, the denial does not apply. The denial is only implemented after all other policies have been considered.
How to Create a Default Denies Policy for Kubernetes Pods?
We advise utilizing the global network policy even if any of the following rules can be used to construct a default denies policy for Kubernetes pods. A global network policy is applied to all workloads (VMs and containers) across all namespaces and hosts. A global network policy encourages a cautious approach to security while defending resources.
-
- Enable default to deny global network policy, non-namespaced
- Enable default to deny network policy, namespaced
- Enable default to deny Kubernetes policy, namespaced
What is IP Block?
With this, specific IP CIDR ranges are chosen to be permitted as ingress sources or egress destinations. Given that Pod IPs are transient and unpredictable, these should be cluster-external IPs.
The source or destination IP of packets must frequently be rewritten when using cluster entrance and egress methods. Depending on the particular network plugin (cloud service provider, service implementation, etc.) that is utilized, the behavior may change.
This is true for ingress and it means that in some cases you must filter incoming packets that are based on the actual source IP. On the other hand, the “source IP” that the NetworkPolicy works on may be the IP of a LoadBalancer or even the Pod’s node, etc.
This shows that connections between pods and Service IPs that are rewritten to cluster-external IPs might be subjected to ipBlock-based restrictions in terms of egress.
What are the Default Policies?
All ingress and egress traffic to and from pods in a namespace is, by default, permitted if there are no controls in place for that namespace. You can alter the namespace’s default behavior by using the following examples.
Default Deny All ingress Traffic
When creating a Network Policy that chooses all pods but does not include any incoming traffic to those pods, you can build a “default” ingress isolation policy and that is for a namespace.
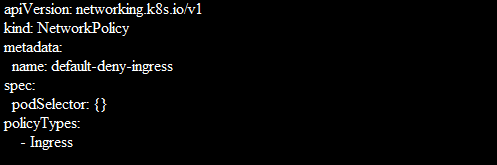
This ensures that all pods, regardless of whether any other NetworkPolicy chooses them, are isolated for ingress. This rule does not apply to isolation for exiting any pod.
Default Deny All Egress Traffic
When you create a NetworkPolicy that chooses all pods but forbids egress traffic from those pods, you can build a “default” egress isolation policy and that is also for a namespace.

Conclusion
This guide was all about the usage of DenyServiceExternalIPs. We have designed a diagrammatic representation as well to make our users understand it’s working. We have provided sample configurations as well.
Source: linuxhint.com