How to Clear Cookies in Microsoft Edge?
Microsoft Edge is a search engine like Bing and Google developed by Microsoft and is a part of the Windows operating system. Clearing the cookies means that users want to clear all the previous activities of the device. However, all those activities consume some storage on the browser. This results in affecting the optimization and loading speed of the browser. Therefore, sometimes users need to clear cookies for a better browsing experience.
This article demonstrates deleting cache and cookies in the search engine–Microsoft Edge.
How to Remove Search Engine Cookies?
To delete the browsing cookies on Microsoft Edge, go through the listed methods:
- Removing Cookies in the Search Engine Using Settings
- Clearing Cache and Cookies Using “Clear browsing history” Settings
Method 1: Removing Cookies in the Search Engine Using Settings
Users can utilize the Microsoft Edge “Settings” option to clear the cookies in Microsoft Edge. For demonstration, implement the given listed instructions:
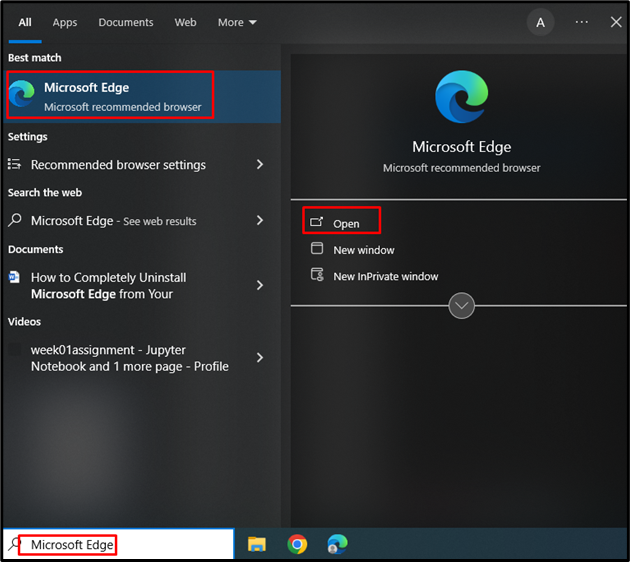
Step 1: Launch the “Microsoft Edge”
First, navigate to the “Startup” menu to launch the “Microsoft Edge” application:
Step 2: Open the Microsoft Edge “Settings”
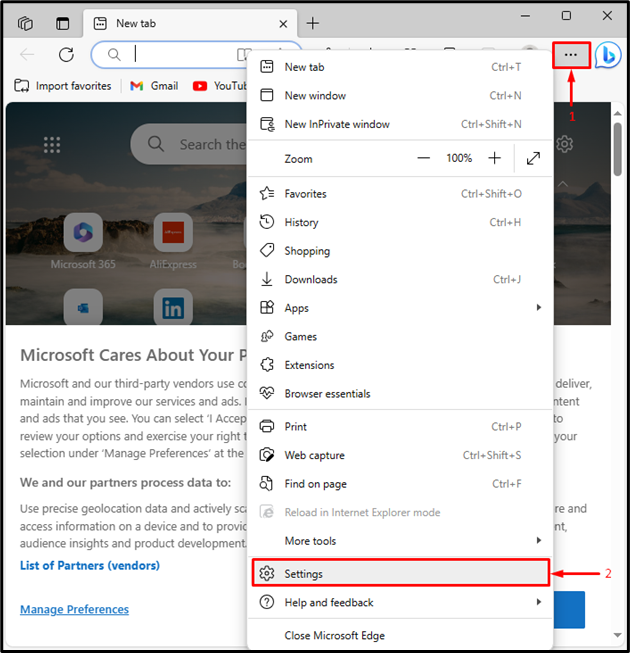
Next, click on the below highlighted “(…)” icon of the Microsoft Edge window. Then, choose the “Settings” option or press the “ALT+F” key to access Microsoft Edge settings:
Step 3: Navigate to “Cookies and site permissions”
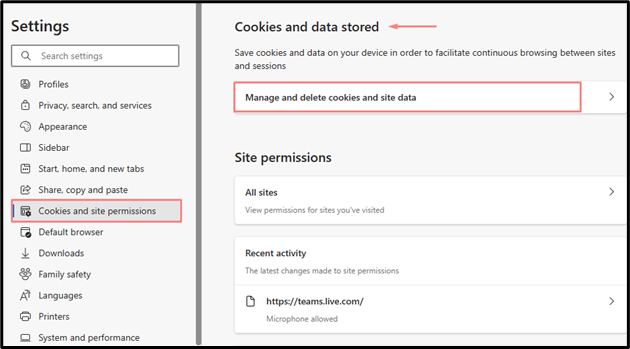
Now, navigate to the “Cookies and site permissions” in the “Settings” navigation pane. Press the below highlighted “Manage and delete cookies and site data”:
Step 4: Open the “Clear all cookies and site data” Option
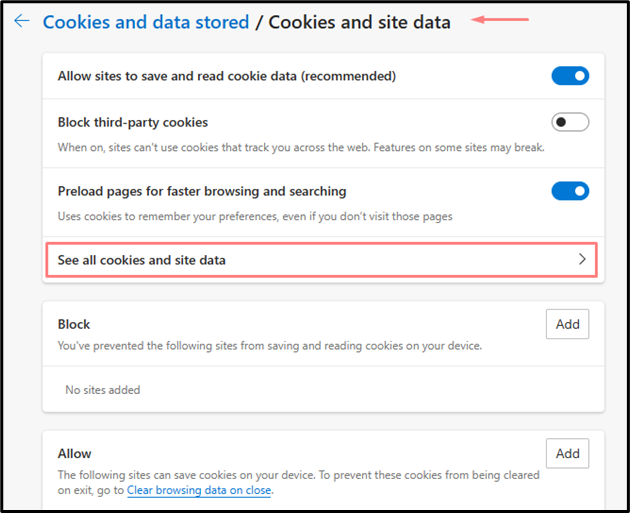
After the “Cookies and site data” window is accessible to the user, navigate to the “See all cookies and site data” and click on it to proceed further:
Step 5: Clearing Cookies
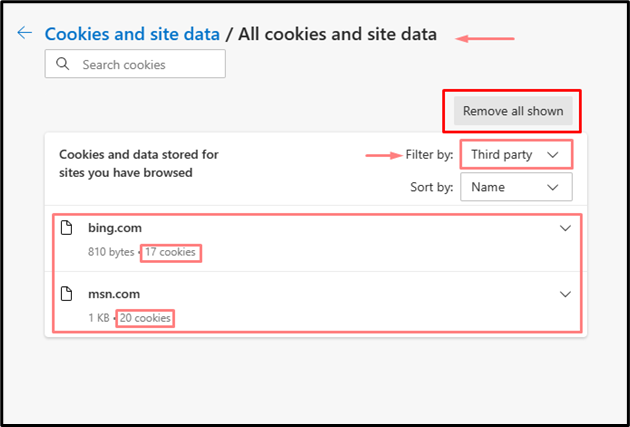
All the data that the user has searched and browsed on Microsoft Edge appears on the window screen. To view and clear the cookies of your choice, utilize the “Filter by” drop-down. After that, click on the “Remove all shown” button to clear cookies in Microsoft Edge:
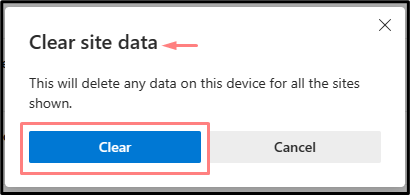
Upon doing so, the “Clear site data” box prompt on the screen, hit the “Clear” button to clear the cookies from Microsoft Edge:
Method 2: Clearing Cache and Cookies Using “Clear browsing data” Settings
Another way to remove the cookies in Microsoft Edge is to delete the browsing history after closing the visited sites. For this purpose, the user needs to enable clearing browsing data every time. For demonstration, follow the below-listed instructions:
Step 1: Navigate to “Privacy, search, and services” Settings
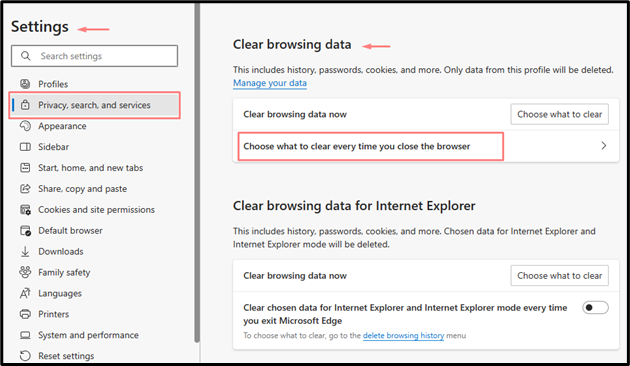
First, open the Microsoft Edge Settings. Choose “Privacy, search, and services” from the “Settings” navigation pane. Next, from the “Clear browsing data” settings, hit the below highlighted “Choose what to clear every time you close the browser” option:
Step 2: Enable the Clearing browsing data on close” Settings
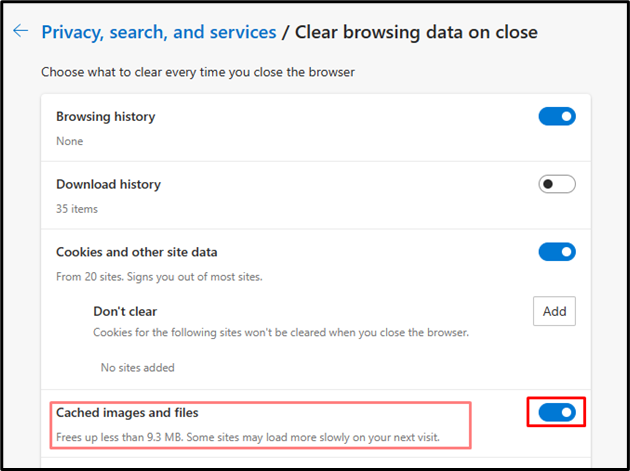
Now, the “Clearing browsing data on close” window will open. Navigate to the “Cookies and other site data” settings, and turn on the below pointed “Toggle” button:
Bonus Tip: How to View and Delete Browser History in Microsoft Edge?
To view and remove browsing history in Microsoft Edge, the user can either delete it by navigating to the History page or Microsoft Edge setting. To delete browser history, first launch the Microsoft Edge app, and navigate to the “Settings>Privacy, search, and services” option to clear history.
For a detailed guide on how to look at and remove browsing history in the search engine, go through our linked article “Deleting Browsing History in Search Engine”.
That’s all about clearing cookies in search engine–Microsoft Edge.
Conclusion
To clear cookies in Microsoft Edge, launch Microsoft Edge. Then, navigate to the settings page through the “ALT+F” key, open the “Privacy, search, and services” option, and clear the cookies by clicking the “Clear browsing data>Cookies and other site data” option. After that, view the filtered cookies and clear them using the “Remove all shown” button. This article has demonstrated an approach for clearing cookies in Microsoft Edge.
Source: linuxhint.com
