How to Clear Arduino Serial Buffer
Arduino is an electronic platform that takes instructions from users in the form of code known as sketch and generates output accordingly. To collect the instructions and process them one by one, the Arduino uses a serial buffer. The Arduino serial buffer holds the incoming data until the device is ready to process them. Sometimes we have to clear the Arduino serial buffer to avoid interference with incoming data. Let’s see this in more detail.
Arduino Serial Buffer
So, we all know Arduino communicates using serial communication protocol known as USART. Yes, Arduino has some other protocols like SPI, I2C but USART is the most common and frequently used protocol. If you have interest in reading Arduino all three protocols, click here.
Arduino serial buffers collect the incoming serial characters and hold them until the microcontroller can process them. Serial communication is the method of transferring data from one device to another. Arduino using USART hardware on its boards assembles each 8 bits into a byte. Then store these bytes in the serial buffer, maximum 64 bytes can be stored inside the Arduino serial buffer.
Clear Arduino Serial Buffer
Arduino serial buffers have limited memory to store data in case if the memory overflows or large amount of data is there at the serial pin, we have to clear the serial buffer first to store incoming data. Let’s find out possible ways of clearing the Arduino serial buffer.
Ways to Clear Arduino Serial Buffer
To free up serial buffer space so that it can be updated with new data following of the two ways can be helpful:
-
- Clear Serial Buffer using Serial.flush() Function
- Clear Serial Buffer using Serial.begin() Function
1: Clear Serial Buffer using Serial.flush() Function
So, the first method which can clear an Arduino serial buffer is using a Serial.flush() function. This function belongs to the Arduino serial library function.
Serial.flush()
Arduino Serial.flush() function waits for the data to be transmitted completely. Rather than discarding the incoming data it allows it to wait so once the data inside the buffer is transmitted completely then the Serial buffer can receive the new data.
Note: After using Serial.flush() programs may take more time to execute and print output on serial monitor. As of now Arduino code waits once all data is transmitted so it can store new data inside its memory.
Syntax
Parameters
It takes only one parameter.
Serial: Serial port object
Returns
This function returns nothing.
Example Code
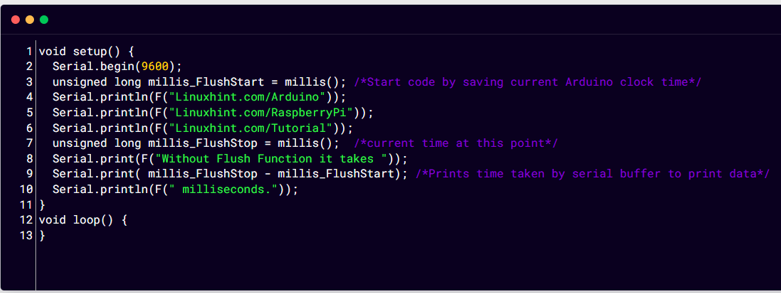
Here is the code which is written without using Serial.flush() function:
Serial.begin(9600);
unsigned long millis_FlushStart = millis(); /*Start code by saving current Arduino clock time*/
Serial.println(F("Linuxhint.com/Arduino"));
Serial.println(F("Linuxhint.com/RaspberryPi"));
Serial.println(F("Linuxhint.com/Tutorial"));
unsigned long millis_FlushStop = millis(); /*current time at this point*/
Serial.print(F("Without Flush Function it takes "));
Serial.print( millis_FlushStop - millis_FlushStart); /*Prints time taken by serial buffer to print data*/
Serial.println(F(" milliseconds."));
}
void loop() {
}
In the above code we initialized three different strings and started the code by taking the current time from millis() function and saving it into a new variable. Once the data is printed again using millis() function we pass the present time to a new variable.
Once both time is received inside two variables there difference will give us the time taken by Arduino to print the three defined strings in milliseconds.
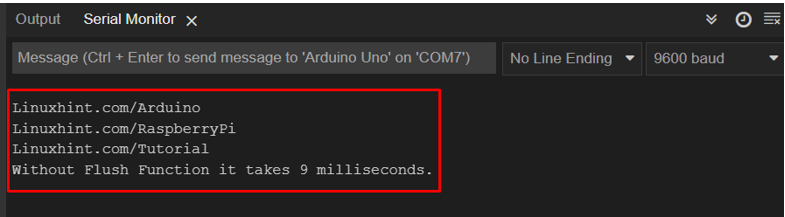
In the output terminal it can be seen it takes 9ms to print the defined string.
Now in the code given below we will use the Serial.flush() function which will allow all the strings to pass and wait there until the serial buffer becomes clear to receive the next data. Therefore, it will take extra time compared to printing data without using Serial.flush().
Serial.begin(9600);
unsigned long millis_FlushStart = millis(); /*Start code by saving current Arduino clock time*/
Serial.println(F("Linuxhint.com/Arduino"));
Serial.println(F("Linuxhint.com/RaspberryPi"));
Serial.println(F("Linuxhint.com/Tutorial"));
Serial.flush(); /*Waits for data to be transmitted after that flush memory*/
unsigned long millis_FlushStop = millis(); /*current time at this point*/
Serial.print(F("With Flush Function it takes "));
Serial.print( millis_FlushStop - millis_FlushStart); /*Prints time taken by serial buffer to print data*/
Serial.println(F(" milliseconds."));
}
void loop() {
}
This code is similar to one we explained earlier. The difference here is Serial.flush() function which allows the program to wait for some extra time until serial buffer memory becomes clear for receiving next data.

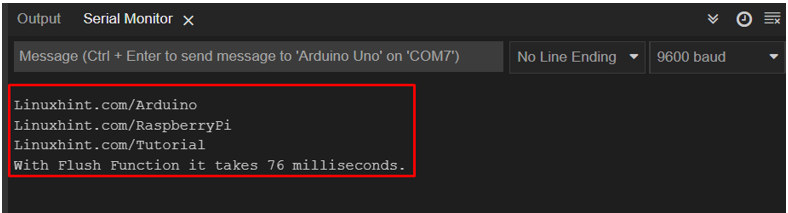
In output we can clearly see that this time it takes 76ms to print the three strings as compared to the previous one which only takes 9ms.
2: Clear Serial Buffer using Serial.begin() Function
Until now we explained the function Serial.flush() to clear the serial buffer but this function has to wait for the data to be transmitted completely now the questions come to mind what if we want to clear the incoming data inside the serial buffer. The answer to the question is simple: we can do this using a while loop with the Serial library function.
Syntax
Serial.read();
Serial.end();
Serial.begin(9600);
Code
void setup() {
}
void loop() {
if (Serial.available()){ /*check for serial data*/
val = "";
while(Serial.available()){ /*read serial data if available*/
char Serial_Data= Serial.read();
val=val+Serial_Data; /*store data inside new string*/
}
Serial.println(val); /*print the read data*/
Serial.end(); /*end serial communication*/
Serial.begin(9600); /*clear serial buffer*/
}
}
Arduino uses Serial.begin() functions to initialize serial communication by defining baud rate, once this function is initialized the data previously stored in Arduino memory becomes clear. Here we will check for the serial data using the Serial.available() function once the data is read it will store inside a new string and lastly using Serial.begin(9600) we will clear the Arduino serial buffer.
Note: We need to flush the serial buffer because it ensures that data has been sent to the device and is just not waiting or on hold to be sent.
Conclusion
To clear the Arduino serial buffer so that it can store new data inside buffer memory Serial.flush() and Serial begin can be used. It can be used to clear the Arduino serial buffer, but we have to wait once all data is transmitted to avoid this, we can use a while loop with Serial.begin() function which can also clear incoming data from the serial buffer.
Source: linuxhint.com