How to Change Ban Time Fail2ban, Even Ban Forever if Desired
In this article, you will learn how to change ban time in fail2ban as well as how to ban an IP address forever if desired.
Note
1. Before proceeding, make sure you have sudo privileges.
2. The procedure explained here has been tested on Ubuntu 22.04. However, the same procedure can also be used on other Linux distributions.
How to Install Fail2ban on Linux
Fail2ban is available in the package repositories of almost every Linux distribution. You can install it using the package managers of your Linux distributions.
On Ubuntu and Debian
To install fail2ban on Debian-based distributions such as Ubuntu and Debian, use the command below:
On CentOS, Fedora, and RHEL
To install fail2ban on RHEL-based distributions such as CentOS, Fedora, and RHEL, use the commands below:
$ sudo dnf install fail2ban
On Manjaro and Arch
To install fail2ban on Arch-based distributions such as Manjaro and Arch, use the command below:
Once installed, you can start fail2ban using the command below:
To enable the service at boot, use the command below:
How to Change Ban Time in Fail2ban
As we stated earlier, the default time for which an IP address is banned after a specific number of failed authentication attempts is 10 minutes. It is recommended to set the ban time long enough to discourage malicious attempts. However, it should not be too long for the legitimate user to be mistakenly banned for his failed authentication attempts. You can also manually unban a legitimate IP address rather than waiting for the ban time to expire.
Fail2ban configuration file jail.conf is located at /etc/fail2ban. However, do not edit this file directly. Instead, copy the jail.conf file to jail.local file in the /etc/fail2ban directory and make all the configuration changes in this new file.
To create a jail.local file, open the Terminal, and run the command below:
It will create a jail.local configuration file under /etc/fail2ban directory.
2. You can modify the ban time by changing the bantime parameter in the /etc/fail2ban/jail.local file. Edit the /etc/fail2ban/jail.local file in any text editor such as Nano:
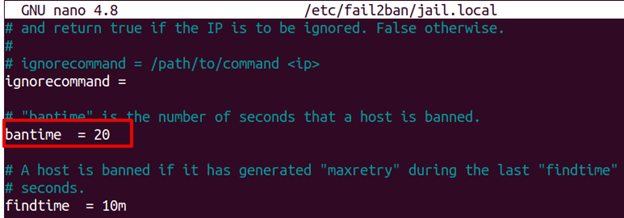
3. Now adjust the bantime parameter value according to your requirements. Let’s say to ban the IP address for 20 seconds, set the value of bantime to 20. Similarly, to ban the IP address for 5 minutes set the value of bantime to 300 seconds.
bantime = 20
Once done, save and close the /etc/fail2ban/jail.local file.
4. After making any adjustments to the fail2ban configuration file, make sure to restart the service to apply the changes:
Now the IP addresses will be banned for 20 seconds. You can also see fail2ban logs to verify this:

The fail2ban logs highlighted in the above screenshot verify that an IP address 192.168.72.186 is banned at 01:14:14 and then unbanned after 20 seconds at 01:14:34.
Permanently Ban an IP Address in Fail2ban
With fail2ban, you can also permanently ban an offending IP address. Let’s see how to accomplish it:
1. If you have already created the jail.local file, then you can leave this step.
Create jail.local file using this command in Terminal:
Now the jail.local configuration file has been created.
2. Now, to permanently ban the IP addresses, edit the /etc/fail2ban/jail.local configuration file using the command below:
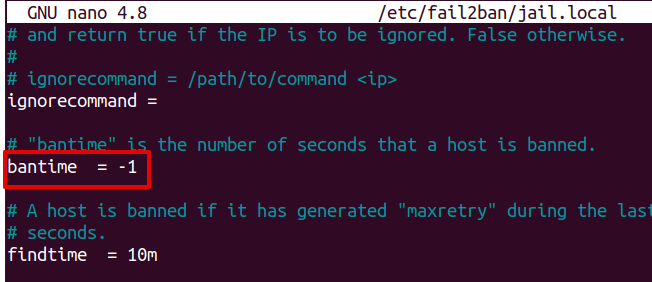
3. To permanently ban an IP address, set the bantime value to -1.
After that, save and exit the /etc/fail2ban/jail.local file.
4. Restart the fail2ban service as follows:
After that, the IP addresses which make the specific number of failed connection attempts will be permanently banned.
Now save and close the file.
However, remember that the permanently banned IPs will not persist across the system or service restart. In order to make these bans persistent, you will need to perform a few more steps:
1. Edit the /etc/fail2ban/jail.local file using the command below:
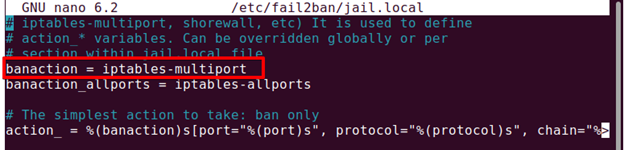
Look for the banaction entry in this file. The following screenshot shows the banaction is iptables-multiport.
2. Edit the banaction file iptables-multiport using the command below:
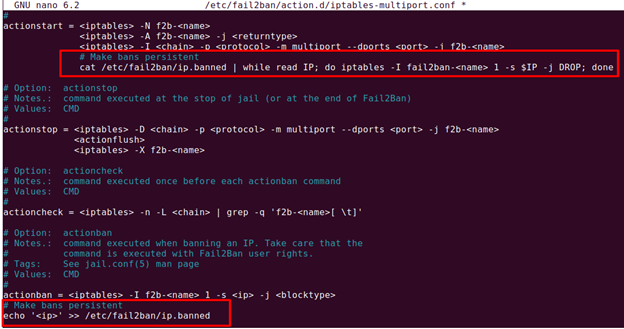
Under the actionstart default entries, add the following lines:
cat /etc/fail2ban/ip.banned | while read IP; do iptables -I fail2ban-<name> 1 -s $IP -j DROP; done
And under the actionban default entries, add the following lines:
echo '<ip>' >> /etc/fail2ban/ip.banned
You can also refer to the following screenshot for clarity.
Then save and close the file and restart the fail2ban service:
Fail2ban will add the banned IPs to the /etc/fail2ban/ip.banned file. You can also manually add IPs to this file. The banned IPs will now persist across the system or service restart.
That is all there is to it! In this article, we explained how using the fail2ban; you can change the ban time or ban an IP forever that is repeatedly failing to authenticate.
Source: linuxhint.com