How to Add Row to HTML Table Using JavaScript
This manual will use JavaScript to explain the procedure for adding a row to a table.
How to Add Row to HTML Table Using JavaScript?
For adding a row in a table, use the following procedures:
Let’s check each procedure individually.
Method 1: Add Row to HTML Table Using insertRow() Method
The “insertRow()” method is utilized to add a new row at the beginning of the table. It creates a new <tr> element and inserts it into the table. It takes an index as a parameter that defines the location of the table where a row will be added. If “0” or no index will be passed in a method, this method adds the row at the start of the table.
If you intend to add the row at the last/end of the table, then pass index “-1” as an argument.
Syntax
Use the following syntax for adding rows in a table with the help of the insertRow() method:
Here, “index” indicates the position where you want to add a new row, such as at the end of the table or at the start.
Example 1: Adding a Row at the Top/Start of the Table
Here, we will create a table and a button in an HTML file using the HTML <table> and <button> tags. The table contains three rows and three columns or cells:
<tr>
<td>Cell of Row 1</td>
<td>Cell of Row 1</td>
<td>Cell of Row 1</td>
</tr>
<tr>
<td>Cell of Row 2</td>
<td>Cell of Row 2</td>
<td>Cell of Row 2</td>
</tr>
<tr>
<td>Cell of Row 3</td>
<td>Cell of Row 3</td>
<td>Cell of Row 3</td>
</tr>
</table>
<br>
Then, create a button which will invoke the “addRow()” button when clicked:
For styling the table, we will set the border of each cell and the table as given below:
border: 1px solid black;
}
Now, we will add rows in the table at the top/start of the table using JavaScript. To do so, define a function named “addRow()” that will be called on the button’s onclick() event. Then, fetch the created table using the “getElementById()” method. After that, call the “insertRow()” method by passing the “0” index as a parameter that indicates the row will be added at the start of the table.
Then, invoke the “insertCell()” method by passing indexes that show how many cells will be added to the row. Finally, add the text data or text in cells using “innerHTML” property:
var tableRow = document.getElementById("table");
var row = tableRow.insertRow(0);
var cell1 = row.insertCell(0);
var cell2 = row.insertCell(1);
var cell3 = row.insertCell(2);
cell1.innerHTML = "Cell of New Row";
cell2.innerHTML = "Cell of New Row";
cell3.innerHTML = "Cell of New Row";
}
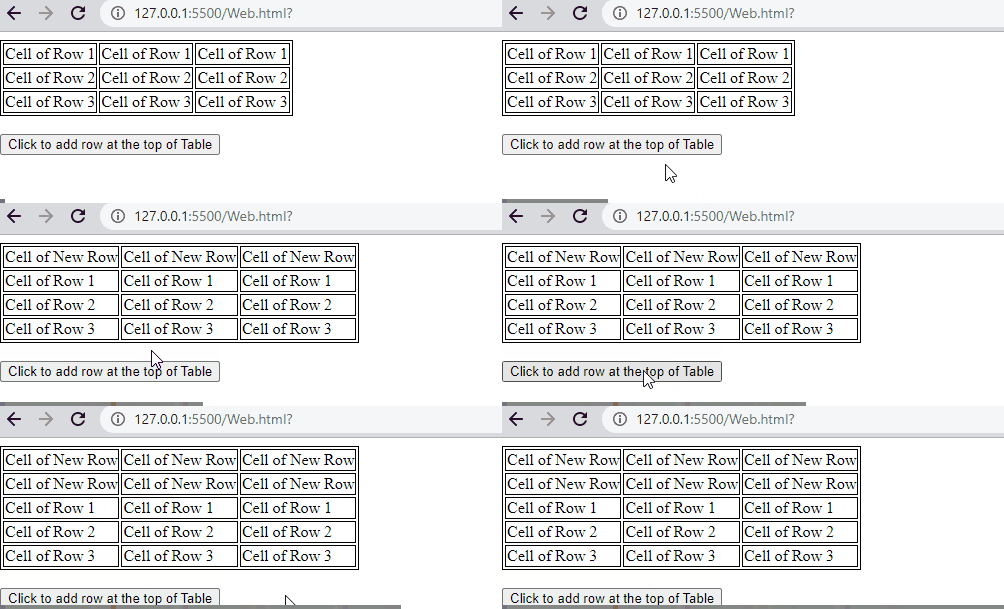
As you can see in the output, the new row is added at the top of the existing table by clicking on the button:

Example 2: Adding a Row at the End of the Table
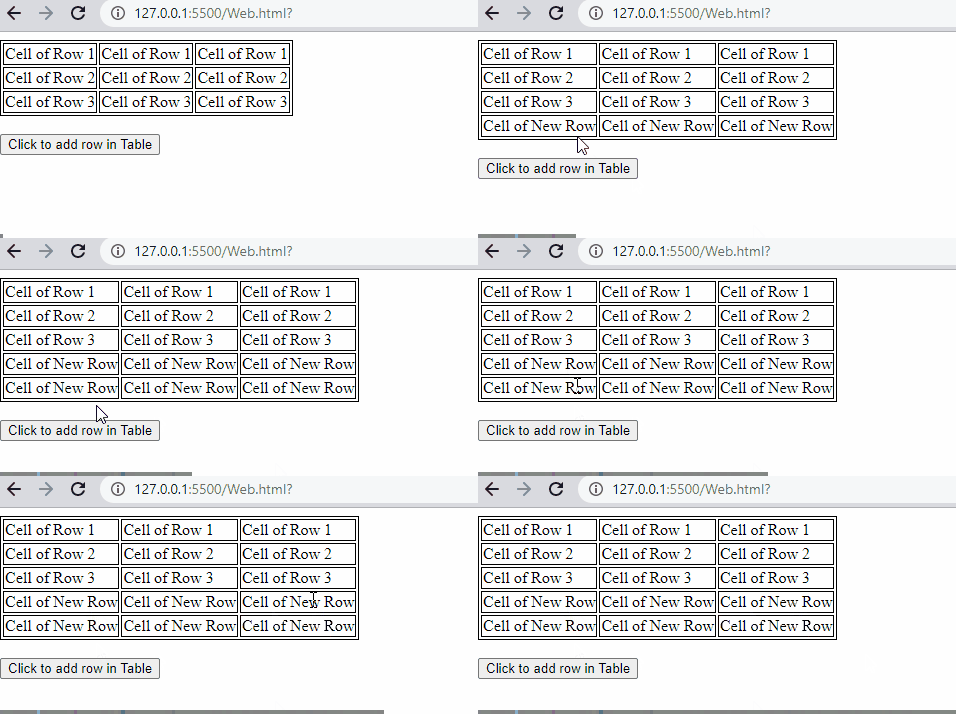
If you want to insert a row at the last/end of the table, pass the “-1” index to the “insertRow()” method. It will add the row at last when the button is clicked:
var tableRow = document.getElementById("table");
var row = tableRow.insertRow(-1);
var cell1 = row.insertCell(0);
var cell2 = row.insertCell(1);
var cell3 = row.insertCell(2);
cell1.innerHTML = "Cell of New Row";
cell2.innerHTML = "Cell of New Row";
cell3.innerHTML = "Cell of New Row";
}
Output

Let’s move to the other method!
Method 2: Add Row to HTML Table by Creating New Element
There is another method for adding a row in a table that is creating new elements using JavaScript methods, including the “createElement()” method and the “appendChild()” method. The createElement() creates the <tr> and <td> elements and the appendChild() method appends the cells and rows in a table.
Syntax
Follow the provided syntax to create a new element for adding a row in a table using JavaScript:
Here, the “tr” is the table row.
Example
We will now use the same previously created table in HTML with a CSS file, but in the JavaScript file, we will use the “createElement()” method. Then, add the data or text in the cells using the “innerHTML” property. Lastly, invoke the “appendChild()” method that will add the cells in a row and then the row in a table:
var tableRow = document.getElementById("table");
var row = document.createElement("tr");
var cell1 = document.createElement("td");
var cell2 = document.createElement("td");
var cell3 = document.createElement("td");
cell1.innerHTML = "Cell of New Row";
cell2.innerHTML = "Cell of New Row";
cell3.innerHTML = "Cell of New Row";
row.appendChild(cell1);
row.appendChild(cell2);
row.appendChild(cell3);
tableRow.appendChild(row);
}
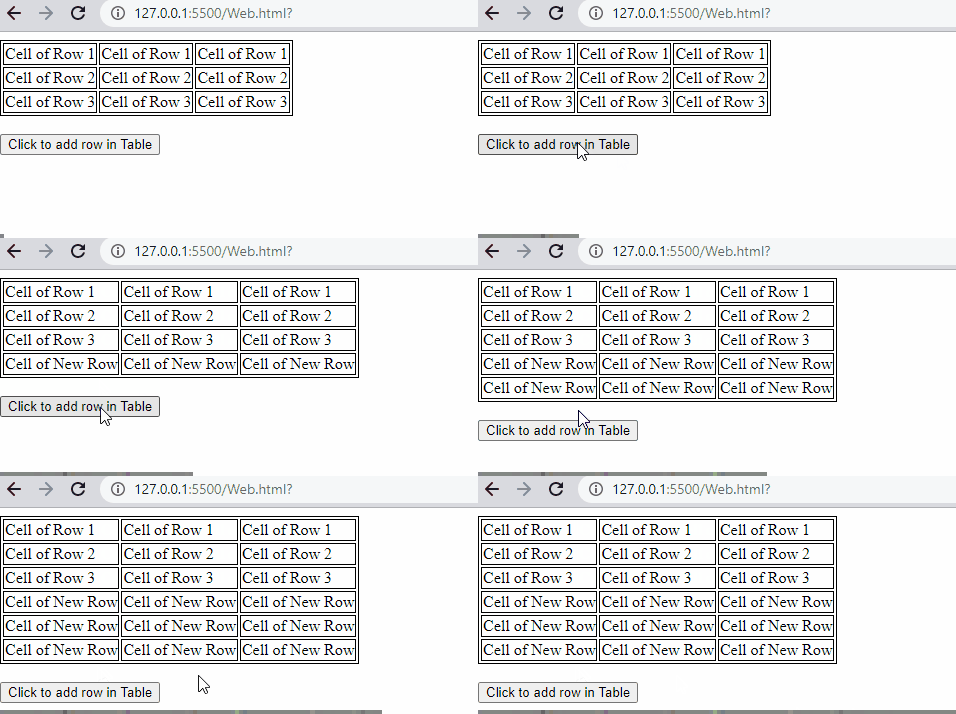
The output shows that the new row is successfully added at the end of the table:

We have compiled all the methods for adding a row in a table using JavaScript.
Conclusion
For adding a row in a table, use the two approaches: insertRow() method or create a new element using JavaScript predefined methods, including the appendChild() method and the createElement() method. You can add a row at the start of the end of the table using the insertRow() method by passing indexes. This manual explained the procedures for adding a new row in a table by clicking on a button using JavaScript.
Source: linuxhint.com
