How to Add a User on Arch Linux
User management is the most needed utility in any operating system because it makes your system secure and provides you an opportunity to assign the right privileges to the right ones. The users can make a lot of changes to your system according to the rights they have. Therefore, it’s very necessary to have a very close look at each activity that is performed by the users. Thus, this guide elaborates on the method to add the new users to the Arch Linux system and how to manage them. Before moving towards the addition of users in the Arch Linux system, we need to make sure that the group is already enabled. To do so, we use the following “visudo” command with “sudo”. This is typically used to make changes to the sudoers file:
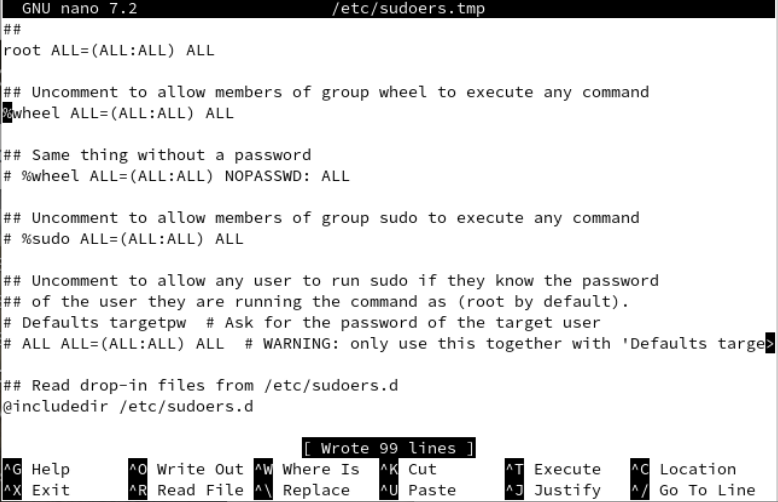
The sudouers file is launched in the “nano” editor. You will find the “wheel” group in the following illustration. Uncomment it and save the file to update the changes. Use “Ctrl-x” to exit.
Add a User
Now, we add a new “test” user to the Arch Linux system using the “useradd” instruction with the “sudo” rights. This instruction doesn’t take anything in return which indicates that the user is created.
Now, it’s very necessary to secure an account that is just created. For this, we establish a new user and add a new password. Therefore, we utilize the shell’s “passwd” command along with the user “test” as our input. You are prompted by the terminal to enter a new password. After providing the password twice, it is updated successfully.
New password:
Retype new password:
passwd: password updated successfully
In case you want to perform the process of user addition to arch Linux along with setting its password at once, you can do so by modifying the useradd instruction. For this, you should use the “-m” and “-p” flags in the instruction. The “-m” flag can be utilized to name a new user while the “-p” option can be used to set the password for the user to be created. For example, we create a “dummy” user with the “dummy123” password via the useradd instruction in the following:
The other thing that you can achieve using the useradd instruction is to set the custom directory for a new user using the “-d” option with the path to the directory. The following instruction shows that we created a “new” user and a “new” password and set its custom directory as “/tmp/new”:
There are a lot of groups which are available in Arch Linux to perform the different functions according to their group types. To add a user to a particular group in Arch Linux, the useradd command comes up with the “-G” option to add a particular user to any group. For example, the following instruction adds a new “blue” user in the wheel, audio, and video group while creating:
There is also a way to add the system users in Arch Linux using the useradd instruction. For this, you need to use the “-r” option with the “-s” flag followed by the path to the “fish” directory, i.e. “/usr/bin/fish”. The “hell” user is created as you can see from the attached command. The output of this instruction generates a warning.
useradd: Warning: missing or non-executable shell ‘/usr/bin/fish’
You can also do it if you wish to confirm the outcome of the aforementioned instruction. For that, try using the following “su’ instruction with the name of a user that you just created. It might show you a warning.
su: warning: cannot change directory to /home/hell: No such file or directory
After that, try the whoami one-word instruction on the shell. You will see that it returns the name of a system user that you just created.
hell
User Modification
While using the arch Linux and creating new users, you should have a piece of knowledge about the user properties and a way to modify them. Consider the scenario where we want to rename the “test” to “test1” user. For this, we use the usermod instruction with the “-l” option followed by the new name and then an old name as shown in the following attached command:
Now, if you want to set the expiry date for a newly created user account, you can also set that using the usermod instruction followed by its “—expiry date” option. The option follows the date and then a username. The “test1” is our new user name in this case.
Now, if you want to add your user to the additional groups, you can do so by using the –append option in the usermod instruction followed by the –groups option with the group names and the name of a user to be added. The wheel and users are 2 groups while the test1 is a user.
To modify the default shell that is used by a user, you can use the –shell option in a usermod instruction. In this instruction, you should provide the path to the shell file like /usr/bin/bash.
Lock/Unlock the User
In case you don’t want anybody to use the particular account, you might lock it. To lock an account, the –lock option can be used in the usermod instruction with the name of a user which is “test1”.
In the same way, if you want to allow a particular user to use its system account, you should unlock the particular account using the “unlock” option in the usermod instruction with the same user name as shown in the attached instruction:
Delete the User
To display the currently available users of your Arch Linux, try using the instruction as follows:
root
bin
daemon
omar
dummy
new
blue
hell
test1
To delete the new and previously made users, the “userdel” instruction can be utilized. This command takes one or more usernames at once.
[omar@omar ~]$ sudo userdel hell
[omar@omar ~]$ sudo userdel blue new
[/c]c
If you create a user with a related home directory, you can delete it using the –r option.
[cc lang="bash" width="100%" height="100%" escaped="true" theme="blackboard" nowrap="0"]
[omar@omar ~]$ sudo userdel -r dummy
Conclusion
The introductory paragraph explains the importance of user management in all sorts of operating systems. To support the discussion, we tried the different instructions to create the new users, modify, lock or unlock, and delete them. For this, we utilized the useradd, usermod, and userdel instructions with the –m, -p, -G, -r, -s, -l, –append, –shell, –lock, –unlock, and –expiredate options.
Source: linuxhint.com