How the Lifecycle of .pipe() Works in Node.js?
This guide explains the lifecycle of the “.pipe()” method and its working in Node.js.
How Does the Lifecycle of .pipe() Work in Node.js?
The “.pipe()” method is the best choice when it comes to handling the backpressure between the two streams. It handles backpressure by halting the sending of data to the destination stream until it becomes idle or ready to receive more data. The “.pipe()” method can be utilized in various real-time projects like:
- Streaming video or audio from a server to a client.
- Streaming data from a sensor to a database.
- Real-time data processing and analysis like filtering.
- Data transformation or conversion.
- Data logging and debugging.
Lifecycle or Workflow of “.pipe()” in Node.js
There are only two streams namely “source” and “destination” in the lifecycle of “.pipe()”, as illustrated below:
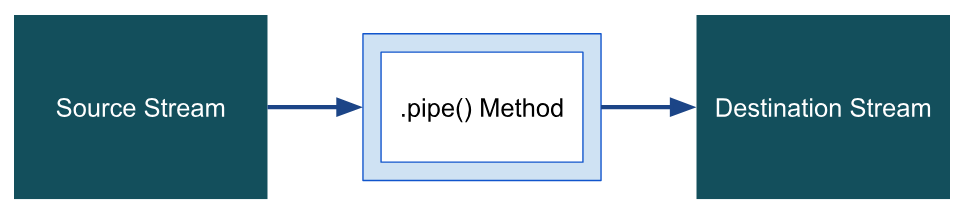
The working of the above flowchart of the “.pipe()” method is as follows:
- The “Source Stream” emits a data event.
- The “.pipe()” method emits the data event on the “Destination Stream”.
- The “Destination Stream” processes the data event.
- If the “Destination Stream” is unable to process any more data, it signals to the source stream that it is backpressure.
- The “Source Stream” stops inserting data into the “Destination Stream” until the “Destination Stream” signals that it is ready to receive more data.
Let’s have a couple of examples to understand the implementation procedure of the “.pipe()” method in Node.js.
Example 1: Displaying Content Using “.pipe()” Method
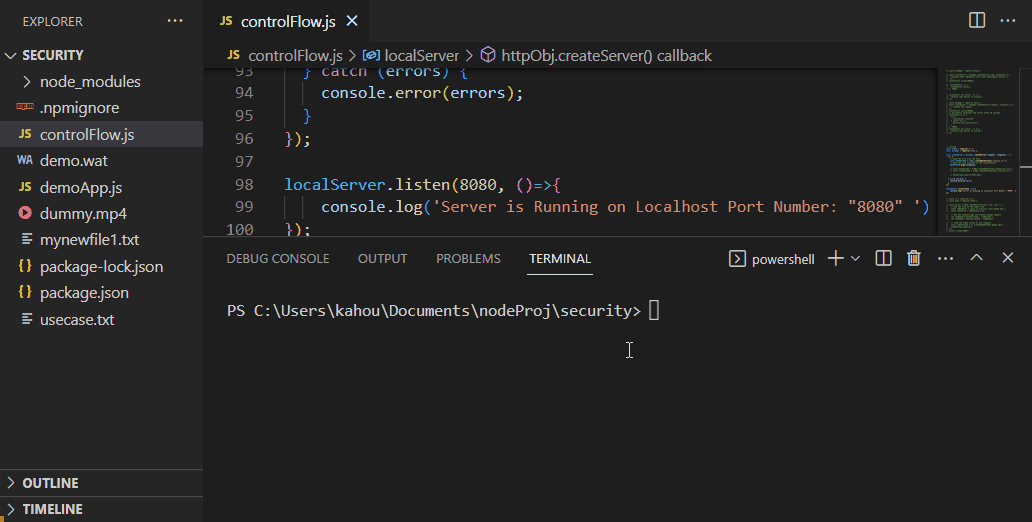
In this example, the random file is being placed over the stream whose content is then retrieved and displayed over the destination stream via the “.pipe()” method:
const httpObj = require('http');
const localServer = httpObj.createServer((request, response) => {
try {
// Targeted File to Read
const dataStream = fsObj.createReadStream('usecase.txt');
// Pipe the file to response
dataStream.pipe(response);
} catch (errors) {
console.error(errors);
}
});
localServer.listen(8080, ()=>{
console.log('Server is Running on Localhost Port Number: "8080" ')
});
The description of the above code is as follows:
- First, import the required “fs” and “http” modules and store their objects in “fsObj” and “httpObj” variables respectively.
- Next, the server has been created by invoking the “createServer()” method and storing this newly created server in a “localServer” variable.
- Then, use a “try” block inside the method callback function and invoke the “createReadStream()” method using the “fsObj” variable.
- Pass the targeted file content that needs to be read inside this method parenthesis and store the result in the “dataStream” variable.
- Insert the “dataStream” variable into the “.pipe()” method to send the response.
- Utilize the “catch” block to handle any occurred errors.
- Finally, listen or set up the server over the port number “8080” and display the success message with the help of its callback function.
Execute the containing file(controlFlow.js) of the above code which is via the below-stated command:
The generated output shows that with the help of “.pipe()”, the file from the source stream has been sent to the destination stream and displayed over the webpage:
Example 2: Modifying Content of the File Using the “.pipe()” Method
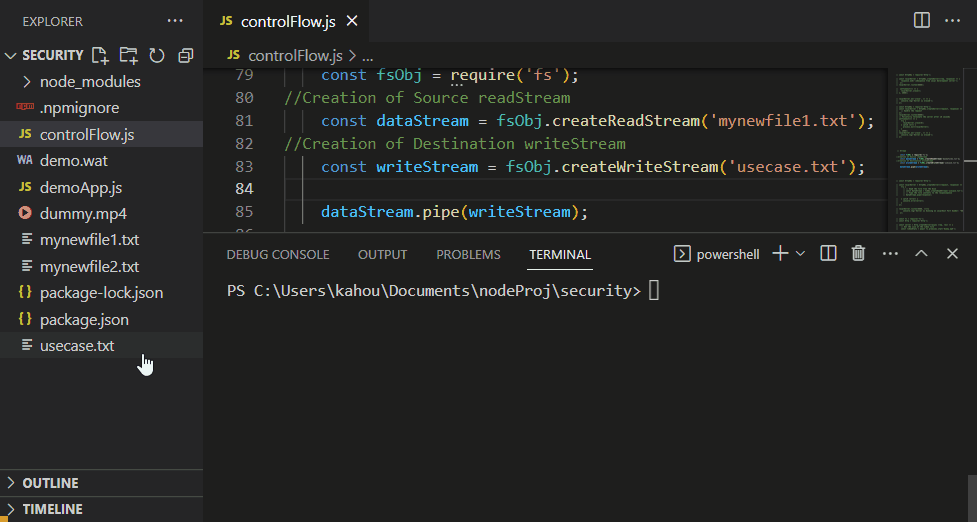
In below code snippet below, the data of one selected file is going to be placed inside the targeted file and removes the already placed content:
const httpObj = require('http');
//Creation of Source readStream
const dataStream = fsObj.createReadStream('mynewfile1.txt');
//Creation of Destination writeStream
const writeStream = fsObj.createWriteStream('usecase.txt');
dataStream.pipe(writeStream);
The explanation of the above code block is stated below:
- Import the required “fs” and “http” modules and store their objects in “fsObj” and “httpObj” variables respectively.
- Next, invoke the “createReadStream()” method using the “fsObj” variable and pass the selected file name inside this method parenthesis whose content needs to be copied or read and store the output of this method in the new variable named “dataStream”.
- Now, pass the targeted file on which the read content needs to be inserted inside the “createWriteStream()” method. Place the output of this method in a “writeStream” named variable.
- After that, invoke the “.pipe()” method using the “dataStream” variable and pass the “writeStream” variable inside the method parenthesis.
Execute the above code by running the containing file(controlFlow.js) using the below-given command:
The generated output shows that the content of the first file has been inserted as the new content of the targeted file:
That’s all about the lifecycle and working of “.pipe()” in Node.js.
Conclusion
The lifecycle of the “.pipe()” method lies around the “source” and “destination” stream. The stream written behind the “pipe()” method is the source and the one written inside the parenthesis is “destination”. The stream can be for writing or reading the file content of the selected file and the file can be audio or video as well. This blog has explained the lifecycle of the “pipe()” method in Node.js.
Source: linuxhint.com