How do you Write a Javadoc Comment?
Syntax
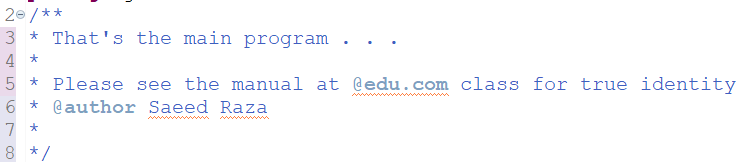
Firstly, we need to see the basic syntax of Javadoc comments in Java. So, we have been using the simple editor to put some Javadoc comments in it and displaying the presentation of it below in the image attached. The autogenerated comment of the Java document starts with some special character like an asterisk, and the whole comment’s first line might be green color. You can see the depiction of a java document comment that has many asterisk characters at the start of each comment from start to end.
At the start, the java doc comment starts with the “/” character followed by two asterisk characters. At the same time, all the other lines contain a single asterisk character at their start. At the end of a java document comment, we have ended it with the “/” character. In between this java document comment illustration, you will see a comment line “7” where we have defined the name of an author using the “@” character to define a variable “author” with the name of a comment author, i.e., Saeed Raza. The meta-data information of java document comments must always be written with the “@” character.
Create Automatic Java Doc Comment in Eclipse IDE
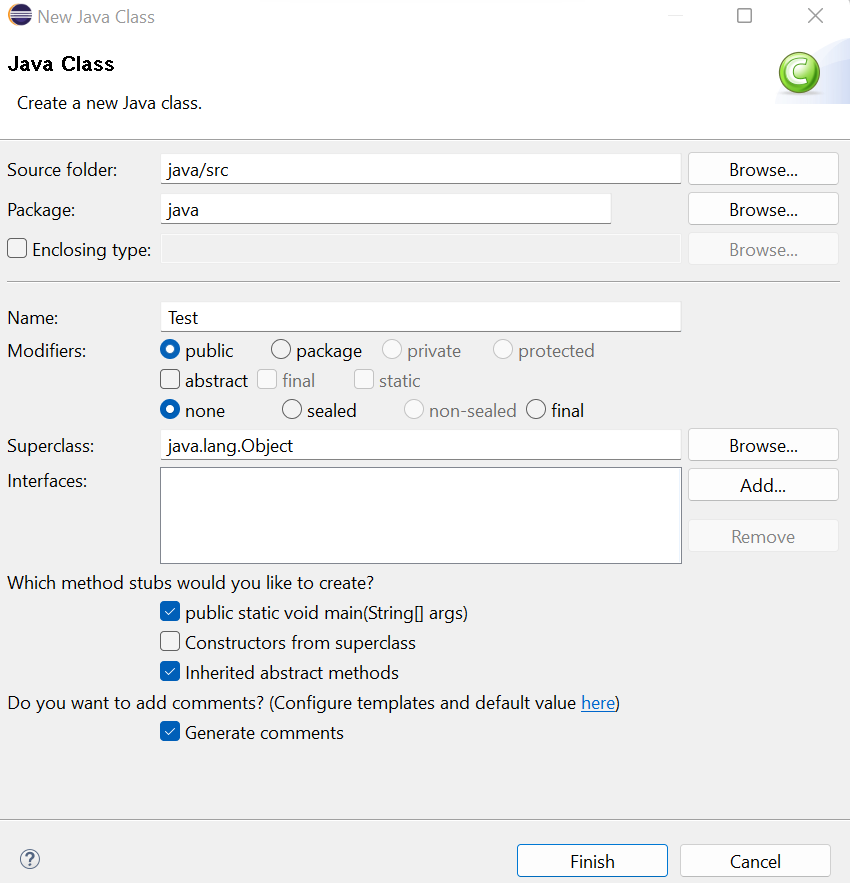
This example uses the Eclipse IDE java development environment to create automatic comments in the Java project. For this, you must have an Eclipse IDE mounted and set up at your end. So, launch the Eclipse IDE and try creating a new project named “java”. It will ask you to name the current project package. We named it “java” as well. After that, you need to create a new java file or create a new class within the same java project. For this, right-tap on the package name from the left corner of the Eclipse IDE project explorer bar, move to the “New” option and hit the “Class” keyword from the expanded options. This will generate a new window on your screen with the title “New Java Class,” as displayed in the image below.
Now, you need to insert the name of a class to be created within the text box in front of the “Name” label. Most of the things will be left unchanged as these were selected automatically whenever you try to create a new class. You just need to clear the method end you want to create for your java code. Therefore, we have checked the first check box to create a main() driver function in this class. Last but not least, you will find an opportunity to add the default comments in the java program to be created. You just need to checkmark the checkbox named “Generate Comments”. This is going to be a phenomenal step in the creation of java code. Let’s hit the “Finish” button after providing all the necessary information.
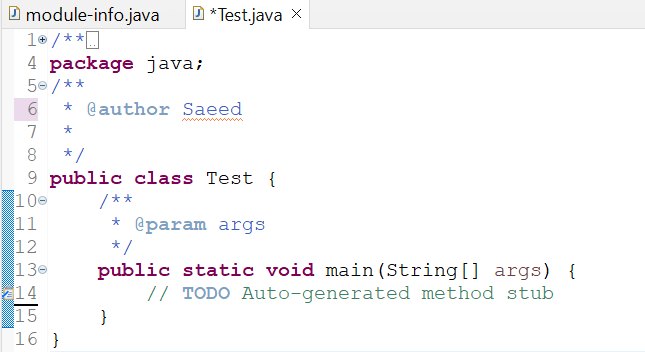
The shown-below java program was created in the Eclipse IDE tool along with automatic comments. You can see that the java doc comments all started with the asterisk characters. It also provides meta-data information regarding the project, i.e., the author. Along with that, it also shows the auto comment depicts we have created a stub main function as well. That’s all about the automatic generation of Javadoc comments in Eclipse IDE.
Example 01: Javadoc Comments
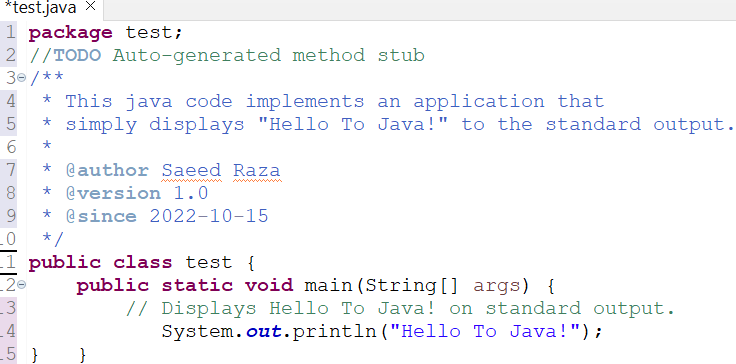
Now, you can create your own Java document comments while coding. Here is another illustration to do that. Whenever you have been using the main() driver function in the code, i.e., you should have been using it in every single program, you should always create its comment at the top of the file or, within this function, start like “//TODO Auto-generated method stub”. This comment explains that the main() method has been generated automatically, i.e., you don’t need to write it.
After this, we have added a Javadoc long comment elaborating on the use of this program along with its meta-data information, i.e., author, version, and the date on which it was created. Before the “println” statement, there is a single line of comments used to explain the purpose of using the println() function. That’s it for this example.
The execution of programs with comments doesn’t affect the output as below.
![]()
Example 01: Single-line and MultiLine Comments
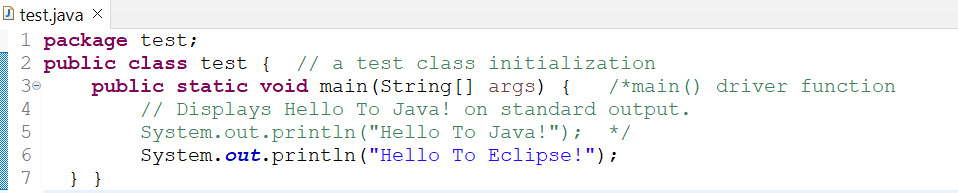
After going through the Javadoc comments in Eclipse IDE, let’s begin to take a look at another example of Java utilizing the single-line and multi-line comments, i.e., user-defined. We now generated a new class “test” and included the main() method in it. This method holds a println() function statement to display something. We have utilized a single-line comment with the name of a class starting with “//” characters, i.e., explains that it is class initialization. At the main() function definition line added a multi-line comment starting with the “/*” characters and ending with “*/” characters.
Conclusion
This article helps you understand the importance and vitality of comments used in daily life and programming life. It discusses how these comments can help you in many ways. Firstly, we discussed what are the Javadoc comments and explained their syntax very briefly. After this, we explained the whole method in Eclipse IDE to generate the automatic Javadoc comments within a few seconds and with a few clicks on the GUI.
Source: linuxhint.com