Golang Labels Examples
In the Go programming language, labels offer a flexible system to manage the program flow. Labels allow us to name specific points in their code and then refer to those points using goto, break, or continue statements. This article explores the different examples of using labels in Go and understand how they can be leveraged to enhance the control flow in your programs.
Example 1: Golang Label Goto Statement
The “goto” statement transfers the program control to a labeled statement. The “goto” statement can be used to “jump” to a specific location in the code which is identified by a label.
import (
"fmt"
)
func main() {
fmt.Println("Lilly")
goto f1
fmt.Println("Rose")
f1:
fmt.Println("Cherry")
}
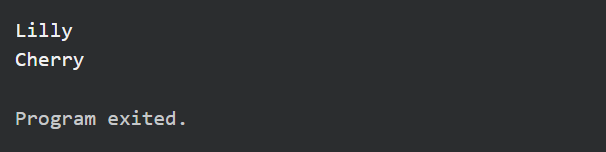
In this example, we set the “Lilly” string in the fmt.Println() function. After that, we define the “goto f1” statement that causes the program to jump to the “f1” label. After printing “Lilly,” the “goto” statement is used to move on to the “f1” label. As a result, “Rose” will not be printed which is also called inside the fmt.Println() function because the program jumps directly to “f1”. Only “Lilly” and “Cherry” will be printed.
Thus, the output is expected as it only displays the two strings, “Lilly” and “Cherry,” and skips the “Rose” string:
Example 2: Golang Label Continue Statement
Additionally, we can use the labeled “continue” statements to specify which loop to continue.
import "fmt"
func main() {
var evenInts []int
for i := 1; i < 12; i++ {
if i%2 == 0 {
evenInts = append(evenInts, i)
continue
}
}
fmt.Println("Even Integer ", evenInts)
}
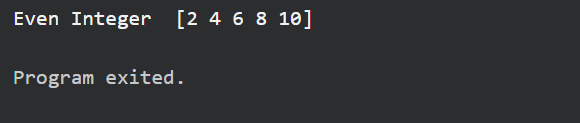
In this example, an “evenInts” variable of type []int (slice of integers) is declared. This slice holds the even integers. Then, the iterations are carried out using the “for” loop from 1 to 10. The loop variable “i” is initialized to 1, and the loop continues as long as “i” is less than 12. On each iteration, “i” is incremented by 1. Inside the loop, an “if” statement checks if the current value of “i” is divisible by 2. If the “i%2 == 0” condition is true, the code inside the “if” block is executed. Within the “if” block, the even number “i” is appended to the “evenInts” slice using the append function. Next, we employ the “continue” statement which skips any additional code in loop iteration and moves on to the next iteration. After the loop is completed, the program prints the contents of the “evenInts” slice using the fmt.Println() function.
The following output shows the even integers from 1 to 10 that are stored in the “evenInts” slice:
Example 3: Golang Label “For” Loop Statement
Moreover, we can use the “for” loops labels to provide a way to a specific loop when you have nested loops. Here, we use a “for” loop with a label and a “goto” statement to control the flow of execution.
import "fmt"
func main() {
var x int = 5
LOOP: for x < 15 {
if x == 10 {
x = x + 1
goto LOOP
}
fmt.Printf("value of x: %d\n", x)
x++
}
}
In this example, we declare an “x” variable of type int and assign a value of 5. Then, the “LOOP:” label is defined just before the “for” loop. The “for” loop here starts with the x < 15 condition. Until “x” equals 15, the loop proceeds to execute. Inside the loop, we define the “if” statement that checks if “x” is equal to 10.
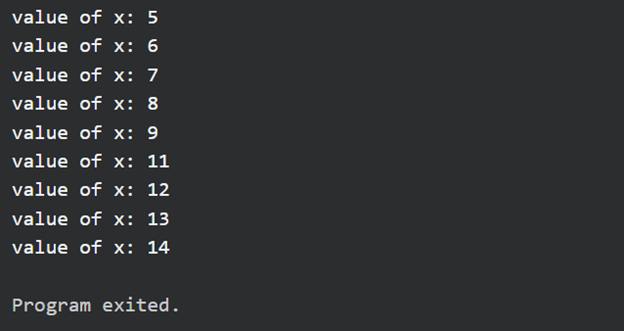
In order to adjust the value, we also increase “x” by 1. The “goto” statement is then used to return to the “LOOP” label. This causes the program to jump back to the beginning of the loop, skipping the remaining code in the current iteration. If the condition in the “if” statement is not true where “x” is not equal to 10, the code continues to execute. The value of “x” is printed using the fmt.Printf, and then “x” is incremented by “1 (x++)”. Moreover, the loop continues until “x” is no longer less than 15.
The output represents the values of “x” from 5 to 9 below, then 11 to 14. The value of 10 is skipped due to the “goto” statement that jumps back to the LOOP label when “x” is equal to 10:
Example 4: Golang Label Break Statement
Next is the Go program which demonstrates the nested loops with a conditional “break” statement. The labeled “break” statement specifies which block to break out of when dealing with nested blocks.
import "fmt"
func main() {
for i := 1; i <= 4; i++ {
for j := 1; j <= 4; j++ {
if i==3 {
break
}
fmt.Println("The outer loop i =", i, "The inner loop j=", j)
}
}
}
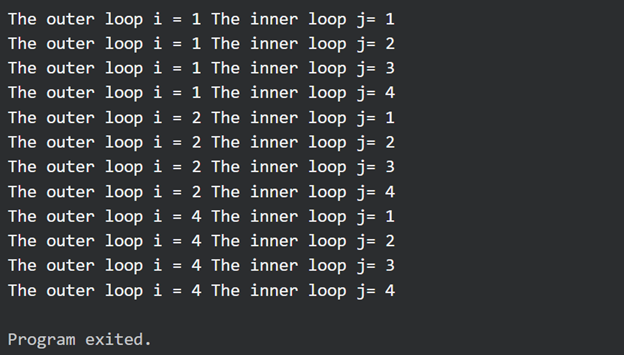
In this example, we define two nested “for” loops. The outer loop iterates from “i = 1” to “i <= 4”, and the inner loop iterates from “j = 1” to “j <= 4”. Here is an “if” statement that examines whether “i” equals 3 inside the inner loop. The break statement is called and performed if the criteria is true. When the “break” statement is encountered, the inner loop is terminated, and the next iteration of the outer loop is initiated. If the condition specified in the “if” statement is not true (“i” is not equal to 3), the program inside the inner loop continues to execute. It prints the values of “i” and “j” using the fmt.Println. Here, the inner loop completes its iterations for each value of “j”, and then the outer loop continues with its next iteration.
Hence, we can see the output that is obtained from the previous program:
Example 5: Golang Label Switch Statement
Here, we demonstrate the use of a labeled loop and a “switch” statement to control the program flow.
import "fmt
func main() {
exit:
for i := 1; i <= 5; i++ {
switch {
case i == 1:
fmt.Println("Begin at ", 1)
case i == 2:
fmt.Println("Progressing at ", 2)
case i == 3:
fmt.Println("Progressing at ", 3)
case i == 4:
fmt.Println("Continuing ", 4)
continue
case i == 5:
fmt.Println("Breaking ", 5)
break exit
}
}
}
In this example, we label the “for” loop with the “exit” label. This label allows us to break out of the loop from within the switch statement. That “for loop” iterates from 1 to 5. When “i” is equal to 1, the program prints “Begin at 1”. When “i” is equal to 2 or 3, the program prints “Progressing at 2” or “Progressing at 3”, respectively. And, when “i” is equal to 4, the program prints “Continuing 4” and employs the “continue” command to go on to the next iteration without running the code that remains in the loop.
This means that the program does not execute any code below the “continue” statement for this iteration. In the next case, when “i” is equal to 5, the program prints “Breaking 5” and uses the “break” statement with the “exit” label to terminate the loop entirely. This means that the program exits the loop and does not continue with any further iterations.
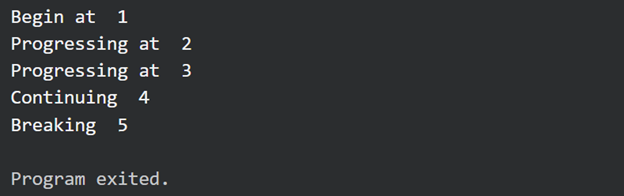
The output generates the results one by one after executing the switch cases successfully:
Conclusion
We discussed the labels in Go with a few examples. The labels in Go provide a powerful mechanism to control the program flow. Whether it is used with loops, “goto” statements, or “switch” statements, the labels offer flexibility and control over the execution.
Source: linuxhint.com