git-stash Command in Git | Explained
In this guide, we will discuss:
What is the “git stash” Command in Git?
The “git stash” command is utilized for temporarily holding the uncommitted changes that users made in their working copy, then they can easily work on something else. After that, they come back and reapply these changes later on. More specifically, stashing becomes a handy process when users want to quickly switch contexts and work on something else.
How to “git stash” Uncommitted Changes in Git?
To use the “git stash” command in Git to temporarily save the uncommitted changes, follow the provided steps:
- Navigate to the local repository.
- View the current state of the current working repository.
- Run the “git stash” command to temporarily hold the tracked and untracked changes.
- Check the stash list of displaying the stash changes index.
- Execute the “git show” command to show the change in detail.
- To reapply, run the “git stash pop” command.
- Run the “git stash clear” command to clear the stashed index.
Step 1: Move to Particular Git Repository
Use the provided command along with the desired Git local repository and move to it:
Step 2: Check Status
To view the current state of the working repository by running the “git status” command:
As you can see the tracked\untracked changes exist in the Git working area and staging index. For instance, the “demofile.py” and “testfile.html” files:

Step 3: Stash Changes
Now, execute the “git stash” command to temporarily hold the staged and unstaged changes:

Step 4: List Stash Changes
Next, list the stash changes by executing the “git stash list” command:
According to the provided output, the stash list temporarily holds the changes in the “stash@{0}” stash index:

Step 5: Show Stash
To view the stash index changes, use the provided command:
From the below-given output, the stashed index temporarily holds the tracked “demofile.py” file and modified untracked “testfile.html” file:

Step 6: Verification
Again, check the Git repository’s current status for verification by utilizing the following command:
It can be seen that there is nothing to commit and the working tree has been cleaned:

Step 7: Apply Stash Changes
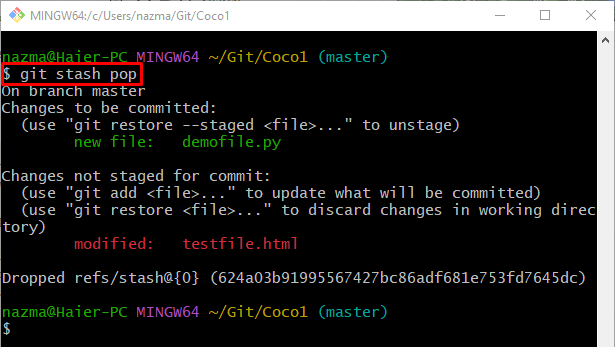
To apply the temporary holds stash changes, execute the “git stash pop” command:
From the below-provided output, the stash changes has been reverted to the git working area and staging index:
Step 8: Clear Stash
Run the “git stash clear” command to permanently clear the stash changes:

Now, run the provided command to stash the changes:
It can be observed that no local changes have to save:

That’s it! We have provided the information about the “git stash” command in Git.
Conclusion
The “git stash” command is utilized to temporarily save the unstaged and staged changes that users made in their working copy. To do so, move to the local repository and view the current state of the current working repository. Then, run the “git stash” command to temporarily hold the uncommitted changes. Next, check the stash list of displaying the stash changes index. After that, use the “git show” command to view the changes in detail and reapply them by executing the “git stash pop” command. This post illustrated about the “git stash” command in Git.
Source: linuxhint.com