Git Object Storage: How Git Stores and Manages Objects
In this guide, you will deeply learn about the working of the Git object storage
The outcomes for this tutorial are:
What are the Types of Objects in Git?
As mentioned earlier, Git stores every operation in objects. Based on the content of the tasks, these objects are categorized into 4 types which are described in the following table.
| Objects | Description |
| Commits | Changes made in the project repository are stored in commits in the form of SHA hash and metadata such as author name, email address, date, and time. Additionally, each commit is attached to the tree object. |
| Trees | It displays the first level of the link with blobs object pathnames, IDs, and some metadata for all files in the repository. |
| Blobs | Blobs (Binary Large Objects) contain any data of the files. |
| Tags | Tag is simply a human-readable message that categorizes projects into versions. |
How Does Git Store and Manage Objects?
As in the above section we have seen types of objects in which information is stored. These objects are located inside the hidden directory “.git/objects” directory. The “.git” folder is automatically created when we initialize the project repository. Let’s create a project repository in Git, initialize it, create a File in it, commit changes, and see where this information is stored practically. Stay tuned with the below-stated steps.
Step 1: Go to Git Repository
Open Git Bash and move to the Git repository by executing the “cd” command:

Step 2: Create Project
Create a project directory through the “mkdir” command. For instance, we are creating the “git-project”:

Step 3: Move to Project
Once the directory is created, jump into it using the “cd” command:

Step 4: Initialize Repository
Initialize the Git repository by running this command:

The project directory is initialized.
Step 5: Check Hidden Files
Now, if you list down the hidden files, you will see that the “.git” folder is created. To list hidden files run this command:

As you can see the “.git” folder is available.
Step 6: Create File
Create the new file in the directory with the help of the “echo” command and redirection operator. As in our scenario, the file “file.txt” is created:

Step 7: Check Status
Check the status of the file with the status command:

The file “file.txt” is untracked.
Step 8: Track File
Let’s add the file to the staging area by considering this command:

Step 9: Commit Changes
Commit the changes in the file via the “git commit” command:

Step 10: Check the Git Log
Next, list down the commit history with the help of “git log” command:

From the above output, you will see the Commit ID/SHA1 comprised of 40 characters. We will use commit ID/SHA1 to check all the information in our “.git/objects” directory.
Step 11: Go to Objects Directory
Use the “cd” command to access the “objects” folder as shown:

Step 12: List Content Directory
To see the content of the “objects” directory, execute “ls”:

In the above output, you will see the random folders. These random folders are linked and store all the information that we performed above. Just keep watching the instructions below!
Step 13: Retrieve Commit Hash Information
Use the “git log” commit ID and explore it using the “cat-file” command to retrieve the commit details as the following command represents.

Upon retrieving the commit ID detail, you will see the tree SHA1 is listed. As we have mentioned in the above guide each commit is linked with the tree. Just note one more thing here, the first 2 digits of the tree SHA1 is “dd” which is exactly the name of the folder in our “objects” directory. So, the meaning is clear, this folder contains the information about the tree.
Step 14: Show Blob Hash
As we described earlier, tree SHA1 is linked with the blob that contains the information about the content of our file. Let’s use tree SHA1 this time and receive its information using the “cat-file” command:

The blob SHA1 is listed and right after next to it, our project file name is displayed.
Did you notice here too? The first 2 digits of the blob SHA1 is “02” and our “objects” directory also has the folder “02”. Yes, you are thinking right, this folder contains the information about blob which is ultimately nothing but will be our file content.
Step 15: Explore Blob Hash
Let’s check what our blob SHA1 is holding using the “cat-file” command:
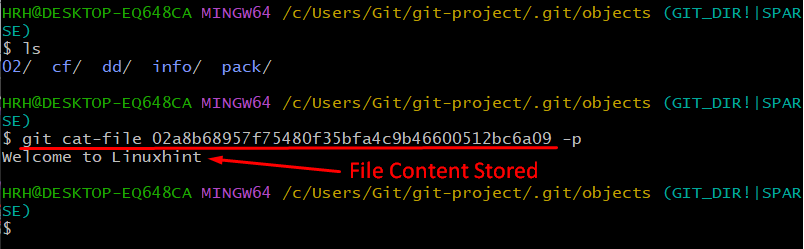
You will see that the content of our file is “Welcome to Linuxhint” which we have added above.
Conclusion
Git objects are categorized into 4 types based on the content of the tasks which are “commit”, “tree”, “blob” and “tag”. These objects are stored in the hidden directory “.git/objects”. In this guide, we have seen the explanation as well as the practical implementation of storing objects in Git.
Source: linuxhint.com