Evil Twin Attack with Airgeddon in Kali Linux
There are two methods to achieve your goal. Either by cracking the captured WPA handshake which relies on a wordlist file, or set up an Evil Twin attack which only requires some time until a client gives the password to us. What is the most reliable and efficient attack between both of them? Of course, the Evil Twin attack, right? As a matter of fact, it is so easy to set up an Evil Twin attack with Kali Linux this day.
We will learn the following topics in detail:
- Capture WPA / WPA2 handshake
- Fake access point
- De-auth attack
- Captive portal attack
Evil Twin Attack
Evil Twin attack is a combination of several wireless attacks, including, a fake access point, a De-auth attack or jamming the wireless, a Captive portal attack, and cracking a WPA/WPA2 password. very complicated, isn’t it? But don’t worry, we can do an Evil twin attack on Kali Linux by using Airgeddon.
Fluxion Vs. Airgeddon
There are two most popular tools related to Evil Twin attacks, they are Fluxion and Airgeddon. In writing this tutorial I have tried both of them. I compared them. I found no luck using Fluxion, the fake AP, DHCP server and DNS server is slow, really slow. And also, Fluxion asked so many questions which are actually could be shortened. On the opposite experience, I got so much impressed with the overall performance of Airgeddon. I really recommend Airgeddon instead of Fluxion, for now. Until maybe the developer makes an enhancement to the Fluxion performance which could beat Airgeddon.
Evil Twin attack using Airgeddon in Kali Linux
The simplest term I could explain to you Airgeddon is an open-source tool used to hack a Wi-Fi password using Evil Twin attacks, and I have mentioned earlier that an Evil Twin attack uses so many attack methods at once. I will tell you one by one of those attacks as we go.
Wireless card for Evil Twin attack
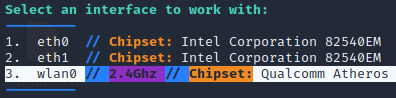
Make sure your wireless card supports, monitor mode, injection mode, and also virtual interface. In this tutorial, I’m using an external USB Wi-Fi adapter TP-Link TL-WN722N version 1. Please be careful of choosing this model. TP-Link TL-WN722N version 1 uses a Qualcomm Atheros chipset, not only it supports monitor and injection mode, but it also supports a virtual interface. Which is required in order to do an Evil Twin attack.
While the higher version of it, v2 and v3, uses the Realtek chipset. With some driver installation, the Realtek chipset on this model (v2 & v3) only supports monitor and injection modes. It won’t work on an Evil Twin attack because it doesn’t support a virtual interface. Read more about the recommended cards and chipset on the Airgeddon GitHub page at
https://github.com/v1s1t0r1sh3r3/airgeddon/wiki/Cards%20and%20Chipsets.
Install Airgeddon in Kali Linux
Airgeddon is not pre-installed in Kali Linux. You can download the Airgeddon project at GitHub at https://github.com/v1s1t0r1sh3r3/airgeddon. The simplest way to download anything from GitHub is by cloning the project into our Kali Linux using the git clone command.
Once the Airgeddon files are downloaded, change the directory to its folder.
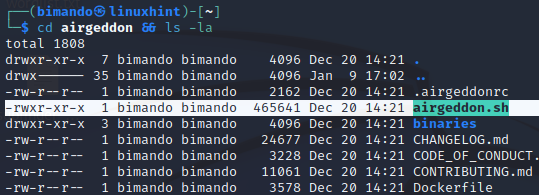
Inside an Airgeddon directory, you will see a bash file named Airgeddon.sh. Run that file with a sudo in the Kali Linux terminal by typing:
It will first check the dependencies, when there are missing dependencies, Airgeddon will automatically install the package, if not, then install it by yourself. Enjoy your time, and take a cup of coffee.
How to use Airgeddon on Kali Linux
Airgeddon is designed to be a semi-automatic tool; we are not given a choice of arguments to run it. However, we will be guided sequentially at each step of the setup. I assume you already have no missing dependencies problem. Run the Airgeddon in the Kali Linux terminal with sudo, again.
The first thing you will be asked to select is your wireless interface.
Then, make sure your interface is in monitor mode. If not, select option 2 to put your interface in monitor mode.
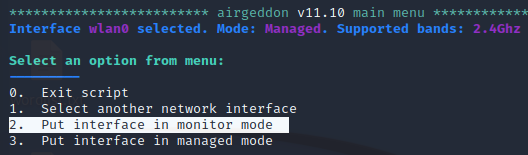
Your interface name will be changed in monitor mode, it now has the suffix ‘mon’. This naming format helps to tell us that the interface is in monitor mode.

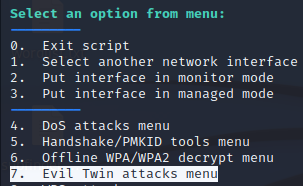
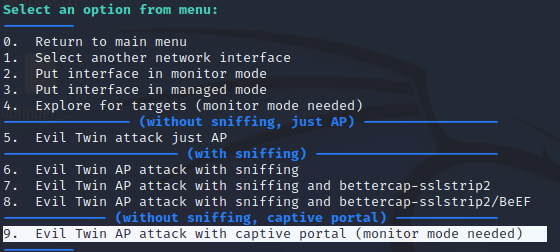
Then, still in the Main Menu. Select option 7 To set up an Evil Twin attack.
Then, select option 9 to activate the captive portal.
Then, Airgeddon will launch a target exploration, it scans for the surrounding wireless access points using airodump-ng.
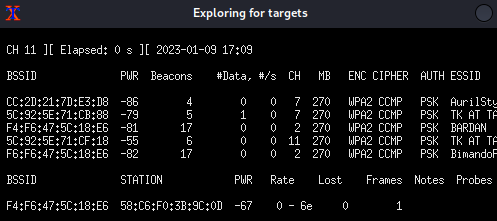
Once your target access point is on the list, then terminate the xterm window.
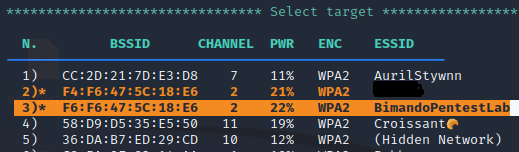
From the target exploration above, airgeddon will list the captured access point. Select your target access point, and note that the colored text indicates that the access point has a client connected to it.
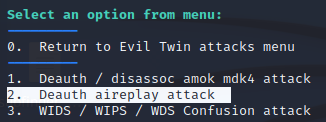
Then, you will be asked for choosing the De-auth attack method. The disassociate amok using mdk4 (the latest version now is mdk5) is more aggressive and may harm your interface card. But I recommend using aireplay-ng, option number 2.
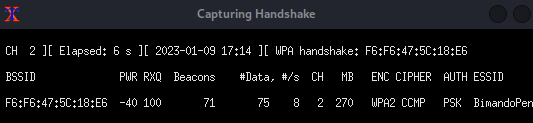
After that, immediately, Airgeddon will launch an xterm window to capture handshake, while another xterm window is spawned by running a De-auth attack. These xterm windows will close once it successfully captured the WPA handshake.
After that, you will be asked for several things, such as choosing the location or path to store the captured WPA handshake, and the result report when the attack succeeds. Don’t make this takes your time, just press Enter to confirm the default setting, and airgeddon will manage it for you.
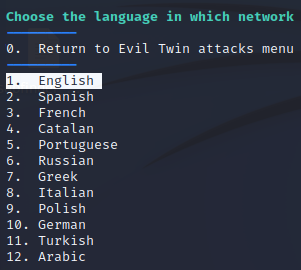
Then, the last step is choosing your captive portal language. If your language doesn’t appear on the list, just choose English.
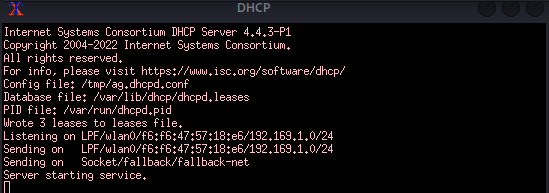
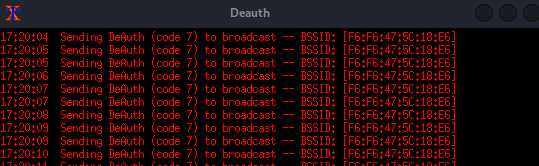
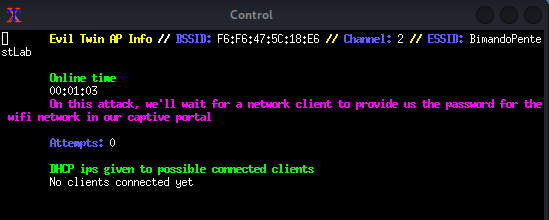
Finally, Airgeddon will launch the Evil Twin attacks. It will spawn several xterm windows to handle services such as:
Fake access point

DHCP server
Web server, used for Captive Portal

DNS server

De-auth attack using aireplay-ng
And the control panel, this window will tell you any information.
On the client or victim side, they will see that there are two access points, that have the same name. But the original one is protected, while the fake access point is open.
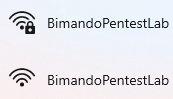
Because of the de-auth attack we launched above, the victim client will be disconnected from the original access point, and be unable to reconnect to it. Instead, they will try to connect to our fake access point.
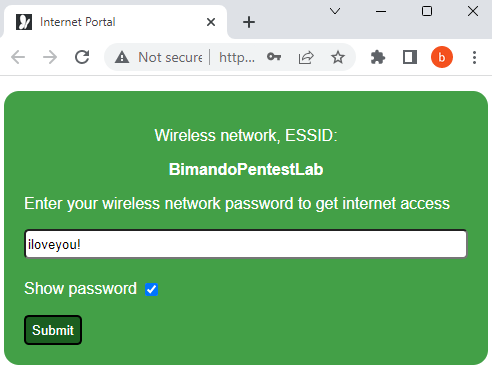
Once the client-victim is connected to our fake access point, they will be automatically redirected to open their browser accessing our Captive Portal page as shown below figure. The captive portal will ask for the Wi-Fi password.
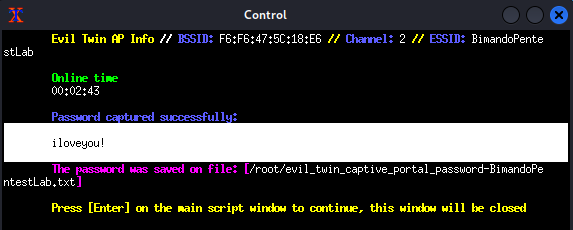
When the client-victim submitted the password, our captive portal will capture the password, then the airgeddon will crack the WPA handshake captured before, with the password given by the client victim.
If the password matches the captured WPA handshake, Airgeddon will shut the Evil Twin attack, by closing all xterm windows in step 11 except the control panel window. The control panel window will display the password, as shown below figure.
On the client-victim side, there will be a message saying that the password is correct.

Now, you could connect to the original access point (target AP) with that password.
SUMMARY
Evil Twin attacks are easy to set up, you only require a suitable wireless card. Which supports, monitor mode, injection mode, and a virtual interface. Make sure to conduct this attack only on the environment you have control.
Source: linuxhint.com